
Migration Operation Steps
Note
- If the source location server is a Linux system, set the source server to open outbound port 22 before migration;
- If the source location server is a Windows system, set the source server to open outbound ports 443 and 12121 before migration;
- Because the intermediate instances and EIPs will be created during migration for data transmission, they will be released automatically after the data transmission is completed. The intermediate instances and EIPs will be billed according to the actual usage duration, so the account balance is required to be no less than RMB 100. For details of billing, refer to Migration Billing.
Migration steps
Install the source server and start the migration tool
Linux
- Download the migration agent to your source server. You can click to download the installation package locally before uploading it to the source location server, or directly execute the corresponding download command on the source location server.
| OS and version | Installation package | Download command |
|---|---|---|
| CentOS 6 Redhat 6 Oracle 6 |
MigrateToBaiduClientV2.5.0_centos6_x86-64.tgz | wget https://wanjuan-docs.bj.bcebos.com/MigrateToBaiduClientV2.5.0_centos6_x86-64.tgz |
| Centos 7/8 AlmaLinux 8/9 Rocky Linux 8/9 Oracle Linux 7/8 Alibaba Cloud Linux 2.1903/3.2104 TencentOS 2.4/3.1 openEuler 20.03/22.03 Alibaba OS veLinux 1.0 Centos compatible version Alibaba OS veLinux 2.0 Centos compatible version |
MigrateToBaiduClientV2.5.0_centos78-rocky89_x86-64.tgz | wget https://wanjuan-docs.bj.bcebos.com/MigrateToBaiduClientV2.5.0_centos78-rocky89_x86-64.tgz |
| Ubuntu 16.04/18.04/20.04/22.04/24.04 Debian 9/10/11/12 Alibaba OS veLinux 1.0 Alibaba OS veLinux 2.0 |
MigrateToBaiduClientV2.5.0_ubuntu-debian_x86-64.tgz | wget https://wanjuan-docs.bj.bcebos.com/MigrateToBaiduClientV2.5.0_ubuntu-debian_x86-64.tgz |
| openSUSE 15/SUSE 15 | MigrateToBaiduClientV2.5.0_suse15_x86-64.tgz | wget https://wanjuan-docs.bj.bcebos.com/MigrateToBaiduClientV2.5.0_suse15_x86-64.tgz |
| Kylin V10 | MigrateToBaiduClientV2.5.0_kylin_x86-64.tgz | wget https://wanjuan-docs.bj.bcebos.com/MigrateToBaiduClientV2.5.0_kylin_x86-64.tgz |
- Make sure the /root/.ssh/id_rsa and /root/.ssh/id_rsa.pub files exist on the migration source. If they are missing, generate them using the ssh-keygen command.
- Use the following command to extract the files.
1tar -xzvf migagent_xxx.tgzFor example, if the source location server runs CentOS 7, run:
1tar -xzvf MigrateToBaiduClientV2.5.0_centos78-rocky89_x86-64.tgz- Use the following command to navigate to the agent directory.
1cd migrate-center-agent_pyinst- Run the following command to edit user_cfg.json and enter the AK and SK of Baidu AI Cloud account.
1vim user_cfg.jsonMove the cursor, press i on the keyboard, and enter the AK and SK. After completion, press esc to exit and :wq to save and exit.
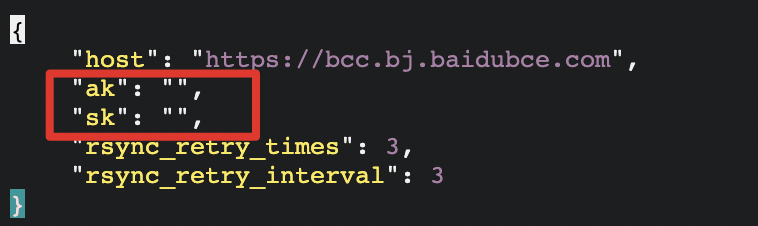
If you have Express Tunnel and migrate via private network transmission, the host must also be adjusted to the endpoint of the target migration region. For domain names of various regions, refer to [Service Domain](BCC/API Reference/Service domain.md).
If you are migrating through public network transmission, no host modifications are required.
- Use the following command to start the migration source.
1./migrate-center startWindows
- Download the migration agent to your source server and extract the files.
Click to download: MigrateToBaiduClient1.0.2_Windows_X64.zip,
Or on the source server, open Windows PowerShell and enter the following command:
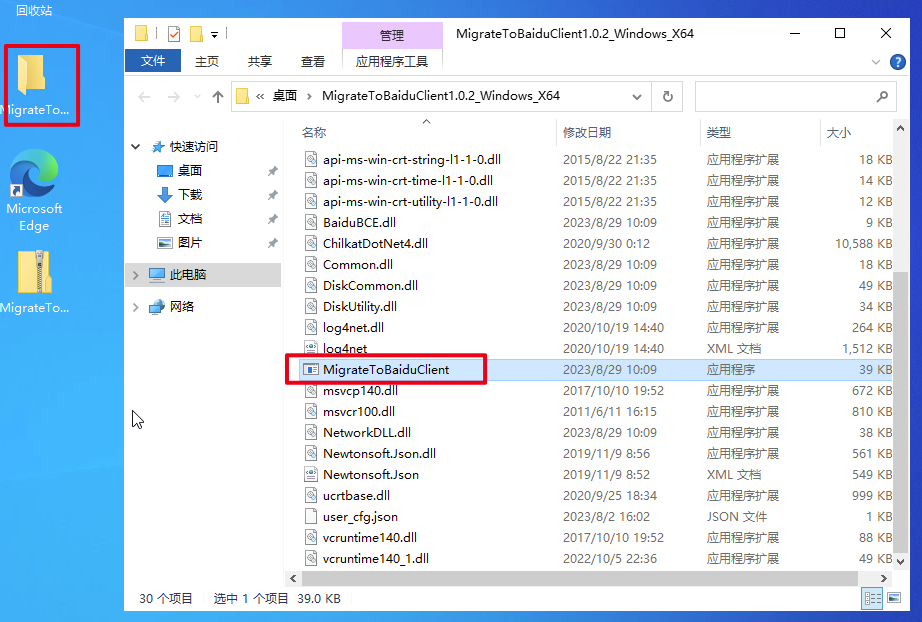
1Start-BitsTransfer -Source https://wanjuan-docs.bj.bcebos.com/MigrateToBaiduClient1.0.2_Windows_X64.zip -Destination C:\Users\Administrator\Desktop\MigrateToBaiduClient1.0.2_Windows_X64.zipAfter downloading, you will find a compressed file named MigrateToBaiduClient1.0.2_Windows_X64.zip on your desktop. Right-click and select Unzip All.
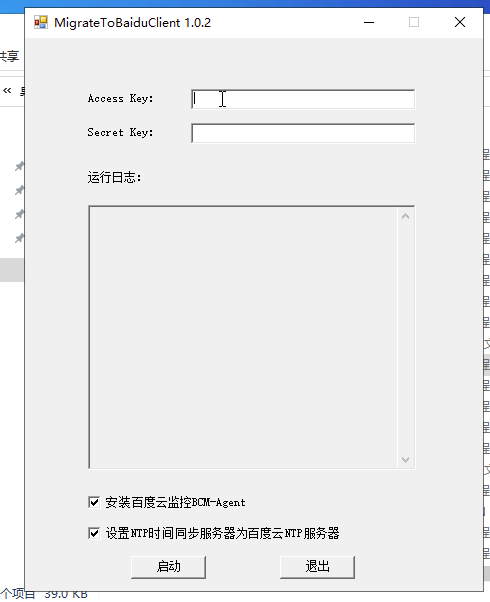
- Once unzipped, find and double-click the "MigrateToBaiduClient" application in the extracted folder (MigrateToBaiduClient1.0.2_Windows_X64 folder).
Enter the user's AK and SK associated with the image created by the migration, then click Start.
Manage migration sources
Prerequisites
- The migration agent has been successfully installed and started on the source server
Operation steps
- After successfully installing and starting the migration agent, navigate to the Instance List in the Baidu AI Cloud console.
- In the console's left navigation bar, click on Server Migration Center to access the Server Migration Center.
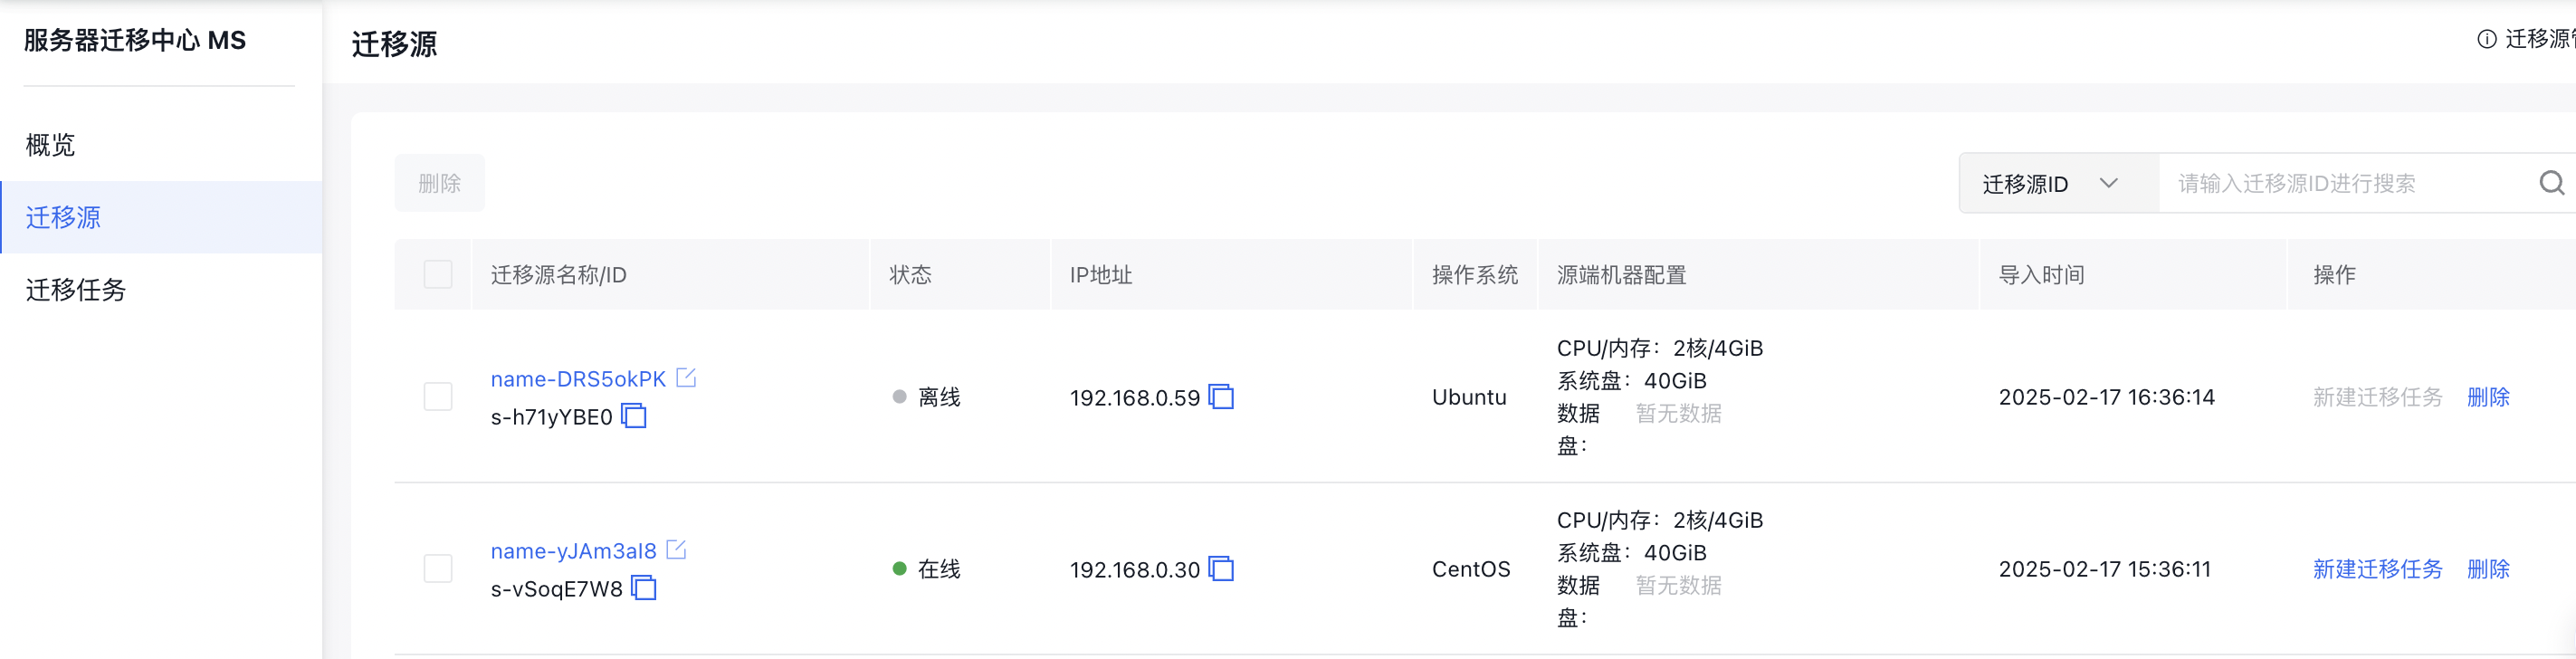
- Once the migration agent is successfully started, the migration source is automatically created, and its details are displayed in the list.
- You can only create a new migration task for a migration source that is in Online status.
- Migration sources can only be deleted if they have no associated migration tasks. To delete a migration source, first delete its migration task.
Create migration task
When the migration source status shows as Online, you can create a new migration task.
1. Select source location
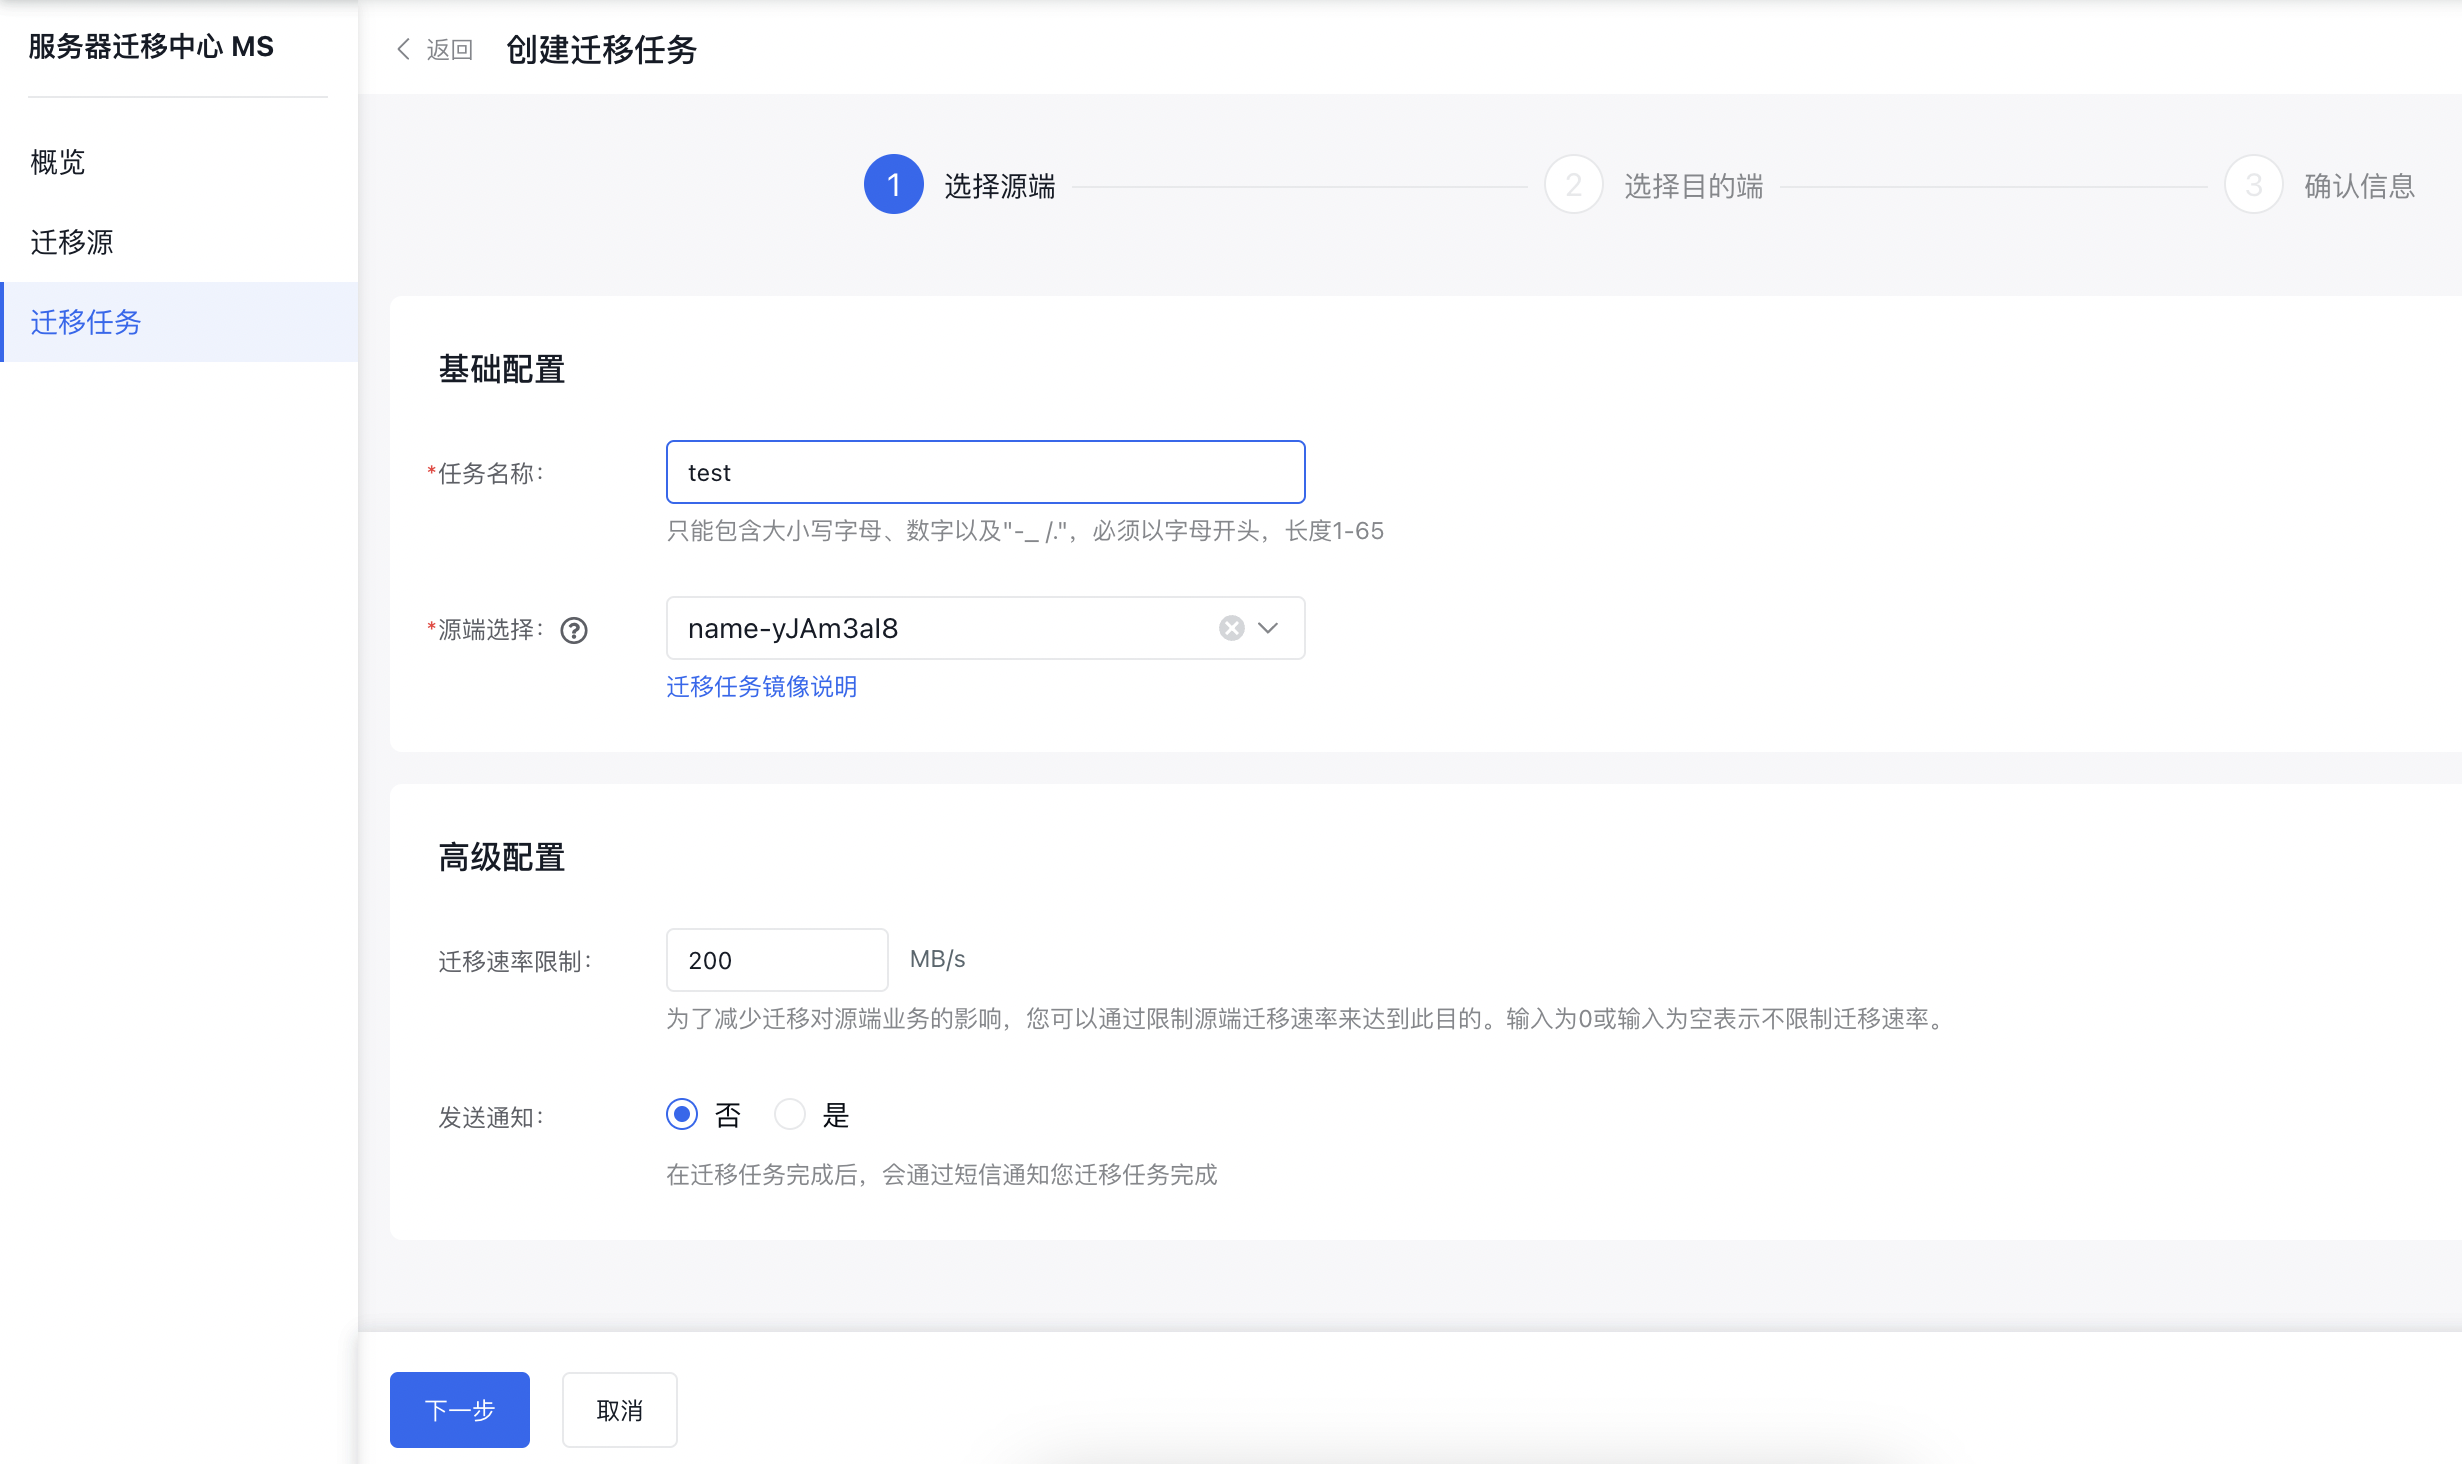
| ConfigMap | Description |
|---|---|
| Task name | This identifies the migration task you have created. |
| Source location selection | Choose the migration source that you want to migrate from. |
| Migration rate configuration | To reduce the impact of migration on source location operations, you can limit the migration rate at the source location. Entering 0 or leaving it blank means no limit is applied to the migration rate. |
| Send notification | Decide whether to receive a notification upon completion of the migration task. If Yes is selected, an SMS will be sent upon task completion. |
2. Select the destination location
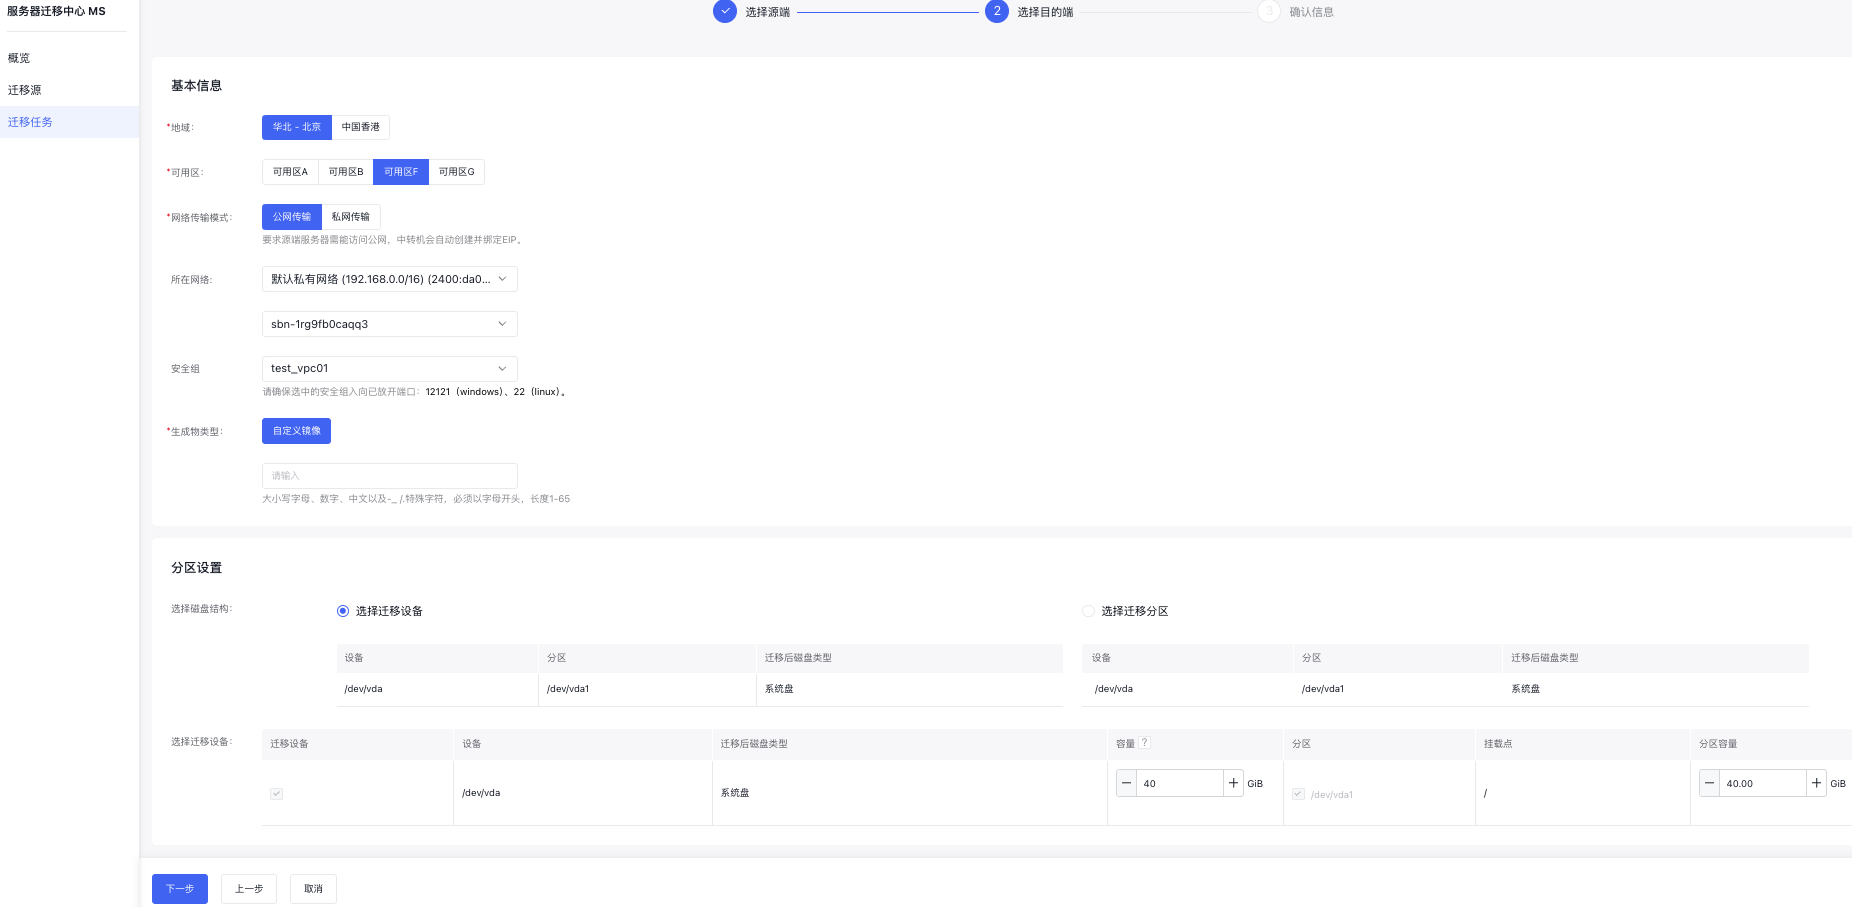
| ConfigMap | Description |
|---|---|
| Region | Select the server region for the destination after migrating to Baidu AI Cloud. |
| Availability zone | Choose the server availability zone for the destination after migrating to Baidu AI Cloud. |
| Migration network type | Public network transmission: The intermediate instance will automatically create and bind an EIP. Private network transmission: It requires the source server to establish connectivity with the designated virtual private cloud of Baidu AI Cloud (refer to Express Tunnel), while the virtual private cloud parameters of the VPC/subnet must be set and specified. |
| Network | Pick the VPC and subnet for the intermediate instance. If Express Tunnel is enabled, select the VPC and subnet associated with it. |
| Security group | For the intermediate instance's security group, ensure that inbound ports 12121 (Windows) and 22 (Linux) in the chosen security group are open. |
| Artifact type | Currently, migration supports only custom images, and the image name can be defined by the user. |
| Partition settings | All disks are selected for migration by default. You can uncheck them as needed. Unchecked disks or partitions will not be migrated. Note: Data disks below 5G are not displayed and migration is not supported. |
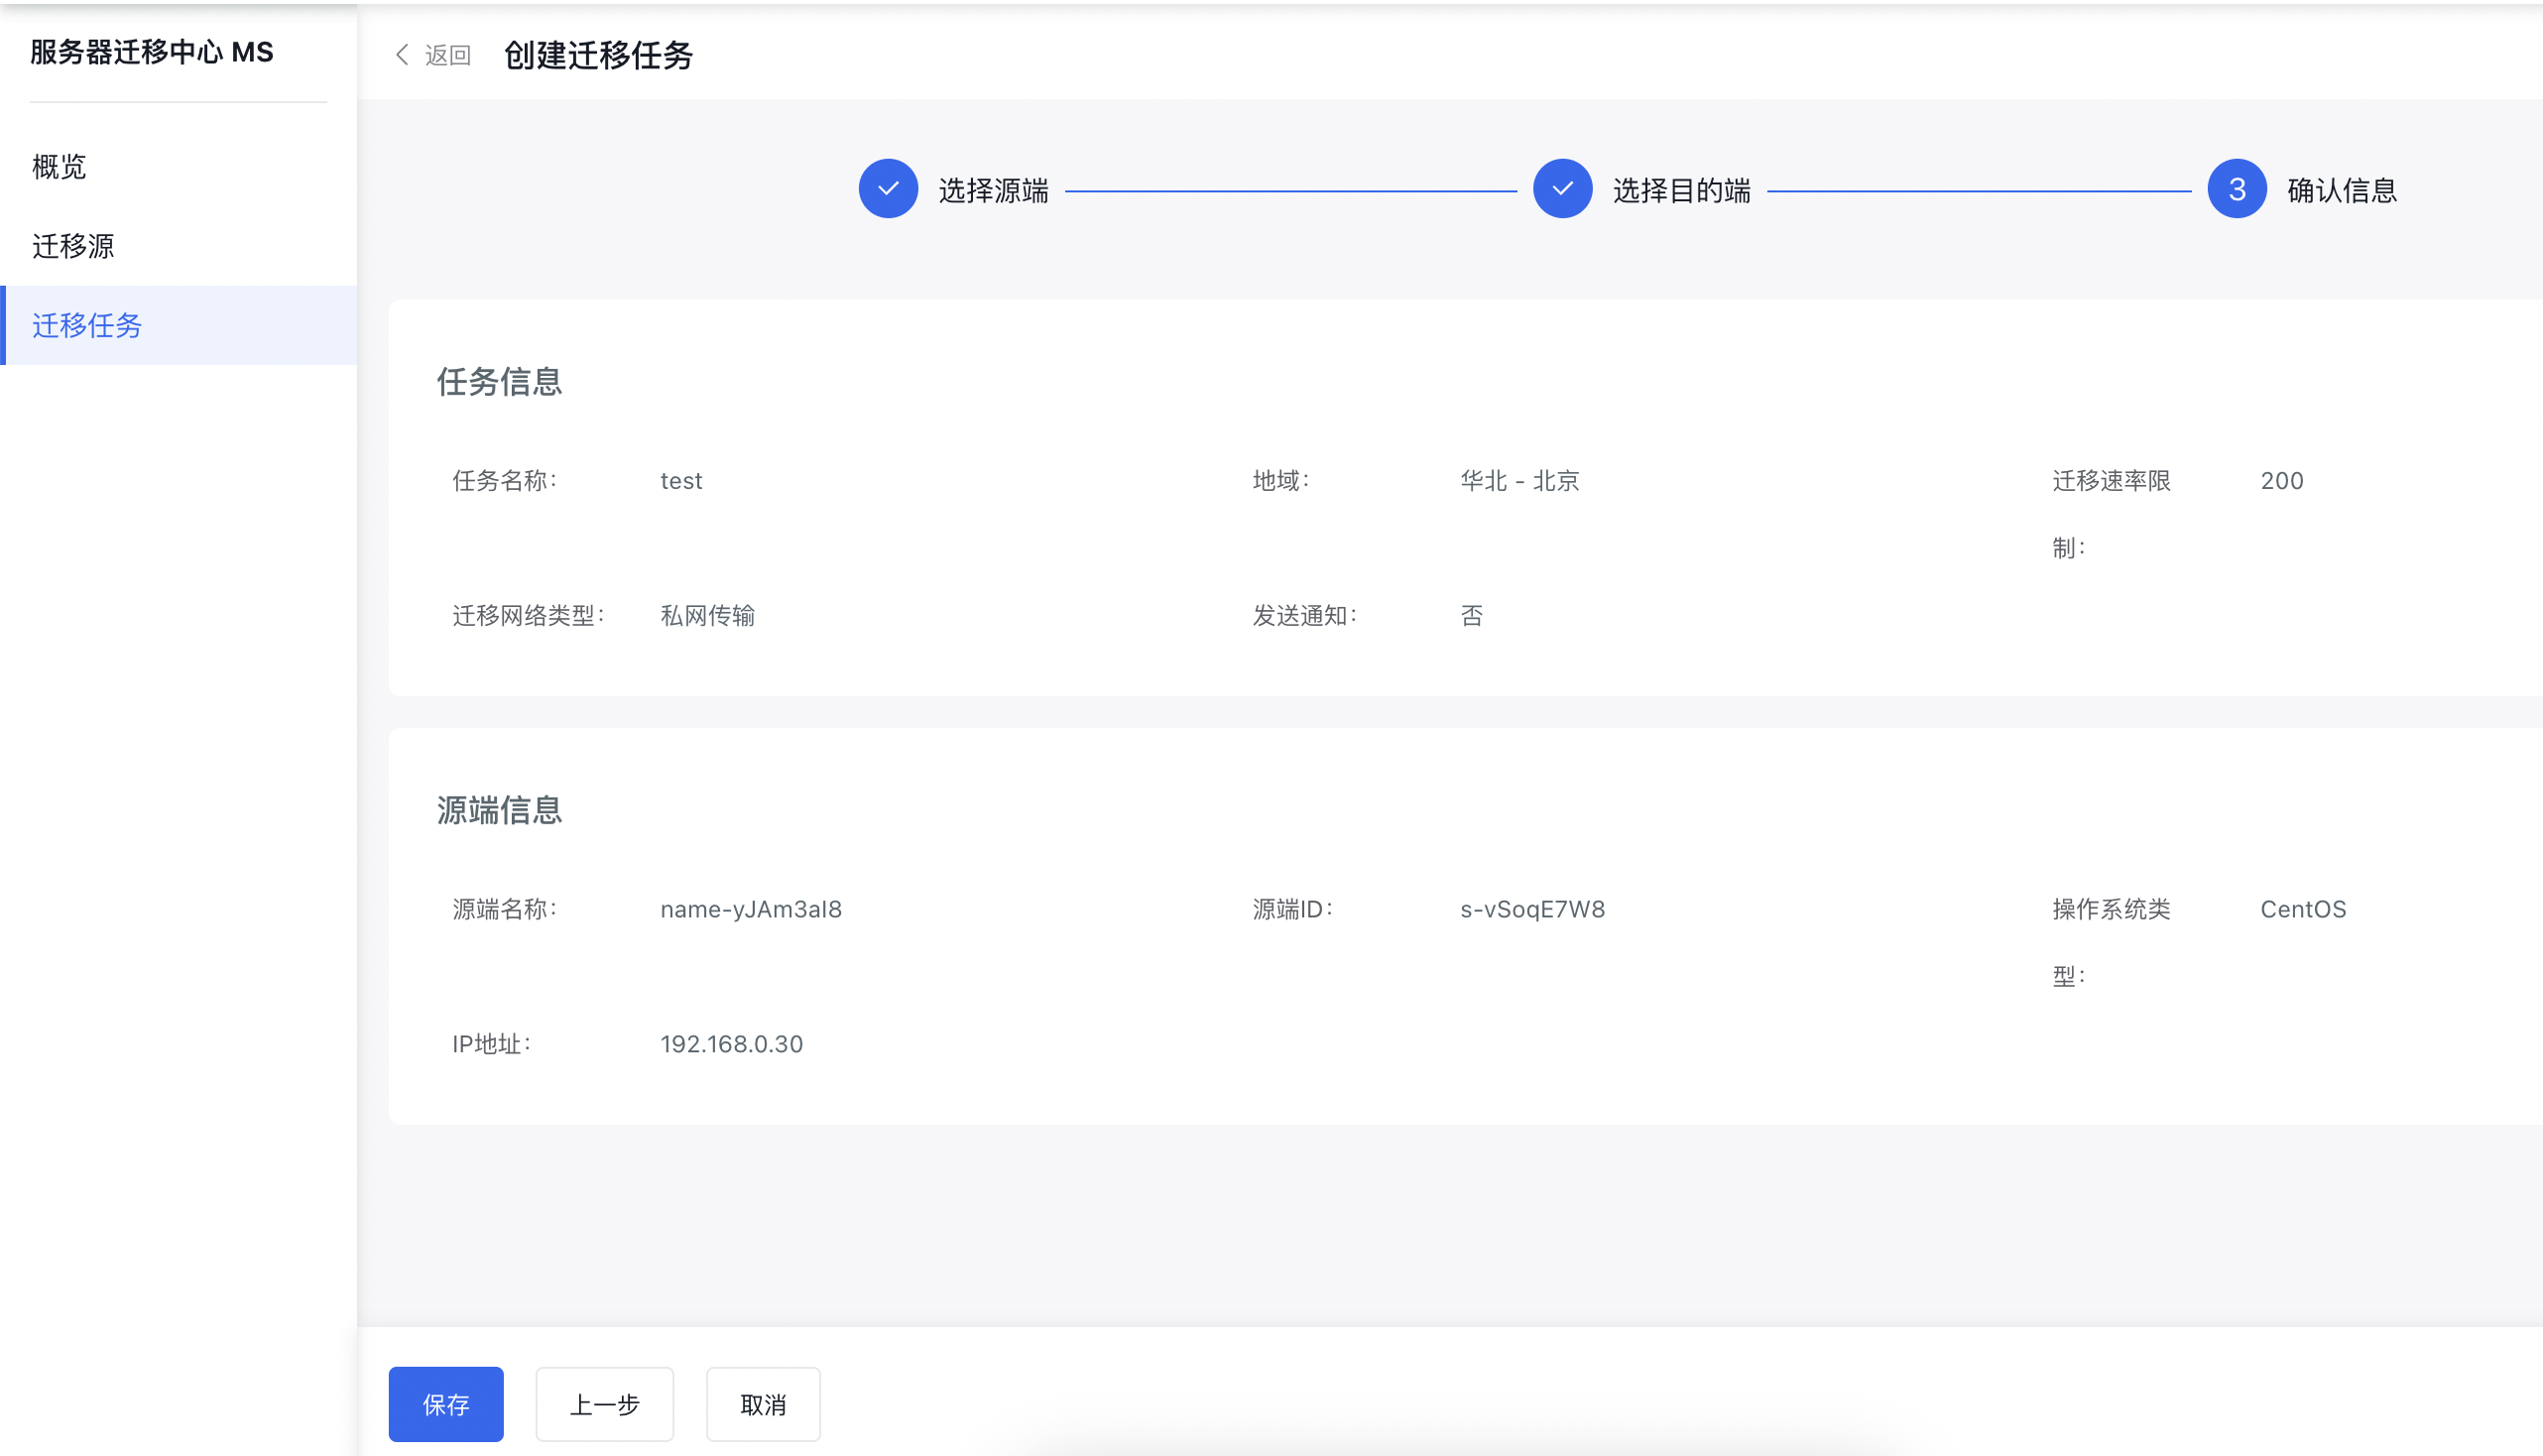
3. Confirm information
After verifying the information, click Save to generate a migration task in the Migration Task List. The task status is Not Started.
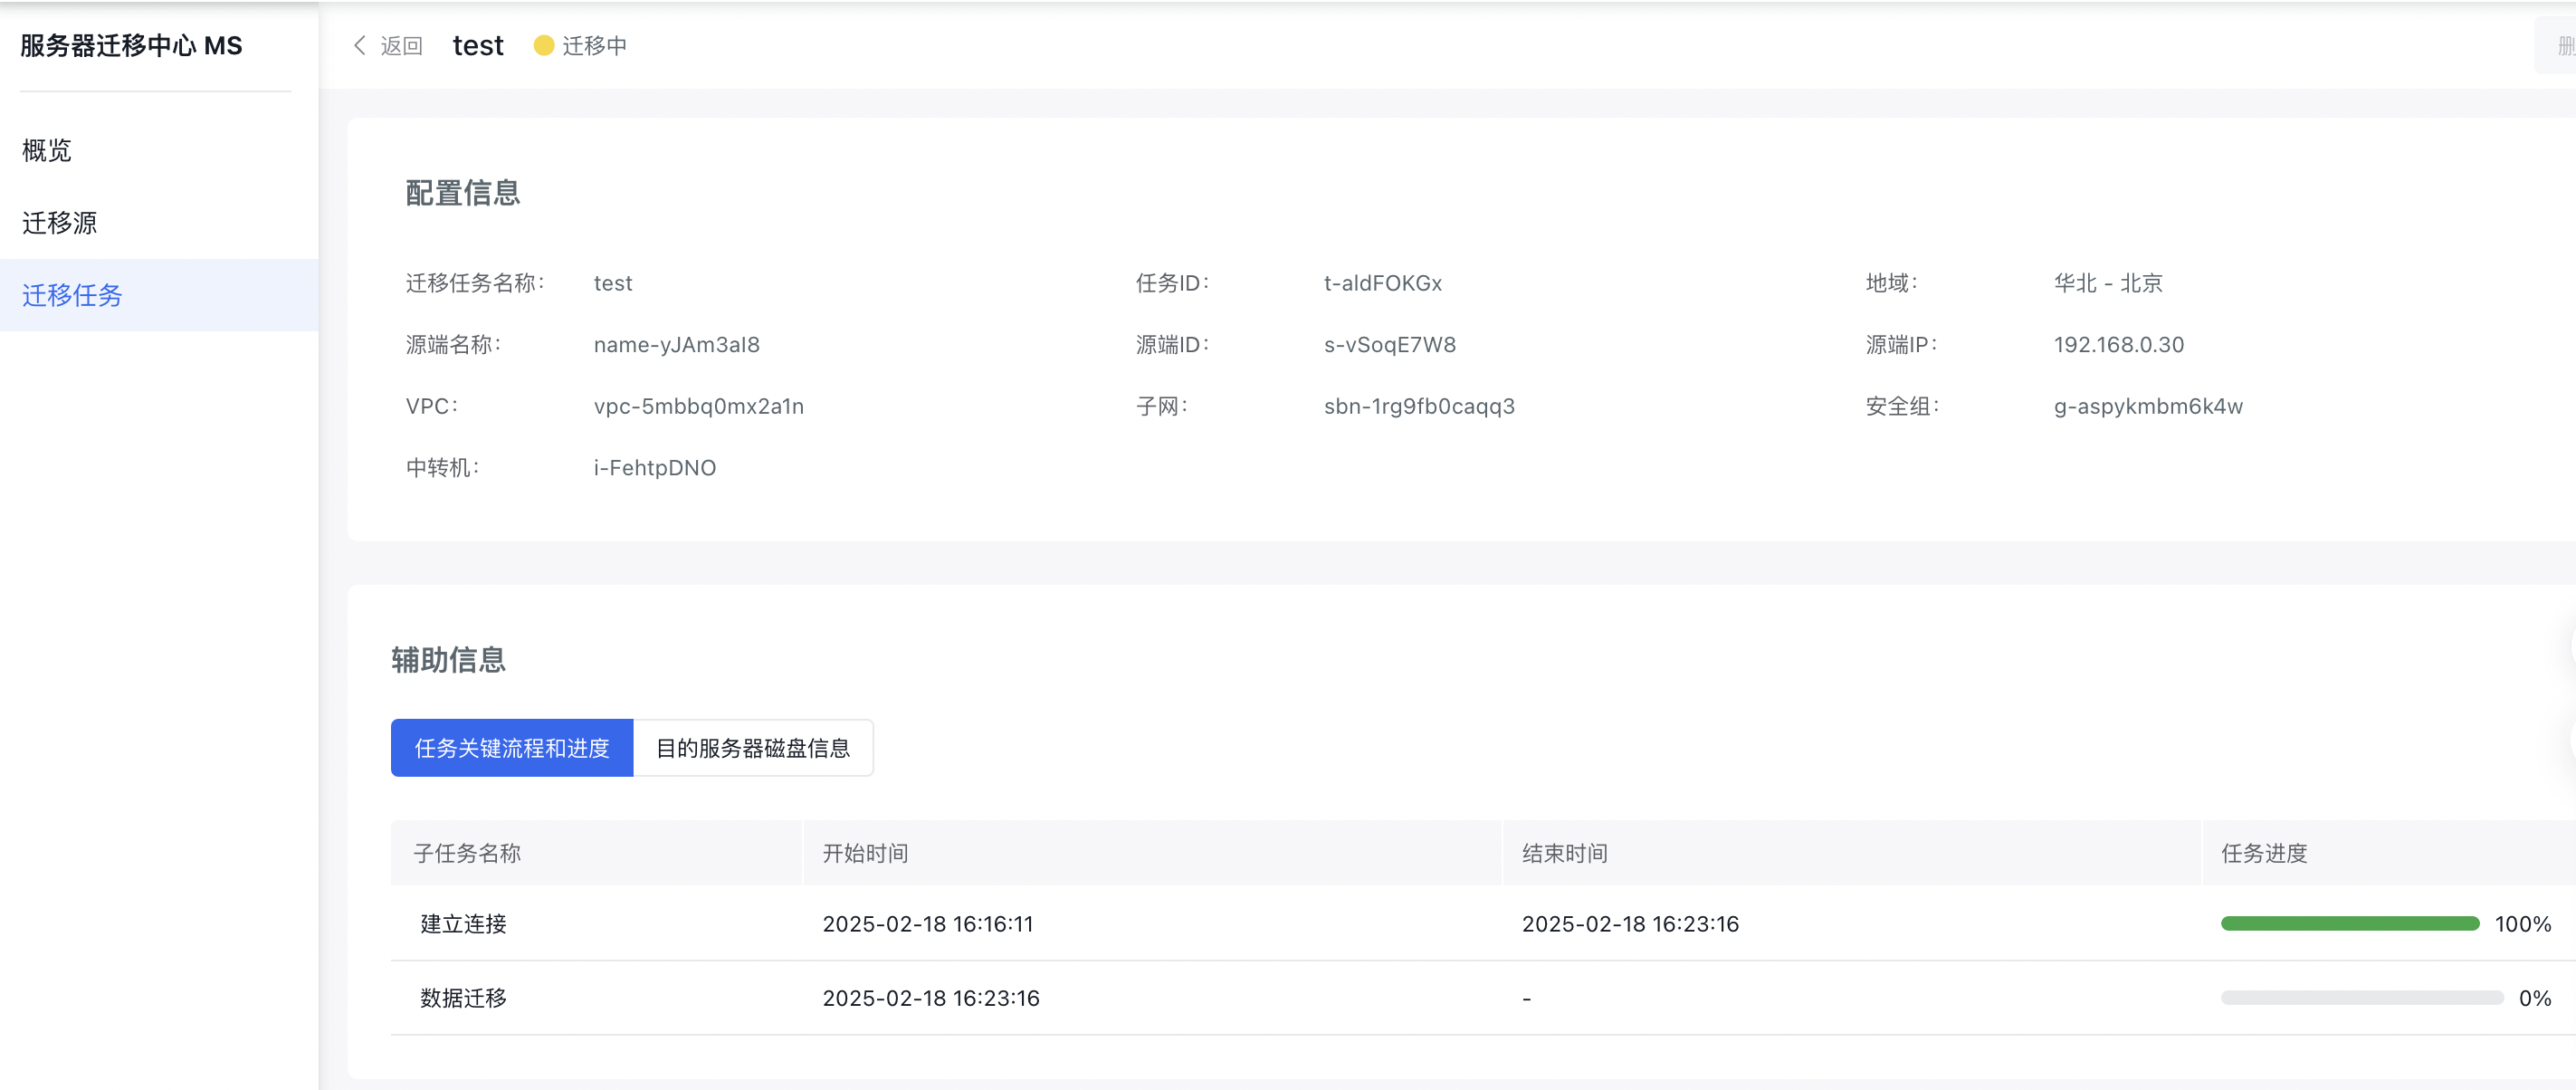
4. Start migration task
In the Migration Task List, click Start in the corresponding migration task operation bar, and the task status will change to Migration in Progress.

Click on the migration task name to access the Details page and monitor task progress.
Other descriptions
Restrictions and notes for starting/pausing/deleting migration tasks:
- Start: The system will check for account debt before proceeding. If the account is in debt, the task cannot be started, and a prompt will appear. If the user selects the auto-create proxy server option, the startup check includes verifying resource creation for postpay accounts.
- Pause: Temporarily halt the migration task, changing its status to Paused. The total elapsed time will continue to record normally.
- Delete: Tasks in the "Migration in Progress" status cannot be deleted unless paused first. Once deleted, the task will disappear from the list, and any auto-created proxy server associated with it will also be released.
Exception handling
If your migration task displays an abnormal status, refer to the following possible scenarios for troubleshooting.
- Abnormal migration task statuses may result from network instability. If the heartbeat is lost for more than 3 minutes, the task will be marked as abnormal.
- In the case of an abnormal migration task, check if the status of the migration source is also abnormal.
- Migration failures may occur due to actions such as shutting down the intermediate instance during migration or not pre-configuring the security group's inbound settings to allow SSH port 22 access for the intermediate instance.
- If the migration task remains in progress, it could be because the intermediate instance hasn’t been created yet. Verify whether the instance has been successfully created.
- After a migration task fails, you must delete the failed task before initiating a new migration task for the same source.
FAQs
For migration sources like IDC physical machines, if the network interface card name is not ethX, it may change to ethX post-migration, leading to network issues. To resolve this, log in to the server using SmartTerm/VNC, remove the old network interface card configuration, set up eth0 as instructed below, and restart the network service.
Centos 6/7/8:
Delete old network interface card configurations under /etc/sysconfig/network-scripts/ and create ifcfg-eth0 with the following configuration
1TYPE=Ethernet
2DEVICE="eth0"
3ONBOOT=yes
4BOOTPROTO=dhcp
5RES_OPTIONS="rotate timeout:1"
6IPV6INIT="yes"
7IPV6_PEERDNS="no"
8DHCPV6C="yes"
9DHCPV6C_OPTIONS=-nw
10IPV6_DEFROUTE="yes"
11IPV6_PEERROUTES="yes"
Ubuntu 16.04:
Edit /etc/network/interfaces and add the following configuration
1auto eth0
2iface eth0 inet dhcp
Ubuntu 18.04/20.04:
Edit /etc/netplan/01-netcfg.yaml
1network:
2  version: 2
3  renderer: networkd
4  ethernets:
5    eth0:
6      dhcp4: yes
Ubuntu 22.04:
Edit /etc/netplan/01-netcfg.yaml
1network:
2  version: 2
3  renderer: networkd
4  ethernets:
5    eth0:
6      dhcp4: yes
7      dhcp-identifier: mac