Configure elastic network interface

BCC BCC

  • API Reference
    • Appendix
    • Automatic Snapshot Policy Related Interfaces
      • Bind automatic snapshot policy
      • Create automatic snapshot policy
      • Delete automatic snapshot policy
      • Query details of automatic snapshot policy
      • Query the list of automatic snapshot policies
      • Unbind automatic snapshot policy
      • Update automatic snapshot policy
    • Cluster Management Related Interfaces
      • Create EHC Cluster
      • Delete EHC Cluster
      • EHC Cluster List
      • Modify EHC Cluster
    • Common Request Headers and Response Headers
    • Dedicated Cluster Related Interfaces
      • Canceling Dedicated Cluster Auto-Renewal
      • Create a dedicated cluster
      • Dedicated Cluster Renewal
      • Dedicated Cluster Tag Binding
      • Dedicated Cluster Tag Unbinding
      • Enabling Dedicated Cluster Auto-Renewal
      • Querying Dedicated Cluster Details
      • Querying Dedicated Cluster List
      • Resizing Dedicated Cluster
    • Deployment Group Related Interfaces
      • Adjust Deployment Group
      • Create Deployment Group
      • Delete Deployment Group
      • Get Deployment Group Details
      • Modify deployment group
      • Query the deployment group list
      • Remove Instance from Deployment Group
    • Disk Related Interfaces
      • Attach a CDS disk
      • Bind a tag to a disk
      • Cancel Auto-renewal
      • Create a CDS disk
      • Detach a CDS disk
      • Disk Expansion and Type Change
      • Enable auto-renewal
      • Get Purchasable Disk Information
      • Modify disk properties
      • Query CDS Price
      • Query disk details
      • Query the disk list
      • Release a CDS disk (new)
      • Release a CDS disk
      • Rename a disk
      • Renew a disk
      • Roll back disk data
      • Shift charge for disks
      • Unbind a tag from a disk
    • Error response
    • General Description
    • Image Related Interfaces
      • Bind a tag to an image
      • Cancel cross-region replication of custom images
      • Create a custom image
      • Delete a custom image
      • Import an image
      • Modify Custom Image Name
      • Query available public image based on instance specifications
      • Query image details
      • Query List of Users with Shared Image Access
      • Query OS information based on instance IDs in batch
      • Query the image list
      • Replicate a custom image across regions
      • Share a custom image
      • Unbind a tag from an image
      • Unshare a custom image
    • Instance Related Interfaces
      • Add an instance to a security group
      • Add IPv6
      • Batch Adding Secondary IP Addresses for Primary Network Interface Card
      • Batch Convert to Postpay
      • Batch Unsubscribe Prepaid Instances
      • Billing Change - Convert to Subscription
      • Bind a role
      • Bind a tag to an instance
      • Change the instance subnet
      • Change the instance VPC
      • Convert to prepay in batch
      • Create an instance (by specifying instance package specifications)
      • Create automatic renewal rules
      • Create instance
      • Delete automatic renewal rules
      • Delete secondary IP address from the primary network interface card in batch
      • Early Release of Prepaid Instances
      • Enter rescue mode
      • Exit rescue mode
      • Instance Resizing (By Specifying Instance Package Specification)
      • Modify instance attributes
      • Modify instance description
      • Modify instance hostname
      • Modify the instance password
      • Query Instance List by Instance ID
      • Query instance list
      • Query Multiple Instance Details
      • Query recycle bin instance list
      • Query resizing specifications
      • Query the custom data of the instance
      • Query the details of a specified instance
      • Query the list of BCC instances eligible for no charge for stopped instances
      • Query the VNC address of the instance
      • Reboot an instance
      • Reinstall an instance
      • Reinstall OS for Instances (Batch Reinstallation)
      • Release instances in batch
      • Release IPv6
      • Release Postpay Instances (Release via POST Request)
      • Release recycle bin instances
      • Remove an instance from a security group
      • Remove the relationship between an instance and its deployment group
      • Renew an instance
      • Resize instances in batches
      • Resuming Billing for BCC in Recycle Bin
      • Retrieve a list of instance roles
      • Retrieve network interface card information for an instance
      • Set Auto-release of Spot Instance EIP
      • Set Instance Deletion Protection
      • Setting Auto-Release for Postpay
      • Start an instance
      • Starting Instances (Batch Start)
      • Stop an instance
      • Stopping Instances (Batch Stop)
      • Unbind a role
      • Unbind a tag from an instance
    • Key Pair Related Interfaces
      • Bind a key pair
      • Change description of key pair
      • Create a key pair
      • Delete a key pair
      • Import a key pair
      • Query key pair details
      • Query the key pair list
      • Rename a key pair
      • Unbind a key pair
    • Maintenance platform APIs
      • Maintenance Records Related Interfaces
      • Maintenance Task Related Interfaces
      • Pre-authorization Related Interfaces
    • Other APIs
      • Query instance package price
      • Query instance package specifications (new)
      • Querying Availability Zones By Package Specification
    • Overview
    • Region and Availability Zone Related Interfaces
      • Query list of availability zones
      • Retrieve the Domain Name List API
    • Reserved Instance Related Interfaces
      • Accept Reserved Instance Transfer
      • Adjust reserved instance
      • Bind Tag to Reserved Instance
      • Create Auto-renewal Rule for Reserved Instance
      • Create reserved instances
      • Disable Auto-renewal Rule for Reserved Instance
      • Initiate Reserved Instance Transfer
      • Query Reserved Instance
      • Reject Reserved Instance Transfer
      • Renew reserved instances
      • Reserved Instance Inbound List
      • Reserved Instance Outbound List
      • Revoke Reserved Instance Transfer
      • Unbind Tag from Reserved Instance
    • Security Group Related Interfaces
      • Authorize security group rules
      • Create a security group
      • Delete a security group
      • Delete security group rules
      • Instance associating with security group
      • Query the security group list
      • Replace security group for instance
      • Revoke security group rules
      • Unbind security group from instance
      • Update security group rules
    • Service domain
    • Snapshot Related Interfaces
      • Bind a tag to a snapshot chain
      • Create a snapshot
      • Delete a snapshot
      • Query snapshot chain list
      • Query snapshot details
      • Query the snapshot list
      • Replicate a snapshot across regions
      • Unbind a tag from a snapshot chain
    • Spot Instance Related Interfaces
      • Cancel Spot Instance Order
      • Create spot instances
      • Query Spot Instance Packages
      • Query Spot Price
  • Cloud Assistant API and SDK Reference
    • Python SDK
      • Batch Retrieval of bsm-agent State within Instances
      • CaClient
      • Command Interface
      • Historical records
      • Initialization
      • Install SDK
      • Log API
  • Cloud Assistant API Reference
    • Batch Retrieve Instance BSM-Agent Status
    • Command Interface
    • Common Request and Response Headers
    • Error response
    • General Description
    • Historical records
    • Log API
    • Service domain
  • FAQs
    • Billing class
    • Common Questions Overview
    • Images
    • Instances
    • Network class
    • Performance
    • Reserved Instance
    • Security class
    • Snapshots
    • Storage class
    • Virtual machine operation and maintenance class
  • Fault handling
    • GPU Instance Downtime Troubleshooting
    • Linux Baidu Cloud Compute Entering Single User Mode to Reset Paasword Reports Error-Authentication token lock busy
    • Linux Baidu Cloud Compute Entering Single User Mode to Reset Paasword Reports Error-Authentication token manipulation error
    • Linux Baidu Cloud Compute Entering Single User Mode to Reset Root Paasword
    • Linux Baidu Cloud Compute Execution Yum Update Reports Dependency Conflict
    • Linux Baidu Cloud Compute Setting Login Method
    • Unable to Remotely Connect to Linux Instance
    • Unable to Remotely Connect to Windows Instance
    • Windows Server Cannot Ping
  • Function Release Records
  • Go-SDK
    • Automatic snapshot policy
    • Availability zone
    • Dedicated CDS Cluster
    • Deployment group
    • Disk
    • Elastic high-performance computing cluster
    • Image
    • Initialization
    • Instance
    • Key pair
    • Overview
    • Region
    • Reserved Instance
    • Security group
    • Snapshot
  • Java-SDK
    • Automatic snapshot policy
    • Availability zone
    • BCC instance
    • BccClient
    • Deployment group
    • Disk
    • Exception handling
    • Image
    • Install the SDK Package
    • Key pair
    • Log
    • Overview
    • Quick Start
    • Region
    • Reserved Instance
    • Security group
    • Snapshot
    • Version Change Records
  • Operation guide
    • Deployment group
      • Adjust Deployment Group for Existing Instances
      • Create BCC Instance within Deployment Group
      • Create Deployment Group
      • Delete Deployment Group
      • Modify Deployment Group Information
      • Overview of deployment policy
      • Remove BCC Instance from Deployment Group
    • Elastic high-performance computing cluster
      • Create Elastic High-performance Computing Cluster
      • Overview of elastic hyper-computing cluster
    • Image
      • Baidu AI Cloud Image Service Agreement
      • Create a custom image
      • Creating Linux Image Based on Local System
      • Cross-region image replication
      • Data and Personal Information Protection Statement
      • Delete a custom image
      • How to Set Network Adapter Multi-Queue Properties
      • Image List
      • Image Overview
      • Image Quick Guide
      • Import Custom Image
        • Checking Network Configuration
        • Checking Virtio Driver
        • Creating Instance Using Imported Custom Image
        • Detecting Image Using Image Detection Tool
        • Image format check
        • Image Format Conversion
        • Image Import Restrictions
        • Import Overview
        • Install cloudbase-init
        • Installing Virtio Driver
        • System Optimization Operations (Linux)
      • OS Official End of Maintenance Plan
      • Public Image Release Records
        • 2023 BCC Public Image Release Records
        • 2023 EBC Public Image Release Records
        • 2024 BCC Public Image Release Records
        • 2024 EBC Public Image Release Records
        • 2025 BCC Public Image Release Records
      • Reinstall OS
      • Share a custom image
      • Windows Image Creation
    • Instance
      • Batch Sequential Naming
      • Change Availability Zone
      • Change Charge Type
        • Postpay to Subscription
        • Subscription to Postpay
      • Change Instance Configuration
      • Create instance
        • Create Instance Navigation
        • Create Instance via Custom Image
        • Create Instance via Purchase Page
        • Create Instances with Launch Templates
        • Purchase Instance with Same Configuration
      • Cross-AZ migration
      • Functional restrictions
      • Instance Overview
      • Modify instance name
      • Postpay Instance No Charge for Stopped Instances
      • Reboot an instance
      • Reclaim instance
      • Release an instance
      • Renew an instance
      • Reset password
      • Set IAM Role
      • Sign in to instance
        • Log in to Linux Instance
          • Connect to Baidu Cloud Compute Using SmartTerm
          • Connect to Linux instance using user name-password certification
          • Log in to Linux Instance Using SSH Key on Linux or Mac
          • Log in to Linux Instance Using SSH Key via SecureCRT
          • Remotely sign in to Baidu Cloud Computer via VNC
          • Sign in to Linux instances via SSH key in Putty
          • Sign in to Linux instances via SSH key in Xshell
        • Log in to Windows Instance
          • Remotely sign in to Baidu Cloud Computer via VNC
          • Sign in to Windows instance via remote desktop
        • Login Method Overview
      • Spot instances
        • Create spot instances
        • What Is Spot Instance
      • Start an instance
      • Stop an instance
        • Elastic Baremetal Instance and Elastic High-performance Computing Cluster Instance Halt Capability Configuration Instructions
        • Stop an instance
      • View instance
    • Launch Template
    • Network
      • Bind and Unbind EIP
      • Change Internal IP
      • Change subnet
      • Change VPC
      • Configure Dual Network Interface Card External Network Access for Windows Baidu Cloud Compute
      • Configure IPv6 Address
      • Elastic network interface
        • Configure elastic network interface
        • Create elastic network interface
        • Elastic Network Interface Overview
        • Mount elastic network interface
      • Elastic RDMA Network Interface
        • Elastic RDMA Network Interface Overview
        • Instructions for use
    • Operations and Monitor
      • Cloud Assistant
        • Cloud Assistant Overview
        • Cloud Assistant Usage Notes
        • Create command
        • FAQs
        • Historical records
        • Identity and access management
        • Instance list
        • My commands
        • Public commands
        • Upload files
      • Evacuate Faulty Instance
      • Instance Health Check
      • Maintenance Platform
        • Maintenance Platform Access Instructions
        • Maintenance Platform Overview
        • Maintenance Records Query
        • Maintenance Task
        • Pre-authorization Rule Settings
      • Monitor and Alarm
      • Self-Service Diagnostic Tool
        • Application Performance Diagnostic Tool Btune
        • Self-Service Diagnostic Tool Overview
      • Use Rescue Mode
    • Reserved Instance
      • FAQ
      • Introduction to reserved instance
      • Renew reserved instances
      • Reserved Instance AZ Change
      • Reserved Instance Cross-Account Transfer
      • Reserved Instance EHC Cluster Change
      • Reserved Instance Purchase
    • Resource Assessment
    • Security
      • Identity and access management
        • Identity and access management
        • Price Permission Control
      • Key pair
        • Bind SSH Key Pair
        • Create SSH Key Pair
        • Delete SSH Key Pair
        • SSH Key Pair Overview
        • Unbind SSH Key Pair
      • Security group
        • Associate with security group
        • Copy security group
        • Create a security group
        • Delete a security group
        • Disassociate security group
        • Edit security group
        • Security group overview
    • Server Migration
      • Migration Operation Steps
      • Server Migration Operation Process
      • Server Migration Overview
    • Snapshot
      • Automatic snapshot
      • Create disk snapshot
      • Delete a snapshot
      • Rollback snapshot
      • Snapshot Overview
    • Storage
      • Overview
      • System disk expansion
    • Tag Management
      • Configure Tag
      • Tag Management Overview
      • View Resource Bill Based on Tag
  • Operations Reference
    • Linux Operations Reference
      • Baidu Cloud Compute Delete or Modify File Prompting File System Read-Only
      • CentOS 7 Install Docker
      • Configure Linux Analysis Tools atop and kdump
      • Enter Single User Mode
        • CentOS 6 Enter Single User
        • CentOS 7 Enter Single User
        • CentOS 8 Enter Single User
        • FreeBSD 11 Single User Modify Password SOP
        • opensuse42
          • 3 Enter Single User
        • Ubuntu Enter Single User
        • OpenSUSE 42_3 Enter Single User
      • How to Enable or Disable Intel CPU Vulnerability Patch in Linux Image
      • How to Handle System Boot Exception Caused by fstab Configuration
      • How to Resolve Unable to Log in to Linux BCC Instance via SSH
      • Linux BCC Instance Insufficient Space Issue Resolution
      • Linux BCC Instance Lagging Issue
      • Linux Format and Mount Instance Mount Local Disk
      • Linux Modify Default Remote Connection Port
      • Linux Server CPU and Memory Full Issue Troubleshooting
      • Linux System Install Graphical Interface and Remote Connection
        • CentOS
          • CentOS 8 Install Graphical Interface and Connect Using VNC Viewer
          • CentOS6
            • 5 Install KDE Desktop Graphical Interface and Connect Using VNC Viewer
          • CentOS7
            • 2 Install GNOME Graphical Interface and Connect Using VNC Viewer
          • Install GNOME GUI on CentOS 7_2 and Connect via VNC Viewer
          • Install GUI on CentOS 8 and Connect via VNC Viewer
          • Install KDE Desktop GUI on CentOS 6_5 and Connect via VNC Viewer
        • opensuse
          • opensuse42
            • 3 Install Graphical Interface and Connect Using VNC Viewer
          • Install GUI on OpenSUSE 42_3 and Connect via VNC Viewer
        • Ubuntu
          • Ubuntu14
            • 04 Install Graphical Interface and Connect Using VNC Viewer
          • Ubuntu18
            • 04 Install Graphical Interface and Connect Using VNC Viewer
          • Install GUI on Ubuntu 14_04 and Connect via VNC Viewer
          • Install GUI on Ubuntu 18_04 and Connect via VNC Viewer
      • Performance test
        • Linux CPU Performance Test
        • Linux Disk IO Performance Test
        • Linux Network Performance Test
      • Ubunut16_04 Subscription Extended Security Maintenance (ESM)
    • Server configuration
      • Debian 9 Software Source Configuration Update
      • Linux PIP Configuration with Baidu Source
      • Online Instance with OFED Driver Kernel Replacement Solution
      • Windows PIP Configuration with Baidu Source
    • Windows Operations Reference
      • Blue Screen Crash General Handling Method
      • Configure Multi-User Access to Windows Server
      • Connecting to Windows Server Using Xshell
      • Data Disk Not Displayed After Server Reboot
      • Desktop and Application Color Turning Black Handling Method
      • Local Playback of Sound from Windows Server
      • Performance Resources
      • Remote Connection to Windows Unable to Use Clipboard
      • System Activation
      • System Black Screen Handling Method
      • Tutorial on Disabling Windows Firewall
      • Windows Allow Single User to Connect Multiple Sessions Method
      • Windows automatic update-related configuration
      • Windows BCC Instance Achieve SID Uniqueness After Joining Domain
      • Windows BCC Instance Lagging Issue
      • Windows CPU and Memory Full Troubleshooting Steps
      • Windows Delete Hardware Reserved Memory
      • Windows Instance Disk Space Insufficient Cleanup Tutorial
      • Windows Modify Default Remote Connection Port
      • Windows Quick Login
      • Windows Server Disable IE Enhanced Security Configuration Tutorial
      • Windows Set Only Allow Local & Fixed IP Access Remote Port
      • Windows Virtual Machine Auto Login Failure Handling Method
  • Product Description
    • Application scenarios
    • Correspondence Between Original and New Model Names
    • Discontinued Instance Specifications
    • Models and Their Regions
    • Product advantages
    • Usage restrictions
    • What Is Baidu Cloud Compute BCC
    • Instance specification
  • Product pricing
    • Billing overview
    • Charge type
      • Postpay Pricing
      • Reserved instances
      • Subscription (Prepay) Pricing
      • Reserved Instance
    • Refund policy
  • Python-SDK
    • BccClient
    • Disk
    • Image
    • Initialization
    • Install the SDK Package
    • Instance
    • Overview
    • Region
    • Reserved Instance
    • Security group
    • Snapshot
    • Version Change Records
  • Python3-SDK
    • Automatic snapshot policy
    • BccClient
    • Dedicated CDS Cluster
    • Deployment group
    • Disk
    • Image
    • Initialization
    • Install the SDK Package
    • Instance
    • Key pair
    • Overview
    • Region
    • Reserved Instance
    • Security group
    • Snapshot
  • Quick Start
    • Baidu Cloud Compute Security Description
    • Quick Configuration of Linux Baidu Cloud Compute
    • Quick Configuration of Windows Baidu Cloud Compute
  • Resources
    • Baidu AI Cloud Image Service Agreement
    • Image Quick Guide
  • Service Level Agreement (SLA)
    • Baidu Intelligent Cloud Baidu Cloud Compute Trusted Cloud
    • BCC Service Level Agreement SLA (V3_0)
  • Tag Service API Reference
    • Appendix 1
    • Domain name
    • General Description
    • Interface List
      • Create tag
      • Delete tag
      • Tag List
      • View resources bound to a tag
    • Introduction
  • Transfer
    • Site Offline Migration Solution
    • Site Smooth Migration Solution
  • Typical Practices
    • Connecting to Windows Server Using Xshell
    • Environment Setup
      • Manual Deployment of SQL Server 2008 R2 Express Edition
      • One-Click Setup for Linux Palworld Server
      • One-Click Setup for Windows Palworld Server
      • Set Up FTP Service on Linux
      • Setting Up Baota on Linux
      • Setting Up Baota on Windows
      • Tutorial on Setting Up IIS and FTP on Windows
      • Typical Practice for Setting Up Access VPN
      • Installing MySQL 8_0 Using Yum on CentOS 7 yum
    • Set Up FTP Service on Linux
    • Tag Management Practice
    • Tutorial on Disabling IE Enhanced Security Configuration on Windows Server 2008
    • Tutorial on Disabling Windows Firewall
    • Website Building Tutorial
      • Building a Website Using IIS Service on Windows 2008 and Windows 2012
      • Deploy SSL Certificate on Baidu Cloud Compute - Apache
      • Deploy SSL Certificate on Baidu Cloud Compute - IIS
      • Deploy SSL Certificate on Baidu Cloud Compute - Nginx
      • Deploy SSL Certificate on Baidu Cloud Compute - Tomcat
      • Installing and Configuring Apache Environment on Windows
      • Installing and Configuring Nginx Environment on Windows
      • CentOS-7_2 LNMP Environment Deployment
      • Deploy LAMP Environment on CentOS-7_2
  • Video Zone
    • Fault handling
    • Operation guide
      • Basic Functions
      • Environment Setup
      • Network Related
      • Operations Reference
      • Paasword Function
    • Operation guide
    • Product introduction
All documents
menu
No results found, please re-enter

BCC BCC

  • API Reference
    • Appendix
    • Automatic Snapshot Policy Related Interfaces
      • Bind automatic snapshot policy
      • Create automatic snapshot policy
      • Delete automatic snapshot policy
      • Query details of automatic snapshot policy
      • Query the list of automatic snapshot policies
      • Unbind automatic snapshot policy
      • Update automatic snapshot policy
    • Cluster Management Related Interfaces
      • Create EHC Cluster
      • Delete EHC Cluster
      • EHC Cluster List
      • Modify EHC Cluster
    • Common Request Headers and Response Headers
    • Dedicated Cluster Related Interfaces
      • Canceling Dedicated Cluster Auto-Renewal
      • Create a dedicated cluster
      • Dedicated Cluster Renewal
      • Dedicated Cluster Tag Binding
      • Dedicated Cluster Tag Unbinding
      • Enabling Dedicated Cluster Auto-Renewal
      • Querying Dedicated Cluster Details
      • Querying Dedicated Cluster List
      • Resizing Dedicated Cluster
    • Deployment Group Related Interfaces
      • Adjust Deployment Group
      • Create Deployment Group
      • Delete Deployment Group
      • Get Deployment Group Details
      • Modify deployment group
      • Query the deployment group list
      • Remove Instance from Deployment Group
    • Disk Related Interfaces
      • Attach a CDS disk
      • Bind a tag to a disk
      • Cancel Auto-renewal
      • Create a CDS disk
      • Detach a CDS disk
      • Disk Expansion and Type Change
      • Enable auto-renewal
      • Get Purchasable Disk Information
      • Modify disk properties
      • Query CDS Price
      • Query disk details
      • Query the disk list
      • Release a CDS disk (new)
      • Release a CDS disk
      • Rename a disk
      • Renew a disk
      • Roll back disk data
      • Shift charge for disks
      • Unbind a tag from a disk
    • Error response
    • General Description
    • Image Related Interfaces
      • Bind a tag to an image
      • Cancel cross-region replication of custom images
      • Create a custom image
      • Delete a custom image
      • Import an image
      • Modify Custom Image Name
      • Query available public image based on instance specifications
      • Query image details
      • Query List of Users with Shared Image Access
      • Query OS information based on instance IDs in batch
      • Query the image list
      • Replicate a custom image across regions
      • Share a custom image
      • Unbind a tag from an image
      • Unshare a custom image
    • Instance Related Interfaces
      • Add an instance to a security group
      • Add IPv6
      • Batch Adding Secondary IP Addresses for Primary Network Interface Card
      • Batch Convert to Postpay
      • Batch Unsubscribe Prepaid Instances
      • Billing Change - Convert to Subscription
      • Bind a role
      • Bind a tag to an instance
      • Change the instance subnet
      • Change the instance VPC
      • Convert to prepay in batch
      • Create an instance (by specifying instance package specifications)
      • Create automatic renewal rules
      • Create instance
      • Delete automatic renewal rules
      • Delete secondary IP address from the primary network interface card in batch
      • Early Release of Prepaid Instances
      • Enter rescue mode
      • Exit rescue mode
      • Instance Resizing (By Specifying Instance Package Specification)
      • Modify instance attributes
      • Modify instance description
      • Modify instance hostname
      • Modify the instance password
      • Query Instance List by Instance ID
      • Query instance list
      • Query Multiple Instance Details
      • Query recycle bin instance list
      • Query resizing specifications
      • Query the custom data of the instance
      • Query the details of a specified instance
      • Query the list of BCC instances eligible for no charge for stopped instances
      • Query the VNC address of the instance
      • Reboot an instance
      • Reinstall an instance
      • Reinstall OS for Instances (Batch Reinstallation)
      • Release instances in batch
      • Release IPv6
      • Release Postpay Instances (Release via POST Request)
      • Release recycle bin instances
      • Remove an instance from a security group
      • Remove the relationship between an instance and its deployment group
      • Renew an instance
      • Resize instances in batches
      • Resuming Billing for BCC in Recycle Bin
      • Retrieve a list of instance roles
      • Retrieve network interface card information for an instance
      • Set Auto-release of Spot Instance EIP
      • Set Instance Deletion Protection
      • Setting Auto-Release for Postpay
      • Start an instance
      • Starting Instances (Batch Start)
      • Stop an instance
      • Stopping Instances (Batch Stop)
      • Unbind a role
      • Unbind a tag from an instance
    • Key Pair Related Interfaces
      • Bind a key pair
      • Change description of key pair
      • Create a key pair
      • Delete a key pair
      • Import a key pair
      • Query key pair details
      • Query the key pair list
      • Rename a key pair
      • Unbind a key pair
    • Maintenance platform APIs
      • Maintenance Records Related Interfaces
      • Maintenance Task Related Interfaces
      • Pre-authorization Related Interfaces
    • Other APIs
      • Query instance package price
      • Query instance package specifications (new)
      • Querying Availability Zones By Package Specification
    • Overview
    • Region and Availability Zone Related Interfaces
      • Query list of availability zones
      • Retrieve the Domain Name List API
    • Reserved Instance Related Interfaces
      • Accept Reserved Instance Transfer
      • Adjust reserved instance
      • Bind Tag to Reserved Instance
      • Create Auto-renewal Rule for Reserved Instance
      • Create reserved instances
      • Disable Auto-renewal Rule for Reserved Instance
      • Initiate Reserved Instance Transfer
      • Query Reserved Instance
      • Reject Reserved Instance Transfer
      • Renew reserved instances
      • Reserved Instance Inbound List
      • Reserved Instance Outbound List
      • Revoke Reserved Instance Transfer
      • Unbind Tag from Reserved Instance
    • Security Group Related Interfaces
      • Authorize security group rules
      • Create a security group
      • Delete a security group
      • Delete security group rules
      • Instance associating with security group
      • Query the security group list
      • Replace security group for instance
      • Revoke security group rules
      • Unbind security group from instance
      • Update security group rules
    • Service domain
    • Snapshot Related Interfaces
      • Bind a tag to a snapshot chain
      • Create a snapshot
      • Delete a snapshot
      • Query snapshot chain list
      • Query snapshot details
      • Query the snapshot list
      • Replicate a snapshot across regions
      • Unbind a tag from a snapshot chain
    • Spot Instance Related Interfaces
      • Cancel Spot Instance Order
      • Create spot instances
      • Query Spot Instance Packages
      • Query Spot Price
  • Cloud Assistant API and SDK Reference
    • Python SDK
      • Batch Retrieval of bsm-agent State within Instances
      • CaClient
      • Command Interface
      • Historical records
      • Initialization
      • Install SDK
      • Log API
  • Cloud Assistant API Reference
    • Batch Retrieve Instance BSM-Agent Status
    • Command Interface
    • Common Request and Response Headers
    • Error response
    • General Description
    • Historical records
    • Log API
    • Service domain
  • FAQs
    • Billing class
    • Common Questions Overview
    • Images
    • Instances
    • Network class
    • Performance
    • Reserved Instance
    • Security class
    • Snapshots
    • Storage class
    • Virtual machine operation and maintenance class
  • Fault handling
    • GPU Instance Downtime Troubleshooting
    • Linux Baidu Cloud Compute Entering Single User Mode to Reset Paasword Reports Error-Authentication token lock busy
    • Linux Baidu Cloud Compute Entering Single User Mode to Reset Paasword Reports Error-Authentication token manipulation error
    • Linux Baidu Cloud Compute Entering Single User Mode to Reset Root Paasword
    • Linux Baidu Cloud Compute Execution Yum Update Reports Dependency Conflict
    • Linux Baidu Cloud Compute Setting Login Method
    • Unable to Remotely Connect to Linux Instance
    • Unable to Remotely Connect to Windows Instance
    • Windows Server Cannot Ping
  • Function Release Records
  • Go-SDK
    • Automatic snapshot policy
    • Availability zone
    • Dedicated CDS Cluster
    • Deployment group
    • Disk
    • Elastic high-performance computing cluster
    • Image
    • Initialization
    • Instance
    • Key pair
    • Overview
    • Region
    • Reserved Instance
    • Security group
    • Snapshot
  • Java-SDK
    • Automatic snapshot policy
    • Availability zone
    • BCC instance
    • BccClient
    • Deployment group
    • Disk
    • Exception handling
    • Image
    • Install the SDK Package
    • Key pair
    • Log
    • Overview
    • Quick Start
    • Region
    • Reserved Instance
    • Security group
    • Snapshot
    • Version Change Records
  • Operation guide
    • Deployment group
      • Adjust Deployment Group for Existing Instances
      • Create BCC Instance within Deployment Group
      • Create Deployment Group
      • Delete Deployment Group
      • Modify Deployment Group Information
      • Overview of deployment policy
      • Remove BCC Instance from Deployment Group
    • Elastic high-performance computing cluster
      • Create Elastic High-performance Computing Cluster
      • Overview of elastic hyper-computing cluster
    • Image
      • Baidu AI Cloud Image Service Agreement
      • Create a custom image
      • Creating Linux Image Based on Local System
      • Cross-region image replication
      • Data and Personal Information Protection Statement
      • Delete a custom image
      • How to Set Network Adapter Multi-Queue Properties
      • Image List
      • Image Overview
      • Image Quick Guide
      • Import Custom Image
        • Checking Network Configuration
        • Checking Virtio Driver
        • Creating Instance Using Imported Custom Image
        • Detecting Image Using Image Detection Tool
        • Image format check
        • Image Format Conversion
        • Image Import Restrictions
        • Import Overview
        • Install cloudbase-init
        • Installing Virtio Driver
        • System Optimization Operations (Linux)
      • OS Official End of Maintenance Plan
      • Public Image Release Records
        • 2023 BCC Public Image Release Records
        • 2023 EBC Public Image Release Records
        • 2024 BCC Public Image Release Records
        • 2024 EBC Public Image Release Records
        • 2025 BCC Public Image Release Records
      • Reinstall OS
      • Share a custom image
      • Windows Image Creation
    • Instance
      • Batch Sequential Naming
      • Change Availability Zone
      • Change Charge Type
        • Postpay to Subscription
        • Subscription to Postpay
      • Change Instance Configuration
      • Create instance
        • Create Instance Navigation
        • Create Instance via Custom Image
        • Create Instance via Purchase Page
        • Create Instances with Launch Templates
        • Purchase Instance with Same Configuration
      • Cross-AZ migration
      • Functional restrictions
      • Instance Overview
      • Modify instance name
      • Postpay Instance No Charge for Stopped Instances
      • Reboot an instance
      • Reclaim instance
      • Release an instance
      • Renew an instance
      • Reset password
      • Set IAM Role
      • Sign in to instance
        • Log in to Linux Instance
          • Connect to Baidu Cloud Compute Using SmartTerm
          • Connect to Linux instance using user name-password certification
          • Log in to Linux Instance Using SSH Key on Linux or Mac
          • Log in to Linux Instance Using SSH Key via SecureCRT
          • Remotely sign in to Baidu Cloud Computer via VNC
          • Sign in to Linux instances via SSH key in Putty
          • Sign in to Linux instances via SSH key in Xshell
        • Log in to Windows Instance
          • Remotely sign in to Baidu Cloud Computer via VNC
          • Sign in to Windows instance via remote desktop
        • Login Method Overview
      • Spot instances
        • Create spot instances
        • What Is Spot Instance
      • Start an instance
      • Stop an instance
        • Elastic Baremetal Instance and Elastic High-performance Computing Cluster Instance Halt Capability Configuration Instructions
        • Stop an instance
      • View instance
    • Launch Template
    • Network
      • Bind and Unbind EIP
      • Change Internal IP
      • Change subnet
      • Change VPC
      • Configure Dual Network Interface Card External Network Access for Windows Baidu Cloud Compute
      • Configure IPv6 Address
      • Elastic network interface
        • Configure elastic network interface
        • Create elastic network interface
        • Elastic Network Interface Overview
        • Mount elastic network interface
      • Elastic RDMA Network Interface
        • Elastic RDMA Network Interface Overview
        • Instructions for use
    • Operations and Monitor
      • Cloud Assistant
        • Cloud Assistant Overview
        • Cloud Assistant Usage Notes
        • Create command
        • FAQs
        • Historical records
        • Identity and access management
        • Instance list
        • My commands
        • Public commands
        • Upload files
      • Evacuate Faulty Instance
      • Instance Health Check
      • Maintenance Platform
        • Maintenance Platform Access Instructions
        • Maintenance Platform Overview
        • Maintenance Records Query
        • Maintenance Task
        • Pre-authorization Rule Settings
      • Monitor and Alarm
      • Self-Service Diagnostic Tool
        • Application Performance Diagnostic Tool Btune
        • Self-Service Diagnostic Tool Overview
      • Use Rescue Mode
    • Reserved Instance
      • FAQ
      • Introduction to reserved instance
      • Renew reserved instances
      • Reserved Instance AZ Change
      • Reserved Instance Cross-Account Transfer
      • Reserved Instance EHC Cluster Change
      • Reserved Instance Purchase
    • Resource Assessment
    • Security
      • Identity and access management
        • Identity and access management
        • Price Permission Control
      • Key pair
        • Bind SSH Key Pair
        • Create SSH Key Pair
        • Delete SSH Key Pair
        • SSH Key Pair Overview
        • Unbind SSH Key Pair
      • Security group
        • Associate with security group
        • Copy security group
        • Create a security group
        • Delete a security group
        • Disassociate security group
        • Edit security group
        • Security group overview
    • Server Migration
      • Migration Operation Steps
      • Server Migration Operation Process
      • Server Migration Overview
    • Snapshot
      • Automatic snapshot
      • Create disk snapshot
      • Delete a snapshot
      • Rollback snapshot
      • Snapshot Overview
    • Storage
      • Overview
      • System disk expansion
    • Tag Management
      • Configure Tag
      • Tag Management Overview
      • View Resource Bill Based on Tag
  • Operations Reference
    • Linux Operations Reference
      • Baidu Cloud Compute Delete or Modify File Prompting File System Read-Only
      • CentOS 7 Install Docker
      • Configure Linux Analysis Tools atop and kdump
      • Enter Single User Mode
        • CentOS 6 Enter Single User
        • CentOS 7 Enter Single User
        • CentOS 8 Enter Single User
        • FreeBSD 11 Single User Modify Password SOP
        • opensuse42
          • 3 Enter Single User
        • Ubuntu Enter Single User
        • OpenSUSE 42_3 Enter Single User
      • How to Enable or Disable Intel CPU Vulnerability Patch in Linux Image
      • How to Handle System Boot Exception Caused by fstab Configuration
      • How to Resolve Unable to Log in to Linux BCC Instance via SSH
      • Linux BCC Instance Insufficient Space Issue Resolution
      • Linux BCC Instance Lagging Issue
      • Linux Format and Mount Instance Mount Local Disk
      • Linux Modify Default Remote Connection Port
      • Linux Server CPU and Memory Full Issue Troubleshooting
      • Linux System Install Graphical Interface and Remote Connection
        • CentOS
          • CentOS 8 Install Graphical Interface and Connect Using VNC Viewer
          • CentOS6
            • 5 Install KDE Desktop Graphical Interface and Connect Using VNC Viewer
          • CentOS7
            • 2 Install GNOME Graphical Interface and Connect Using VNC Viewer
          • Install GNOME GUI on CentOS 7_2 and Connect via VNC Viewer
          • Install GUI on CentOS 8 and Connect via VNC Viewer
          • Install KDE Desktop GUI on CentOS 6_5 and Connect via VNC Viewer
        • opensuse
          • opensuse42
            • 3 Install Graphical Interface and Connect Using VNC Viewer
          • Install GUI on OpenSUSE 42_3 and Connect via VNC Viewer
        • Ubuntu
          • Ubuntu14
            • 04 Install Graphical Interface and Connect Using VNC Viewer
          • Ubuntu18
            • 04 Install Graphical Interface and Connect Using VNC Viewer
          • Install GUI on Ubuntu 14_04 and Connect via VNC Viewer
          • Install GUI on Ubuntu 18_04 and Connect via VNC Viewer
      • Performance test
        • Linux CPU Performance Test
        • Linux Disk IO Performance Test
        • Linux Network Performance Test
      • Ubunut16_04 Subscription Extended Security Maintenance (ESM)
    • Server configuration
      • Debian 9 Software Source Configuration Update
      • Linux PIP Configuration with Baidu Source
      • Online Instance with OFED Driver Kernel Replacement Solution
      • Windows PIP Configuration with Baidu Source
    • Windows Operations Reference
      • Blue Screen Crash General Handling Method
      • Configure Multi-User Access to Windows Server
      • Connecting to Windows Server Using Xshell
      • Data Disk Not Displayed After Server Reboot
      • Desktop and Application Color Turning Black Handling Method
      • Local Playback of Sound from Windows Server
      • Performance Resources
      • Remote Connection to Windows Unable to Use Clipboard
      • System Activation
      • System Black Screen Handling Method
      • Tutorial on Disabling Windows Firewall
      • Windows Allow Single User to Connect Multiple Sessions Method
      • Windows automatic update-related configuration
      • Windows BCC Instance Achieve SID Uniqueness After Joining Domain
      • Windows BCC Instance Lagging Issue
      • Windows CPU and Memory Full Troubleshooting Steps
      • Windows Delete Hardware Reserved Memory
      • Windows Instance Disk Space Insufficient Cleanup Tutorial
      • Windows Modify Default Remote Connection Port
      • Windows Quick Login
      • Windows Server Disable IE Enhanced Security Configuration Tutorial
      • Windows Set Only Allow Local & Fixed IP Access Remote Port
      • Windows Virtual Machine Auto Login Failure Handling Method
  • Product Description
    • Application scenarios
    • Correspondence Between Original and New Model Names
    • Discontinued Instance Specifications
    • Models and Their Regions
    • Product advantages
    • Usage restrictions
    • What Is Baidu Cloud Compute BCC
    • Instance specification
  • Product pricing
    • Billing overview
    • Charge type
      • Postpay Pricing
      • Reserved instances
      • Subscription (Prepay) Pricing
      • Reserved Instance
    • Refund policy
  • Python-SDK
    • BccClient
    • Disk
    • Image
    • Initialization
    • Install the SDK Package
    • Instance
    • Overview
    • Region
    • Reserved Instance
    • Security group
    • Snapshot
    • Version Change Records
  • Python3-SDK
    • Automatic snapshot policy
    • BccClient
    • Dedicated CDS Cluster
    • Deployment group
    • Disk
    • Image
    • Initialization
    • Install the SDK Package
    • Instance
    • Key pair
    • Overview
    • Region
    • Reserved Instance
    • Security group
    • Snapshot
  • Quick Start
    • Baidu Cloud Compute Security Description
    • Quick Configuration of Linux Baidu Cloud Compute
    • Quick Configuration of Windows Baidu Cloud Compute
  • Resources
    • Baidu AI Cloud Image Service Agreement
    • Image Quick Guide
  • Service Level Agreement (SLA)
    • Baidu Intelligent Cloud Baidu Cloud Compute Trusted Cloud
    • BCC Service Level Agreement SLA (V3_0)
  • Tag Service API Reference
    • Appendix 1
    • Domain name
    • General Description
    • Interface List
      • Create tag
      • Delete tag
      • Tag List
      • View resources bound to a tag
    • Introduction
  • Transfer
    • Site Offline Migration Solution
    • Site Smooth Migration Solution
  • Typical Practices
    • Connecting to Windows Server Using Xshell
    • Environment Setup
      • Manual Deployment of SQL Server 2008 R2 Express Edition
      • One-Click Setup for Linux Palworld Server
      • One-Click Setup for Windows Palworld Server
      • Set Up FTP Service on Linux
      • Setting Up Baota on Linux
      • Setting Up Baota on Windows
      • Tutorial on Setting Up IIS and FTP on Windows
      • Typical Practice for Setting Up Access VPN
      • Installing MySQL 8_0 Using Yum on CentOS 7 yum
    • Set Up FTP Service on Linux
    • Tag Management Practice
    • Tutorial on Disabling IE Enhanced Security Configuration on Windows Server 2008
    • Tutorial on Disabling Windows Firewall
    • Website Building Tutorial
      • Building a Website Using IIS Service on Windows 2008 and Windows 2012
      • Deploy SSL Certificate on Baidu Cloud Compute - Apache
      • Deploy SSL Certificate on Baidu Cloud Compute - IIS
      • Deploy SSL Certificate on Baidu Cloud Compute - Nginx
      • Deploy SSL Certificate on Baidu Cloud Compute - Tomcat
      • Installing and Configuring Apache Environment on Windows
      • Installing and Configuring Nginx Environment on Windows
      • CentOS-7_2 LNMP Environment Deployment
      • Deploy LAMP Environment on CentOS-7_2
  • Video Zone
    • Fault handling
    • Operation guide
      • Basic Functions
      • Environment Setup
      • Network Related
      • Operations Reference
      • Paasword Function
    • Operation guide
    • Product introduction
  • Document center
  • arrow
  • BCCBCC
  • arrow
  • Operation guide
  • arrow
  • Network
  • arrow
  • Elastic network interface
  • arrow
  • Configure elastic network interface
Table of contents on this page
  • Prerequisites
  • Preparation
  • Configure elastic network interface
  • Configuration of elastic network interface by Windows system
  • Configuration of elastic network interface by CentOS system
  • Configuration of elastic network interface by Ubuntu/Debian system

Configure elastic network interface

Updated at:2025-10-20

Depending on the image used by your instance, some images may require configuration with an elastic network interface if necessary.

Prerequisites

You have successfully bound the elastic network interface to the BCC instance.

Preparation

Configuration tool for elastic network interface

  • After binding the elastic network interface to a BCC/EBC instance and ensuring the interface is recognized within the instance, execute the following scripts to configure the IP address and route table based on the image version. For CentOS/CentOS Stream/RockyLinux/BaiduLinux/AlmaLinux, use the CentOS version scripts.

    CentOS:bcc_elastic_net_centos_20241121.sh

    Ubuntu:bcc_elastic_net_ubuntu_20241120.sh

    Debian:bcc_elastic_net_debian_20241211.sh

  • Windows systems need to be configured manually.

The configuration tool will set up a static route. After restarting the network or the instance, no additional route settings are required.

Run configuration tool

  • Log into the created BCC server and grant executable permissions to the configuration tool.
  • After completing Mount Elastic Network Interface operation, execute the configuration tool.
  • Run the configuration tool to modify an IP address or to unbind/rebind a network interface card.

As shown below:

Plain Text
1----------------------------------
2  Disable NetworkManager.
3  Begin to config network...
4    create/recreate network config file [OK]
5  Begin to create route table...
6    add 192.168.32.212 to route table: rt_ens3 [OK]
7    add 192.168.32.228 to route table: rt_ens3 [OK]
8    add 192.168.32.209 to route table: rt_ens6 [OK]
9    add 192.168.32.210 to route table: rt_ens6 [OK]
10    add 192.168.32.211 to route table: rt_ens6 [OK]
11    add 192.168.32.226 to route table: rt_ens7 [OK]
12    add 192.168.32.227 to route table: rt_ens7 [OK]
13    add 192.168.32.229 to route table: rt_ens7 [OK]
14  Restart network...  [OK]
15----------------------------------

After configuration, check if the IP address is enabled via the ip addr command (taking Centos for example)

Plain Text
1[root@instance-h1q92lvr ~]# ip addr
21: lo: <LOOPBACK,UP,LOWER_UP> mtu 65536 qdisc noqueue state UNKNOWN
3    link/loopback 00:00:00:00:00:00 brd 00:00:00:00:00:00
4    inet 127.0.0.1/8 scope host lo
5    inet6 ::1/128 scope host
6       valid_lft forever preferred_lft forever
72: eth0: <BROADCAST,MULTICAST,UP,LOWER_UP> mtu 1400 qdisc pfifo_fast state UP qlen 1000
8    link/ether fa:16:3e:7d:2d:ad brd ff:ff:ff:ff:ff:ff
9    inet 192.168.32.212/20 brd 192.168.47.255 scope global eth0
10    inet 192.168.32.228/20 brd 192.168.47.255 scope global secondary eth0:1
11    inet6 fe80::f816:3eff:fe7d:2dad/64 scope link
12       valid_lft forever preferred_lft forever
133: eth1: <BROADCAST,MULTICAST,UP,LOWER_UP> mtu 1400 qdisc pfifo_fast state UP qlen 1000
14    link/ether fa:16:3e:a6:69:8f brd ff:ff:ff:ff:ff:ff
15    inet 192.168.32.209/20 brd 192.168.47.255 scope global eth1
16    inet 192.168.32.210/20 brd 192.168.47.255 scope global secondary eth1:1
17    inet 192.168.32.211/20 brd 192.168.47.255 scope global secondary eth1:2
18    inet6 fe80::f816:3eff:fea6:698f/64 scope link
19       valid_lft forever preferred_lft forever
204: eth2: <BROADCAST,MULTICAST,UP,LOWER_UP> mtu 1400 qdisc pfifo_fast state UP qlen 1000
21    link/ether fa:16:3e:93:e5:44 brd ff:ff:ff:ff:ff:ff
22    inet 192.168.32.226/20 brd 192.168.47.255 scope global eth2
23    inet 192.168.32.227/20 brd 192.168.47.255 scope global secondary eth2:1
24    inet 192.168.32.229/20 brd 192.168.47.255 scope global secondary eth2:2
25    inet6 fe80::f816:3eff:fe93:e544/64 scope link
26       valid_lft forever preferred_lft forever

Configure elastic network interface

Based on the OS of the BCC instance, choose the method to configure the elastic network interface:

  • [Configuration of elastic network interface by Windows system](#Configuration of elastic network interface by Windows system)
  • [Configuration of elastic network interface by CentOS system](#Configuration of elastic network interface by CentOS system)
  • [Configuration of elastic network interface by Ubuntu/Debian system](#Ubuntu/Debian System Configuration for Elastic Network Interface)

Configuration of elastic network interface by Windows system

Preparation

Before setting up an elastic network interface for your Windows instances, first bind the elastic network interface to the instance. You can assign one or more secondary private IP addresses to the elastic network interface as needed. Using multiple private IP addresses enhances the utilization of Windows instances and allows traffic failover in case of a load failure.

Configuration method

The following example demonstrates how to configure a secondary IP address on a Windows system running Windows Server 2012R2.

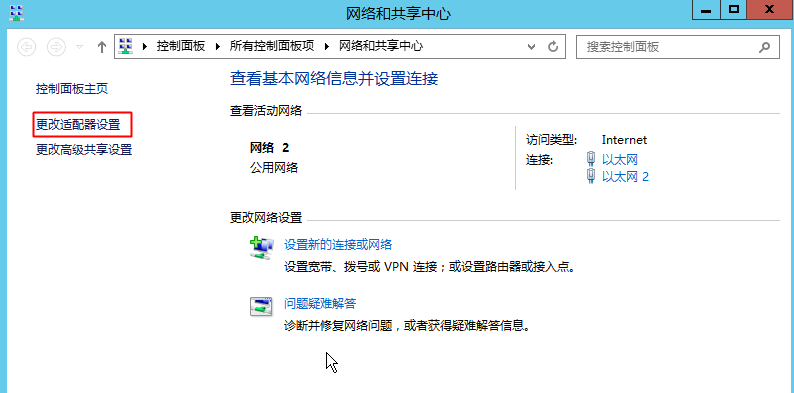
  1. Open the Network and Sharing Center, and select Change Adapter Settings.

111.png

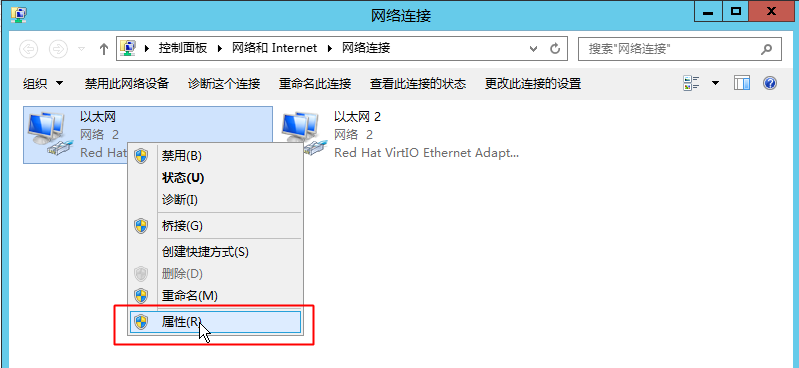
  1. In the window that appears, select a network interface card, right-click, and choose Properties.

222.png

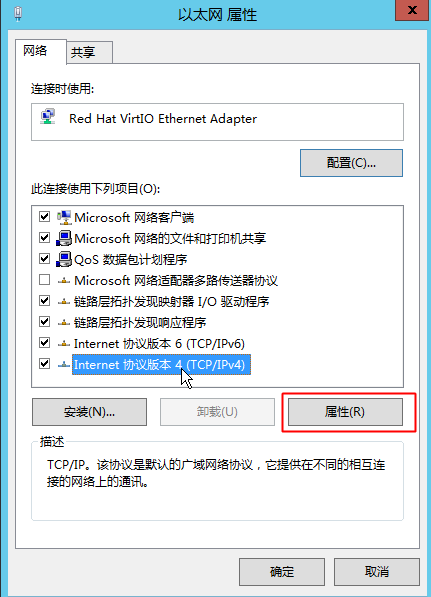
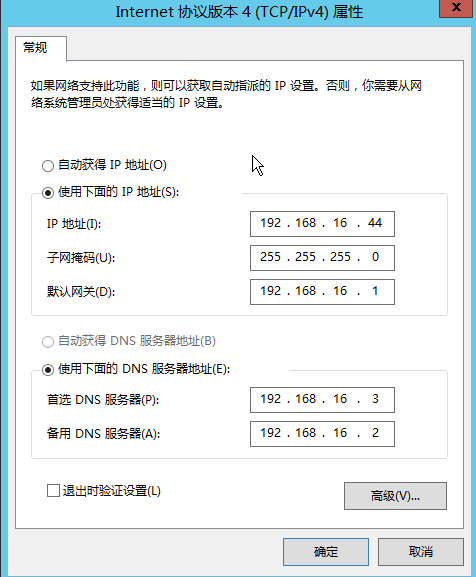
  1. Select Internet Protocol Version 4 (TCP/IPv4) and click Properties.

333.png

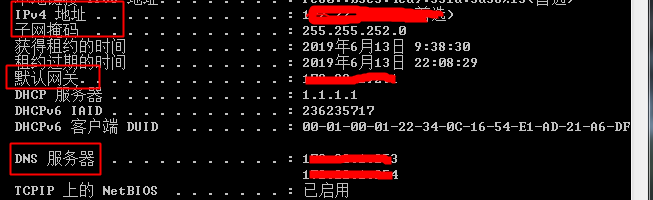
  1. In the dialog box that appears, select Use the Following IP Address and input the IP address, subnet mask, DNS server, etc. This information can be retrieved by running the ipconfig /all command in the command line. Once executed, a list of details will appear. Take note of the IPv4 address, subnet mask, default gateway, and DNS server information.

444.png

  1. Return to the properties dialog box to configure a static IP address. Enter the noted IP address, subnet mask, default gateway, DNS server address, etc., as demonstrated in the example. Click OK. Note: A brief network interruption lasting a few seconds during this process is normal.

555.png

  1. After setting up the static IP address, proceed to add a secondary IP address if it has already been added in the console.
  2. In the Internet Protocol Version 4 (TCP/IPv4) Properties window, click Advanced. In the pop-up dialog, click Add to add IP addresses. Input the secondary IP addresses added in the console one by one to complete the configuration.

666.png

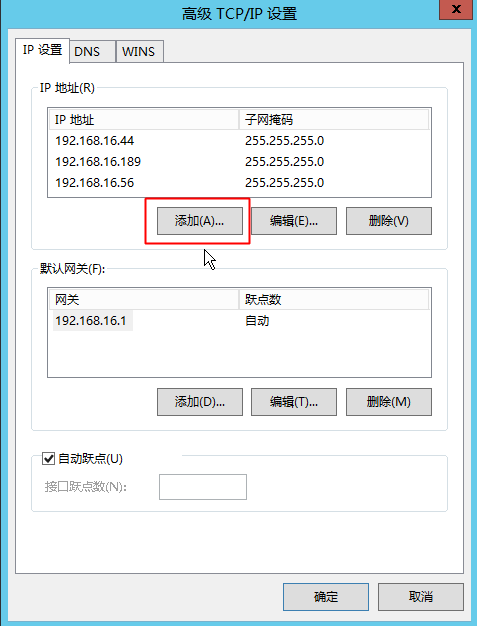
  1. To confirm that the secondary IP address has been successfully added to the OS, run the ipconfig /all command in the command line and check if the newly added IP address is listed.

Configuration of elastic network interface by CentOS system

Preparation

  1. To stop cloud-init from overwriting your custom network setup, disable its network configuration feature by editing /etc/cloud/cloud.cfg and adding the following content.

    network: {config: disabled}

  2. The NetworkManager installed on BCC instances might alter the routing configuration, so it should be disabled.
  • How to disable NetworkManager on CentOS 7

    Plain Text
    1  systemctl stop NetworkManager
    2  systemctl disable NetworkManager
  • How to disable NetworkManager on CentOS 6

    Plain Text
    1  service NetworkManager stop
    2  chkconfig NetworkManager off

Configure network interface card

  1. Obtain the name of network interface (name of network interface card)
  • Once you add an elastic network interface to a BCC instance, use the following command to retrieve its name.

    Plain Text
    1  ls /sys/class/net
  • Output result (example)

    Plain Text
    1  eth0 eth1 eth2 lo
  • The primary network interface card on BCC instances is typically named eth0 or ens3 (ens3 in some cases). In the results above, the names for the added elastic network interfaces are eth1 and eth2.
  1. Create a configuration file for the elastic network interface. For instance, take eth1 as an example:

    Plain Text
    1vim /etc/sysconfig/network-scripts/ifcfg-eth1

Add the following contents:

Plain Text
1    DEVICE=eth1
2    BOOTPROTO=dhcp
3    ONBOOT=yes
4    TYPE=Ethernet
5    USERCTL=no
6    PEERDNS=no
7    IPV6INIT=no
8    PERSISTENT_DHCLIENT=yes
9    HWADDR=fa:16:3e:6a:14:b5
10    DEFROUTE=no

Note:

  • Enter the MAC address of elastic network interface in the configuration file. (You can view the MAC address of elastic network interface via cat /sys/class/net/[name of network interface card ]/address).
  • To avoid changes to default routes, include the DEFROUTE=no option in the elastic network interface's configuration file.

If the network interface card has multiple IP addresses, include the secondary IP in the configuration file.

Plain Text
1    DEVICE=eth1
2    BOOTPROTO=dhcp
3    ONBOOT=yes
4    TYPE=Ethernet
5    USERCTL=no
6    PEERDNS=no
7    IPV6INIT=no
8    PERSISTENT_DHCLIENT=yes
9    HWADDR=fa:16:3e:6a:14:b5
10    DEFROUTE=no
11    IPADDR1=192.168.32.210
12    PREFIX1=24
13    IPADDR2=192.168.32.211
14    PREFIX2=24
  1. Restart network

    Plain Text
    1systemctl restart network  /  service network restart

Configure routes

To ensure data transmits through the appropriate network interface, create a new route table and corresponding rules for the elastic network interface.

  1. Create route table

Modify /etc/iproute2/rt_tables to establish a dedicated route table for each elastic network interface.

Plain Text
1    10 rt_eth1
2    20 rt_eth2
  1. Set routing rules (taking eth1 as an example)

Run the following command in the terminal:

Plain Text
1    ip route add default via 192.168.32.1 dev eth1 table rt_eth1
2
3    ip route add 192.168.32.209 dev eth1 table rt_eth1
4    ip route add 192.168.32.210 dev eth1 table rt_eth1
5    ip route add 192.168.32.211 dev eth1 table rt_eth1
6
7    ip rule add from 192.168.32.209 lookup rt_eth1
8    ip rule add from 192.168.32.210 lookup rt_eth1
9    ip rule add from 192.168.32.211 lookup rt_eth1

Notes:

  • The IP addresses 192.168.32.209 / 210 / 211 belong to the elastic network interface.
  • The default gateway for the elastic network interface is 192.168.32.1.

After configuration, you can check the routing details of each IP on the elastic network interface using ip route show table rt_eth1.

  1. Create a static route file for the elastic network interface (taking eth1 as an example)

Set up static route and rule files for elastic network interfaces to ensure they persist after restarting the BCC instance or network, removing the need for manual reconfiguration.

Create the static route file for route-eth1 via vim /etc/sysconfig/network-scripts/route-eth1, and add the following contents:

Plain Text
1    default via 192.168.32.1 dev eth1 table rt_eth1
2
3    192.168.32.209 dev eth1 table rt_eth1
4    192.168.32.210 dev eth1 table rt_eth1
5    192.168.32.211 dev eth1 table rt_eth1

Create or edit the rule files of rule-eth1: vim /etc/sysconfig/network-scripts/rule-eth1, and add the following contents:

Plain Text
1    from 192.168.32.209 lookup rt_eth1
2    from 192.168.32.210 lookup rt_eth1
3    from 192.168.32.211 lookup rt_eth1

Configuration of elastic network interface by Ubuntu/Debian system

Preparations before configuration

  1. To prevent cloud-init from resetting your custom network configuration, please disable network configuration in cloud-init as follows. Edit /etc/cloud/cloud.cfg to add the following content.

    Plain Text
    1network: {config: disabled}
  2. The NetworkManager installed on BCC instances might alter the routing configuration, so it should be disabled and remain disabled after a system reboot.
  • Unmount NetworkManager for Ubuntu14

    Plain Text
    1  service network-manager stop
    2  apt-get --purge remove -y network-manager
  • How to disable NetworkManager on CentOS 6

    Plain Text
    1  systemctl stop NetworkManager
    2  systemctl disable NetworkManager

Configure network interface card

  1. Obtain the name of network interface (name of network interface card)

Once you add an elastic network interface to a BCC instance, use the following command to retrieve its name.

Plain Text
1    ls /sys/class/net

Output result (example)

Plain Text
1    eth0 eth1 eht2 lo

The primary network interface card on BCC instances is typically named eth0 or ens3 (ens3 in some cases). In the results above, the names for the added elastic network interfaces are eth1 and eth2.

  1. Edit /etc/network/interfaces

Edit the network interface file - /etc/network/interfaces to modify it to the following content:

Plain Text
1    auto lo
2    iface lo inet loopback
3    source /etc/network/interfaces.d/*

For BCC Ubuntu16 instances, edit /etc/network/interfaces.d/50-cloud-init.cfg to modify it to the following content:

Plain Text
1    auto ens3
2    iface ens3 inet dhcp

Moreover, rename the file to ens3.cfg

Plain Text
1    mv /etc/network/interfaces.d/50-cloud-init.cfg  /etc/network/interfaces.d/ens3.cfg

For BCC Ubuntu20 instances, edit /etc/netplan/01-netcfg.yaml to modify it to the following content:

Plain Text
1    network:
2        version: 2
3        renderer: networkd
4        ethernets:
5            eth0:
6                dhcp4: yes
7            eth1:
8                dhcp4: yes
9            eth2:
10                dhcp4: yes
  1. Create a configuration file for the elastic network interface. For instance, take eth1 as an example:

Create a new eth1.cfg file in the /etc/network/interfaces.d/directory.

Plain Text
1    vim /etc/network/interfaces.d/eth1.cfg

Add the following contents:

Plain Text
1    auto eth1
2    iface eth1 inet dhcp
3    hwaddress=fa:16:3e:6a:14:b5

Note:

  • Enter the MAC address of elastic network interface in the configuration file. (You can view the MAC address of elastic network interface via cat /sys/class/net/[name of network interface card ]/address).

If the network interface card has multiple IP addresses, include the secondary IP in the configuration file.

Plain Text
1    auto eth1
2    iface eth1 inet dhcp
3    hwaddress=fa:16:3e:6a:14:b5
4
5    iface eth1 inet static
6    address 192.168.32.210
7    netmask 255.255.240.0
8
9    iface eth1 inet static
10    address 192.168.32.211
11    netmask 255.255.240.0
  1. Create a restrict-default-route file to prevent the default route from being overwritten.

vim /etc/dhcp/dhclient-enter-hooks.d/restrict-default-route, add the following content:

Plain Text
1    case ${interface} in
2 eth0)           #  ubuntu16/debian9 is ens3
3        ;;
4      *)
5        unset new_routers
6        ;;
7    esac
  1. Restart the network service.
  • Ubuntu14

    Plain Text
    1  ifdown eth1 && ifup eth1
  • Ubuntu16

    Plain Text
    1  systemctl restart networking
  • Ubuntu20

    Plain Text
    1  netplan apply

Configure routes

To ensure data transmits through the appropriate network interface, create a new route table and corresponding rules for the elastic network interface.

  1. Create route table

Modify /etc/iproute2/rt_tables to establish a dedicated route table for each elastic network interface.

Plain Text
1    10 rt_eth1
2    20 rt_eth2
  1. Define routing rules, using eth1 as an example.

Run the following command in the terminal:

Plain Text
1    ip route add default via 192.168.32.1 dev eth1 table rt_eth1
2
3    ip route add 192.168.32.209 dev eth1 table rt_eth1
4    ip route add 192.168.32.210 dev eth1 table rt_eth1
5    ip route add 192.168.32.211 dev eth1 table rt_eth1
6
7    ip rule add from 192.168.32.209 lookup rt_eth1
8    ip rule add from 192.168.32.210 lookup rt_eth1
9    ip rule add from 192.168.32.211 lookup rt_eth1

Notes:

  • 192.168.32.209 / 210 / 211 is the IP of the elastic network interface.
  • 192.168.32.1 is the default gateway for the elastic network interface.

After configuration, you can check the routing details of each IP on the elastic network interface using ip route show table rt_eth1.

  1. Create a static route file for the elastic network interface, using eth1 as a reference.

Edit /etc/network/interfaces.d/eth1.cfg

Plain Text
1    auto eth1
2    iface eth1 inet dhcp
3    hwaddress=fa:16:3e:6a:14:b5
4
5    iface eth1 inet static
6    address 192.168.32.210
7    netmask 255.255.240.0
8
9    iface eth1 inet static
10    address 192.168.32.211
11    netmask 255.255.240.0
12
13    # default gateway for eth1
14    up ip route add default via 192.168.32.1 dev eth1 table rt_eth0
15
16    # route for every IP
17    up ip route add 192.168.32.210 dev eth1 table rt_eth0
18    up ip route add 192.168.32.211 dev eth1 table rt_eth0
19
20    # policy rule for every IP
21    up ip rule add from 192.168.32.210  lookup rt_eth0
22    up ip rule add from 192.168.32.210  lookup rt_eth0

Previous
Configure IPv6 Address
Next
Create elastic network interface