
Online Instance with OFED Driver Kernel Replacement Solution
Overview
Some online BCC/EBC images come with pre-installed OFED drivers. Users can immediately utilize the RDMA feature after creating an instance with the RDMA network function package. However, since OFED is compiled for the current OS kernel version, switching to a different kernel version may cause the RDMA network interface card to fail. In such cases, recompiling and reinstalling the OFED driver will be necessary.
This document offers a solution for reinstalling OFED after modifying the kernel version on instances with various operating systems.
Operation steps
CentOS 7
For instance, consider upgrading the kernel to kernel-3.10.0-1160.90.1.el7.x86_64.
1. Install the kernel and kernel development package. Proceed to install the kernel-3.10.0-1160.90.1.el7.x86_64 version along with the related kernel development package on the instance:
1yum install -y kernel-3.10.0-1160.90.1.el7.x86_64 \
2                kernel-devel-3.10.0-1160.90.1.el7.x86_64 \
3                kernel-headers-3.10.0-1160.90.1.el7.x86_64 \
4                kernel-tools-3.10.0-1160.90.1.el7.x86_64
2. Check the RDMA lossless configuration package. Verify whether the RDMA lossless configuration package, rdma-userspace-config, is installed on the instance. If so, uninstall the package and reinstall it after OFED installation. Execute the following commands:
1# Check if rdma-userspace-config is installed
2rpm -qa |grep -i rdma-userspace-config
If the lossless configuration package is found installed, execute the command to delete it:
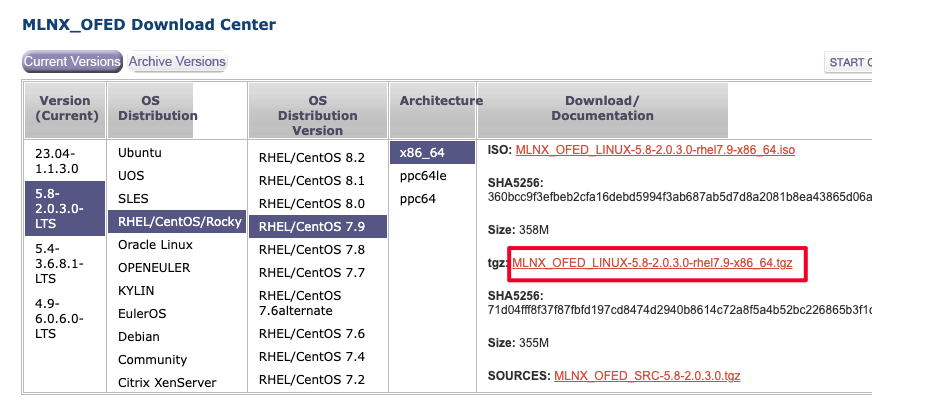
1# rpm -e rdma-userspace-config3. Download the OFED installation package. You can download it from the Baidu software repository or transfer it to the instance after downloading it from the official OFED website:
- Download from Baidu software repository: Taking the download of ofed version 5.8-2.0.3 as an example, execute the following command in the instance to download;
1wget http://mirrors.baidubce.com/mlnx-ofed/5.8-2.0.3.0/MLNX_OFED_LINUX-5.8-2.0.3.0-rhel7.9-x86_64.tgz- Download from the official website: Obtain the corresponding version of ofed installation package from the ofed official site
4. Compile and install ofed
- Run the script below to compile and install the OFED driver.
- The entire process of compilation and installation takes about 30 minutes.
Note: Ensure the script and the OFED installation package are placed in the same directory, and update the OFED version and kernel version in the script to match the actual versions being used.
1#!/usr/bin/env bash
2# Update mlnx ofed drivers
3# -- Prepare mlnx ofed drivers
4# -- Extract and install
5mlnx_ofed_version=5.8-2.0.3.0
6mlnx_ofed_drv=MLNX_OFED_LINUX-${mlnx_ofed_version}-rhel7.9-x86_64.tgz
7kern_ver=3.10.0-1160.90.1.el7.x86_64
8if [ ! -d /lib/modules/${kern_ver}/build ]; then
9    echo "There is no kernel build directory. Please check if kernel-devel is installed ..."
10    exit 1
11fi
12if ! which gcc >& /dev/null; then
13    yum install -y gcc
14fi
15if ! which make >& /dev/null; then
16    yum install -y make
17fi
18# Install Build Requirement
19yum install -y elfutils-libelf-devel createrepo python-devel redhat-rpm-config rpm-build libtool
20# Install runtime requirement for all OFED components installation
21yum install -y tcl gcc-gfortran fuse-libs tk libnl3-devel
22# Install updated mlnx_ofed packages including kernel modules and userspace packages
23mkdir update_drivers
24tar xf ${mlnx_ofed_drv} --strip-components 2 -C update_drivers/
25cd update_drivers
26./mlnxofedinstall --without-fw-update  --add-kernel-support -k ${kern_ver} --skip-distro-check \
27    --package-install-options "--force" --distro rhel7.9 -q
28if [ $? -ne 0 ]; then
29    echo "MLNX OFED driver install ... Failed."
30    exit 1
31fi
32cd ..
33# 82-net-setup-link.rules cause the name of NIC changed. Then disable this rule.
34if [ -f /usr/lib/udev/rules.d/82-net-setup-link.rules ]; then
35    mv /usr/lib/udev/rules.d/82-net-setup-link.rules /usr/lib/udev/rules.d/82-net-setup-link.rules.orig
36fi
37if [ -f /usr/lib/udev/rules.d/83-mlnx-sf-name.rules ]; then
38    mv /usr/lib/udev/rules.d/83-mlnx-sf-name.rules /usr/lib/udev/rules.d/83-mlnx-sf-name.rules.orig
39fi
40# Disable rshim(tmfifo_net0)
41systemctl disable rshim.service
42rm -rf ${mlnx_ofed_drv} update_drivers
43rm -rf /tmp/MLNX* /tmp/*.conf
44# update initramfs
45dracut -f /boot/initramfs-${kern_ver}.img ${kern_ver}- If rdma-userspace-config is uninstalled in the second step, reinstall it
1wget -q http://mirrors.baidubce.com/baidu/rdma_specs/rdma-userspace-config-bbc-v1.0.3-1.el7.centos.x86_64.rpm
2rpm -ivh rdma-userspace-config-bbc-v1.0.3-1.el7.centos.x86_64.rpm
3service rdma start- Reboot the instance to enter the new kernel;
- Verify the installation.
1#Check the installed 5.8-2.0.3 version and the ofed compiled under the current kernel
2[root@localhost ~]# rpm -qa | grep mlnx | grep 3.10.0_1160
3mlnx-ofa_kernel-modules-5.8-OFED.5.8.2.0.3.1.kver.3.10.0_1160.90.1.el7.x86_64.x86_64
4mlnx-ofa_kernel-devel-5.8-OFED.5.8.2.0.3.1.kver.3.10.0_1160.90.1.el7.x86_64.x86_64
5knem-modules-1.1.4.90mlnx1-OFED.5.8.0.4.7.1.kver.3.10.0_1160.90.1.el7.x86_64.x86_64
6[root@localhost ~]# modinfo mlx5_core
7filename:       /lib/modules/3.10.0-1160.90.1.el7.x86_64/extra/mlnx-ofa_kernel/drivers/net/ethernet/mellanox/mlx5/core/mlx5_core.ko
8alias:          auxiliary:mlx5_core.eth-rep
9alias:          auxiliary:mlx5_core.eth
10basedon:        Korg 5.17-rc4
11version:        5.8-2.0.3
12license:        Dual BSD/GPL
13description:    Mellanox 5th generation network adapters (ConnectX series) core driver
14author:         Eli Cohen <eli@mellanox.com>
15retpoline:      Y
16rhelversion:    7.9
17srcversion:     6A14E2ECBAE645B024A60B6
18...
19 #Check the network interface card
20[root@localhost ~]# ifconfig
21 #Check the network interface card driver
22[root@localhost ~]# ethtool -i ethX
23 #Check the software package dependency. If dependency package is missing, software package is duplicated, or other issues exist, manually resolve by installing missing dependency package, and removing duplicate software package, etc.;
24[root@localhost ~]# yum check dependencies
CentOS 8
For example, consider upgrading the kernel to kernel-4.18.0-348.7.1.el8_5.x86_64.
1. Install the kernel and kernel development package. Install the kernel-4.18.0-348.7.1.el8_5.x86_64 version and its associated development packages in the instance:
1yum install -y kernel-4.18.0-348.7.1.el8_5.x86_64 \
2                kernel-devel-4.18.0-348.7.1.el8_5.x86_64 \
3                kernel-headers-4.18.0-348.7.1.el8_5.x86_64 \
4                kernel-tools-4.18.0-348.7.1.el8_5.x86_64
2. Verify the RDMA lossless configuration package. Some instances have the RDMA lossless configuration package (rdma-userspace-config) installed. This package needs to be removed and reinstalled after installing OFED:
1# Check if rdma-userspace-config is installed
2rpm -qa |grep -i rdma-userspace-config
If the lossless configuration package is found installed, execute the command to delete it:
1If it exists, uninstall the package
2# rpm -e rdma-userspace-config
3. Download the OFED installation package. You can download it from the Baidu software repository or transfer it to the instance after downloading it from the official OFED website:
- Download from Baidu software repository: Taking the download of ofed version 5.8-2.0.3 as an example, execute the following command in the instance to download:
1wget http://mirrors.baidubce.com/mlnx-ofed/5.8-2.0.3.0/MLNX_OFED_LINUX-5.8-2.0.3.0-rhel8.4-x86_64.tgz- Download from the official website: Obtain the corresponding version of ofed installation package from the ofed official site
4. Compile and install ofed
Run the following script to compile and install the OFED driver. The entire process of compilation and installation takes about 30 minutes.
Note: Ensure the script and the OFED installation package are placed in the same directory, and update the OFED version and kernel version in the script to match the actual versions being used.
1#!/usr/bin/env bash
2# Update mlnx ofed drivers
3# -- Prepare mlnx ofed drivers
4# -- Extract and install
5mlnx_ofed_version=5.8-2.0.3.0
6mlnx_ofed_drv=MLNX_OFED_LINUX-${mlnx_ofed_version}-rhel8.4-x86_64.tgz
7kern_ver=4.18.0-348.7.1.el8_5.x86_64
8if [ ! -d /lib/modules/${kern_ver}/build ]; then
9    echo "There is no kernel build directory. Please check if kernel-devel is installed ..."
10    exit 1
11fi
12if ! which gcc >& /dev/null; then
13    yum install -y gcc
14fi
15if ! which make >& /dev/null; then
16    yum install -y make
17fi
18# Install Build Requirement
19yum install -y createrepo python36-devel libtool python36 kernel-rpm-macros gdb-headless rpm-build elfutils-libelf-devel
20# Install runtime requirement for all OFED components installation
21yum install -y tk gcc-gfortran tcsh tcl libnl3-devel perl-Math-Complex cmake-filesystem
22# Install updated mlnx_ofed packages including kernel modules and userspace packages
23mkdir update_drivers
24tar xf ${mlnx_ofed_drv} --strip-components 2 -C update_drivers/
25cd update_drivers
26./mlnxofedinstall --without-fw-update  --add-kernel-support -k ${kern_ver} --skip-distro-check \
27    --package-install-options "--force" --distro rhel8.4 -q
28if [ $? -ne 0 ]; then
29    echo "MLNX OFED driver install ... Failed."
30    exit 1
31fi
32cd ..
33# 82-net-setup-link.rules cause the name of NIC changed. Then disable this rule.
34if [ -f /usr/lib/udev/rules.d/82-net-setup-link.rules ]; then
35    mv /usr/lib/udev/rules.d/82-net-setup-link.rules /usr/lib/udev/rules.d/82-net-setup-link.rules.orig
36fi
37if [ -f /usr/lib/udev/rules.d/83-mlnx-sf-name.rules ]; then
38    mv /usr/lib/udev/rules.d/83-mlnx-sf-name.rules /usr/lib/udev/rules.d/83-mlnx-sf-name.rules.orig
39fi
40# Disable rshim(tmfifo_net0)
41systemctl disable rshim.service
42rm -rf ${mlnx_ofed_drv} update_drivers
43rm -rf /tmp/MLNX* /tmp/*.conf
44# update initramfs
45dracut -f /boot/initramfs-${kern_ver}.img ${kern_ver}- If rdma-userspace-config is uninstalled in the second step, reinstall it
1wget -q http://mirrors.baidubce.com/baidu/rdma_specs/rdma-userspace-config-bbc-v1.0.3-1.el7.centos.x86_64.rpm
2rpm -ivh --nodeps --force rdma-userspace-config-bbc-v1.0.3-1.el7.centos.x86_64.rpm
3service rdma start- Reboot the instance to enter the new kernel;
- Verify the installation.
1#Check the installed 5.8-2.0.3 version and the ofed compiled under the current kernel
2[root@localhost ~]# rpm -qa | grep mlnx | grep 4.18.0_348
3mlnx-ofa_kernel-devel-5.8-OFED.5.8.2.0.3.1.kver.4.18.0_348.7.1.el8_5.x86_64.x86_64
4knem-modules-1.1.4.90mlnx1-OFED.5.8.0.4.7.1.kver.4.18.0_348.7.1.el8_5.x86_64.x86_64
5mlnx-ofa_kernel-modules-5.8-OFED.5.8.2.0.3.1.kver.4.18.0_348.7.1.el8_5.x86_64.x86_64
6[root@localhost ~]# modinfo mlx5_core
7filename:       /lib/modules/4.18.0-348.7.1.el8_5.x86_64/extra/mlnx-ofa_kernel/drivers/net/ethernet/mellanox/mlx5/core/mlx5_core.ko
8alias:          auxiliary:mlx5_core.eth-rep
9alias:          auxiliary:mlx5_core.eth
10basedon:        Korg 5.17-rc4
11version:        5.8-2.0.3
12license:        Dual BSD/GPL
13description:    Mellanox 5th generation network adapters (ConnectX series) core driver
14author:         Eli Cohen <eli@mellanox.com>
15rhelversion:    8.5
16srcversion:     AED21A09CA345D254692F69
17...
18 #Check the network interface card
19[root@localhost ~]# ifconfig
20 #Check the network interface card driver
21[root@localhost ~]# ethtool -i ethX
22 #Check the software package dependency. If dependency package is missing, software package is duplicated, or other issues exist, manually resolve by installing missing dependency package, and removing duplicate software package, etc.;
23[root@localhost ~]# yum check
Rocky Linux 8
For example, consider upgrading the kernel to kernel-4.18.0-477.13.1.el8_8.x86_64.
1. Install the kernel and kernel development package. Install the kernel-4.18.0-477.13.1.el8_8.x86_64 version and its associated development packages in the instance:
1yum install -y kernel-4.18.0-477.13.1.el8_8.x86_64 \
2                kernel-devel-4.18.0-477.13.1.el8_8.x86_64 \
3                kernel-headers-4.18.0-477.13.1.el8_8.x86_64 \
4                kernel-tools-4.18.0-477.13.1.el8_8.x86_64
2. Verify the RDMA lossless configuration package. Some instances have the RDMA lossless configuration package (rdma-userspace-config) installed. This package needs to be removed and reinstalled after installing OFED:
1# Check if rdma-userspace-config is installed
2rpm -qa |grep -i rdma-userspace-config
If the lossless configuration package is found installed, execute the command to delete it:
1If it exists, uninstall the package
2# rpm -e rdma-userspace-config
3. Download the OFED installation package. You can download it from the Baidu software repository or transfer it to the instance after downloading it from the official OFED website:
- Download from Baidu software repository: Taking the download of ofed version 5.8-2.0.3 as an example, execute the following command in the instance to download.
1wget http://mirrors.baidubce.com/mlnx-ofed/5.8-2.0.3.0/MLNX_OFED_LINUX-5.8-2.0.3.0-rhel8.7-x86_64.tgz- Download from the official website: Obtain the corresponding version of ofed installation package from the ofed official site
4. Compile and install ofed
Run the script below to compile and install the OFED driver.
Note: Ensure the script and the OFED installation package are placed in the same directory, and update the OFED version and kernel version in the script to match the actual versions being used.
The entire process of compilation and installation takes about 30 minutes.
1#!/usr/bin/env bash
2# Update mlnx ofed drivers
3# -- Prepare mlnx ofed drivers
4# -- Extract and install
5mlnx_ofed_version=5.8-2.0.3.0
6mlnx_ofed_drv=MLNX_OFED_LINUX-${mlnx_ofed_version}-rhel8.7-x86_64.tgz
7kern_ver=4.18.0-477.13.1.el8_8.x86_64
8if [ ! -d /lib/modules/${kern_ver}/build ]; then
9    echo "There is no kernel build directory. Please check if kernel-devel is installed ..."
10    exit 1
11fi
12if ! which gcc >& /dev/null; then
13    yum install -y gcc
14fi
15if ! which make >& /dev/null; then
16    yum install -y make
17fi
18# Install Build Requirement
19yum install -y createrepo python36-devel libtool python36 kernel-rpm-macros gdb-headless rpm-build elfutils-libelf-devel
20# Install runtime requirement for all OFED components installation
21yum install -y tk gcc-gfortran tcsh tcl libnl3-devel perl-Math-Complex cmake-filesystem
22# Install updated mlnx_ofed packages including kernel modules and userspace packages
23mkdir update_drivers
24tar xf ${mlnx_ofed_drv} --strip-components 2 -C update_drivers/
25cd update_drivers
26./mlnxofedinstall --without-fw-update  --add-kernel-support -k ${kern_ver} --skip-distro-check \
27    --package-install-options "--force" --distro rhel8.7 -q
28if [ $? -ne 0 ]; then
29    echo "MLNX OFED driver install ... Failed."
30    exit 1
31fi
32cd ..
33# 82-net-setup-link.rules cause the name of NIC changed. Then disable this rule.
34if [ -f /usr/lib/udev/rules.d/82-net-setup-link.rules ]; then
35    mv /usr/lib/udev/rules.d/82-net-setup-link.rules /usr/lib/udev/rules.d/82-net-setup-link.rules.orig
36fi
37if [ -f /usr/lib/udev/rules.d/83-mlnx-sf-name.rules ]; then
38    mv /usr/lib/udev/rules.d/83-mlnx-sf-name.rules /usr/lib/udev/rules.d/83-mlnx-sf-name.rules.orig
39fi
40# Disable rshim(tmfifo_net0)
41systemctl disable rshim.service
42rm -rf ${mlnx_ofed_drv} update_drivers
43rm -rf /tmp/MLNX* /tmp/*.conf
44# update initramfs
45dracut -f /boot/initramfs-${kern_ver}.img ${kern_ver}- If rdma-userspace-config is uninstalled in the second step, reinstall it
1wget -q http://mirrors.baidubce.com/baidu/rdma_specs/rdma-userspace-config-bbc-v1.0.3-1.el7.centos.x86_64.rpm
2rpm -ivh --nodeps --force rdma-userspace-config-bbc-v1.0.3-1.el7.centos.x86_64.rpm
3service rdma start- Reboot the instance to enter the new kernel;
- Verify the installation.
1#Check the installed 5.8-2.0.3 version and the ofed compiled under the current kernel
2[root@localhost ~]# rpm -qa | grep mlnx | grep 4.18.0_477
3mlnx-ofa_kernel-modules-5.8-OFED.5.8.2.0.3.1.kver.4.18.0_477.13.1.el8_8.x86_64.x86_64
4mlnx-ofa_kernel-devel-5.8-OFED.5.8.2.0.3.1.kver.4.18.0_477.13.1.el8_8.x86_64.x86_64
5knem-modules-1.1.4.90mlnx1-OFED.5.8.0.4.7.1.kver.4.18.0_477.13.1.el8_8.x86_64.x86_64
6[root@localhost ~]# modinfo mlx5_core
7filename:       /lib/modules/4.18.0-477.13.1.el8_8.x86_64/extra/mlnx-ofa_kernel/drivers/net/ethernet/mellanox/mlx5/core/mlx5_core.ko
8alias:          auxiliary:mlx5_core.eth-rep
9alias:          auxiliary:mlx5_core.eth
10basedon:        Korg 5.17-rc4
11version:        5.8-2.0.3
12license:        Dual BSD/GPL
13description:    Mellanox 5th generation network adapters (ConnectX series) core driver
14author:         Eli Cohen <eli@mellanox.com>
15rhelversion:    8.8
16srcversion:     AED21A09CA345D254692F69
17...
18 #Check the network interface card
19[root@localhost ~]# ifconfig
20 #Check the network interface card driver
21[root@localhost ~]# ethtool -i ethX
22 #Check the software package dependency. If dependency package is missing, software package is duplicated, or other issues exist, manually resolve by installing missing dependency package, and removing duplicate software package, etc.;
23[root@localhost ~]# yum check
Rocky Linux 9
For example, consider upgrading the kernel to kernel-5.14.0-284.11.1.el9_2.x86_64.
1. Install the kernel and kernel development package. Install the kernel-5.14.0-284.11.1.el9_2.x86_64 version and its associated development packages in the instance:
1yum install -y kernel-5.14.0-284.11.1.el9_2.x86_64 \
2                kernel-devel-5.14.0-284.11.1.el9_2.x86_64 \
3                kernel-headers-5.14.0-284.11.1.el9_2.x86_64 \
4                kernel-tools-5.14.0-284.11.1.el9_2.x86_64
2. Verify the RDMA lossless configuration package. Some instances have the RDMA lossless configuration package (rdma-userspace-config) installed. This package needs to be removed and reinstalled after installing OFED:
1# Check if rdma-userspace-config is installed
2rpm -qa |grep -i rdma-userspace-config
If the lossless configuration package is found installed, execute the command to delete it:
1If it exists, uninstall the package
2# rpm -e rdma-userspace-config
3. Download the OFED installation package. You can download it from the Baidu software repository or transfer it to the instance after downloading it from the official OFED website:
- Download from Baidu software repository: Taking the download of ofed version 5.8-2.0.3 as an example, execute the following command in the instance to download.
1wget http://mirrors.baidubce.com/mlnx-ofed/5.8-2.0.3.0/MLNX_OFED_LINUX-5.8-2.0.3.0-rhel9.1-x86_64.tgz- Download from the official website: Obtain the corresponding version of ofed installation package from the ofed official site
4. Compile and install ofed
Run the script below to compile and install the OFED driver.
Note: Ensure the script and the OFED installation package are placed in the same directory, and update the OFED version and kernel version in the script to match the actual versions being used.
The entire process of compilation and installation takes about 30 minutes.
1#!/usr/bin/env bash
2# Update mlnx ofed drivers
3# -- Prepare mlnx ofed drivers
4# -- Extract and install
5mlnx_ofed_version=5.8-2.0.3.0
6mlnx_ofed_drv=MLNX_OFED_LINUX-${mlnx_ofed_version}-rhel9.1-x86_64.tgz
7kern_ver=5.14.0-284.11.1.el9_2.x86_64
8if [ ! -d /lib/modules/${kern_ver}/build ]; then
9    echo "There is no kernel build directory. Please check if kernel-devel is installed ..."
10    exit 1
11fi
12if ! which gcc >& /dev/null; then
13    yum install -y gcc
14fi
15if ! which make >& /dev/null; then
16    yum install -y make
17fi
18# Install Build Requirement
19yum install -y perl createrepo python3-devel libtool kernel-rpm-macros gdb-headless rpm-build elfutils-libelf-devel
20# Install runtime requirement for all OFED components installation
21yum install -y tk gcc-gfortran tcsh tcl libnl3-devel cmake-filesystem
22# Install updated mlnx_ofed packages including kernel modules and userspace packages
23mkdir update_drivers
24tar xf ${mlnx_ofed_drv} --strip-components 2 -C update_drivers/
25cd update_drivers
26./mlnxofedinstall --without-fw-update  --add-kernel-support -k ${kern_ver} --skip-distro-check \
27    --package-install-options "--force" --distro rhel9.1 -q
28if [ $? -ne 0 ]; then
29    echo "MLNX OFED driver install ... Failed."
30    exit 1
31fi
32cd ..
33# 82-net-setup-link.rules cause the name of NIC changed. Then disable this rule.
34if [ -f /usr/lib/udev/rules.d/82-net-setup-link.rules ]; then
35    mv /usr/lib/udev/rules.d/82-net-setup-link.rules /usr/lib/udev/rules.d/82-net-setup-link.rules.orig
36fi
37if [ -f /usr/lib/udev/rules.d/83-mlnx-sf-name.rules ]; then
38    mv /usr/lib/udev/rules.d/83-mlnx-sf-name.rules /usr/lib/udev/rules.d/83-mlnx-sf-name.rules.orig
39fi
40# Disable rshim(tmfifo_net0)
41systemctl disable rshim.service
42rm -rf ${mlnx_ofed_drv} update_drivers
43rm -rf /tmp/MLNX* /tmp/*.conf
44# update initramfs
45dracut -f /boot/initramfs-${kern_ver}.img ${kern_ver}- If rdma-userspace-config is uninstalled in the second step, reinstall it
1wget -q http://mirrors.baidubce.com/baidu/rdma_specs/rdma-userspace-config-bbc-v1.0.3-1.el7.centos.x86_64.rpm
2rpm -ivh --nodeps --force rdma-userspace-config-bbc-v1.0.3-1.el7.centos.x86_64.rpm
3service rdma start- Reboot the instance to enter the new kernel;
- Verify the installation.
1#Check the installed 5.8-2.0.3 version and the ofed compiled under the current kernel
2[root@localhost ~]# rpm -qa | grep mlnx | grep 5.14.0_284
3mlnx-ofa_kernel-modules-5.8-OFED.5.8.2.0.3.1.kver.5.14.0_284.11.1.el9_2.x86_64.x86_64
4mlnx-ofa_kernel-devel-5.8-OFED.5.8.2.0.3.1.kver.5.14.0_284.11.1.el9_2.x86_64.x86_64
5knem-modules-1.1.4.90mlnx1-OFED.5.8.0.4.7.1.kver.5.14.0_284.11.1.el9_2.x86_64.x86_64
6[root@localhost ~]# modinfo mlx5_core
7filename:       /lib/modules/5.14.0-284.11.1.el9_2.x86_64/extra/mlnx-ofa_kernel/drivers/net/ethernet/mellanox/mlx5/core/mlx5_core.ko
8alias:          auxiliary:mlx5_core.eth-rep
9alias:          auxiliary:mlx5_core.eth
10basedon:        Korg 5.17-rc4
11version:        5.8-2.0.3
12license:        Dual BSD/GPL
13description:    Mellanox 5th generation network adapters (ConnectX series) core driver
14author:         Eli Cohen <eli@mellanox.com>
15rhelversion:    9.2
16srcversion:     E4CF39F4680CAB323741675
17...
18 #Check the network interface card
19[root@localhost ~]# ifconfig
20 #Check the network interface card driver
21[root@localhost ~]# ethtool -i ethX
22 #Check the software package dependency. If dependency package is missing, software package is duplicated, or other issues exist, manually resolve by installing missing dependency package, and removing duplicate software package, etc.;
23[root@localhost ~]# yum check
Ubuntu 20.04
For example, consider upgrading the kernel to 5.4.0-152-generic.
1. Install the kernel and kernel development package. Install the 5.4.0-152-generic version and other related components in the instance:
1apt-get install -y linux-image-5.4.0-152-generic \
2                   linux-headers-5.4.0-152 \
3                   linux-headers-5.4.0-152-generic \
4                   linux-modules-5.4.0-152-generic \
5                   linux-modules-extra-5.4.0-152-generic
2. Verify the RDMA lossless configuration package. Some instances have the RDMA lossless configuration package (rdma-userspace-config) installed. This package needs to be removed and reinstalled after installing OFED:
1# Check if rdma-userspace-config is installed
2rpm -qa |grep -i rdma-userspace-config
If the lossless configuration package is found installed, execute the command to delete it:
1If it exists, uninstall the package
2# rpm -e rdma-userspace-config
3. Download the OFED installation package. You can download it from the Baidu software repository or transfer it to the instance after downloading it from the official OFED website:
- Download from Baidu software repository: Taking the download of ofed version 5.8-2.0.3 as an example, execute the following command in the instance to download.
1wget http://mirrors.baidubce.com/mlnx-ofed/5.8-2.0.3.0/MLNX_OFED_LINUX-5.8-2.0.3.0-ubuntu20.04-x86_64.tgz- Download from the official website: Obtain the corresponding version of ofed installation package from the ofed official site
4. Compile and install ofed
Run the following script to compile and install the OFED driver. The entire process of compilation and installation takes about 30 minutes.
Note: Ensure the script and the OFED installation package are placed in the same directory, and update the OFED version and kernel version in the script to match the actual versions being used.
1#!/usr/bin/env bash
2# Update mlnx ofed drivers
3# -- Prepare mlnx ofed drivers
4# -- Extract and install
5mlnx_ofed_version=5.8-2.0.3.0
6mlnx_ofed_drv=MLNX_OFED_LINUX-${mlnx_ofed_version}-ubuntu20.04-x86_64.tgz
7kern_ver=5.4.0-152-generic
8if [ ! -d /lib/modules/${kern_ver}/build ]; then
9    echo "There is no kernel build directory. Please check if kernel-devel is installed ..."
10    exit 1
11fi
12apt-get update
13if ! which gcc >& /dev/null; then
14    apt-get -y install gcc
15fi
16if ! which make >& /dev/null; then
17    apt-get -y install make
18fi
19# Install updated mlnx_ofed packages including kernel modules and userspace packages
20mkdir update_drivers
21tar xf ${mlnx_ofed_drv} --strip-components 2 -C update_drivers/
22pushd update_drivers
23./mlnxofedinstall --without-fw-update  --add-kernel-support -k ${kern_ver} --skip-distro-check -q
24if [ $? -ne 0 ]; then
25    ECHO_ERROR "MLNX OFED driver install ... Failed."
26    exit 1
27fi
28popd
29# 82-net-setup-link.rules cause the name of NIC changed. Then disable this rule.
30if [ -f /lib/udev/rules.d/82-net-setup-link.rules ]; then
31    mv /lib/udev/rules.d/82-net-setup-link.rules /lib/udev/rules.d/82-net-setup-link.rules.orig
32fi
33if [ -f /usr/lib/udev/rules.d/83-mlnx-sf-name.rules ]; then
34    mv /usr/lib/udev/rules.d/83-mlnx-sf-name.rules /usr/lib/udev/rules.d/83-mlnx-sf-name.rules.orig
35fi
36# Disable rshim(tmfifo_net0)
37systemctl disable rshim.service
38rm -rf ${mlnx_ofed_drv} update_drivers
39rm -rf /tmp/MLNX* /tmp/*.conf
40# update initramfs
41dracut -f /boot/initrd.img-${kern_ver} ${kern_ver}- If rdma-userspace-config is uninstalled in the second step, reinstall it
1wget -q http://mirrors.baidubce.com/baidu/rdma_specs/rdma-userspace-config-bbc_1.0.4_x86.deb
2dpkg -i rdma-userspace-config-bbc_1.0.4_x86.deb
3service rdma start- Reboot the instance to enter the new kernel;
- Verify the installation.
1#Check the installed 5.8-2.0.3 version and the ofed compiled under the current kernel
2[root@localhost ~]# dpkg -l | grep mlnx | grep 5.4.0-152
3ii  knem-modules                          1.1.4.90mlnx1-OFED.5.8.0.4.7.1.kver.5.4.0-152-generic amd64        kernel module for high-performance intra-node MPI communication for large messages
4ii  mlnx-ofed-kernel-modules              5.8-OFED.5.8.2.0.3.1.kver.5.4.0-152-generic           amd64        mlnx-ofed kernel modules
5ii  mlnx-ofed-kernel-utils                5.8-OFED.5.8.2.0.3.1.kver.5.4.0-152-generic           amd64        Userspace tools to restart and tune mlnx-ofed kernel modules
6[root@localhost ~]# modinfo mlx5_core
7filename:       /lib/modules/5.4.0-152-generic/updates/dkms/mlx5_core.ko
8alias:          auxiliary:mlx5_core.eth-rep
9alias:          auxiliary:mlx5_core.eth
10basedon:        Korg 5.17-rc4
11version:        5.8-2.0.3
12license:        Dual BSD/GPL
13description:    Mellanox 5th generation network adapters (ConnectX series) core driver
14author:         Eli Cohen <eli@mellanox.com>
15srcversion:     E9B015CBD3F471BDD31CB24
16...
17 #Check the network interface card
18[root@localhost ~]# ifconfig
19 #Check the network interface card driver
20[root@localhost ~]# ethtool -i ethX
21 #Check the software package dependency. If dependency package is missing, software package is duplicated, or other issues exist, manually resolve by installing missing dependency package, and removing duplicate software package, etc.;
22[root@localhost ~]# apt-get check
Ubuntu 22.04
For example, consider upgrading the kernel to 5.15.0-75-generic.
1. Install the kernel and kernel development package. Install the 5.15.0-75-generic version and other related components in the instance:
1apt-get install -y linux-image-5.15.0-75-generic \
2                   linux-headers-5.15.0-75 \
3                   linux-headers-5.15.0-75-generic \
4                   linux-modules-5.15.0-75-generic \
5 linux-modules-extra-5.15.0-75-generic- Some instances have the RDMA lossless configuration package (rdma-userspace-config) installed. This package needs to be removed and reinstalled after installing OFED:
1#Check if rdma-userspace-config is installed
2dpkg -l |grep -i rdma-userspace-config
3 If it exists, uninstall the package
4dpkg -r rdma-userspace-config
3. Download the OFED installation package. You can download it from the Baidu software repository or transfer it to the instance after downloading it from the official OFED website:
- Download from Baidu software repository: Taking the download of ofed version 5.8-2.0.3 as an example, execute the following command in the instance to download.
1wget http://mirrors.baidubce.com/mlnx-ofed/5.8-2.0.3.0/MLNX_OFED_LINUX-5.8-2.0.3.0-ubuntu22.04-x86_64.tgz- Download from the official website: Obtain the corresponding version of ofed installation package from the ofed official site
4. Compile and install ofed
Run the following script to compile and install the OFED driver. The entire process of compilation and installation takes about 30 minutes.
Note: Ensure the script and the OFED installation package are placed in the same directory, and update the OFED version and kernel version in the script to match the actual versions being used.
1#!/usr/bin/env bash
2# Update mlnx ofed drivers
3# -- Prepare mlnx ofed drivers
4# -- Extract and install
5mlnx_ofed_version=5.8-2.0.3.0
6mlnx_ofed_drv=MLNX_OFED_LINUX-${mlnx_ofed_version}-ubuntu22.04-x86_64.tgz
7kern_ver=5.15.0-75-generic
8if [ ! -d /lib/modules/${kern_ver}/build ]; then
9    echo "There is no kernel build directory. Please check if kernel-devel is installed ..."
10    exit 1
11fi
12apt-get update
13if ! which gcc >& /dev/null; then
14    apt-get -y install gcc
15fi
16if ! which make >& /dev/null; then
17    apt-get -y install make
18fi
19# Install required packages for installing MLNX_OFED_LINUX
20apt-get install -y libnl-route-3-200 libnl-route-3-dev libnl-3-dev bison libfuse2 flex gfortran tk libnuma-dev libgfortran5
21# Install updated mlnx_ofed packages including kernel modules and userspace packages
22mkdir update_drivers
23tar xf ${mlnx_ofed_drv} --strip-components 2 -C update_drivers/
24pushd update_drivers
25./mlnxofedinstall --without-fw-update  --add-kernel-support -k ${kern_ver} --skip-distro-check -q
26if [ $? -ne 0 ]; then
27    ECHO_ERROR "MLNX OFED driver install ... Failed."
28    exit 1
29fi
30popd
31# 82-net-setup-link.rules cause the name of NIC changed. Then disable this rule.
32if [ -f /lib/udev/rules.d/82-net-setup-link.rules ]; then
33    mv /lib/udev/rules.d/82-net-setup-link.rules /lib/udev/rules.d/82-net-setup-link.rules.orig
34fi
35if [ -f /usr/lib/udev/rules.d/83-mlnx-sf-name.rules ]; then
36    mv /usr/lib/udev/rules.d/83-mlnx-sf-name.rules /usr/lib/udev/rules.d/83-mlnx-sf-name.rules.orig
37fi
38# Disable rshim(tmfifo_net0)
39systemctl disable rshim.service
40rm -rf ${mlnx_ofed_drv} update_drivers
41rm -rf /tmp/MLNX* /tmp/*.conf
42# update initramfs
43dracut -f /boot/initrd.img-${kern_ver} ${kern_ver}- If rdma-userspace-config is uninstalled in the second step, reinstall it
1wget -q http://mirrors.baidubce.com/baidu/rdma_specs/rdma-userspace-config-bbc_1.0.4_x86.deb
2dpkg -i rdma-userspace-config-bbc_1.0.4_x86.deb
3service rdma start- Reboot the instance to enter the new kernel;
- Verify the installation.
1#Check the installed 5.8-2.0.3 version and the ofed compiled under the current kernel
2[root@localhost ~]# dpkg -l | grep mlnx | grep 5.15.0-75
3ii  knem-modules                          1.1.4.90mlnx1-OFED.5.8.0.4.7.1.kver.5.15.0-75-generic amd64        kernel module for high-performance intra-node MPI communication for large messages
4ii  mlnx-ofed-kernel-modules              5.8-OFED.5.8.2.0.3.1.kver.5.15.0-75-generic           amd64        mlnx-ofed kernel modules
5ii  mlnx-ofed-kernel-utils                5.8-OFED.5.8.2.0.3.1.kver.5.15.0-75-generic           amd64        Userspace tools to restart and tune mlnx-ofed kernel modules
6[root@localhost ~]# modinfo mlx5_core
7filename:       /lib/modules/5.15.0-75-generic/updates/dkms/mlx5_core.ko
8alias:          auxiliary:mlx5_core.eth-rep
9alias:          auxiliary:mlx5_core.eth
10basedon:        Korg 5.17-rc4
11version:        5.8-2.0.3
12license:        Dual BSD/GPL
13description:    Mellanox 5th generation network adapters (ConnectX series) core driver
14author:         Eli Cohen <eli@mellanox.com>
15srcversion:     E4CF39F4680CAB323741675
16...
17 #Check the network interface card
18[root@localhost ~]# ifconfig
19 #Check the network interface card driver
20[root@localhost ~]# ethtool -i ethX
21 #Check the software package dependency. If dependency package is missing, software package is duplicated, or other issues exist, manually resolve by installing missing dependency package, and removing duplicate software package, etc.;
22[root@localhost ~]# apt-get check