
Deploy SSL Certificate on Baidu Cloud Compute - Tomcat
Install JKS format certificate
You can install the downloaded certificate on a Tomcat server. Tomcat supports certificates in both PFX and JKS formats. Choose the format compatible with your Tomcat version. This guide explains the steps to install a JKS format certificate.
Background
In this example, the certificate used is named domain.com. If the certificate file is domain.com.jks (for JKS or PFX format certificates deployed on Baidu AI Cloud), enter its unzip password.
Operation guide
- Log in to the Baidu AI Cloud SSL certificate console.
- On the SSL certificate page, locate the certificate to be downloaded and click View Certificate at the bottom right of the certificate entry
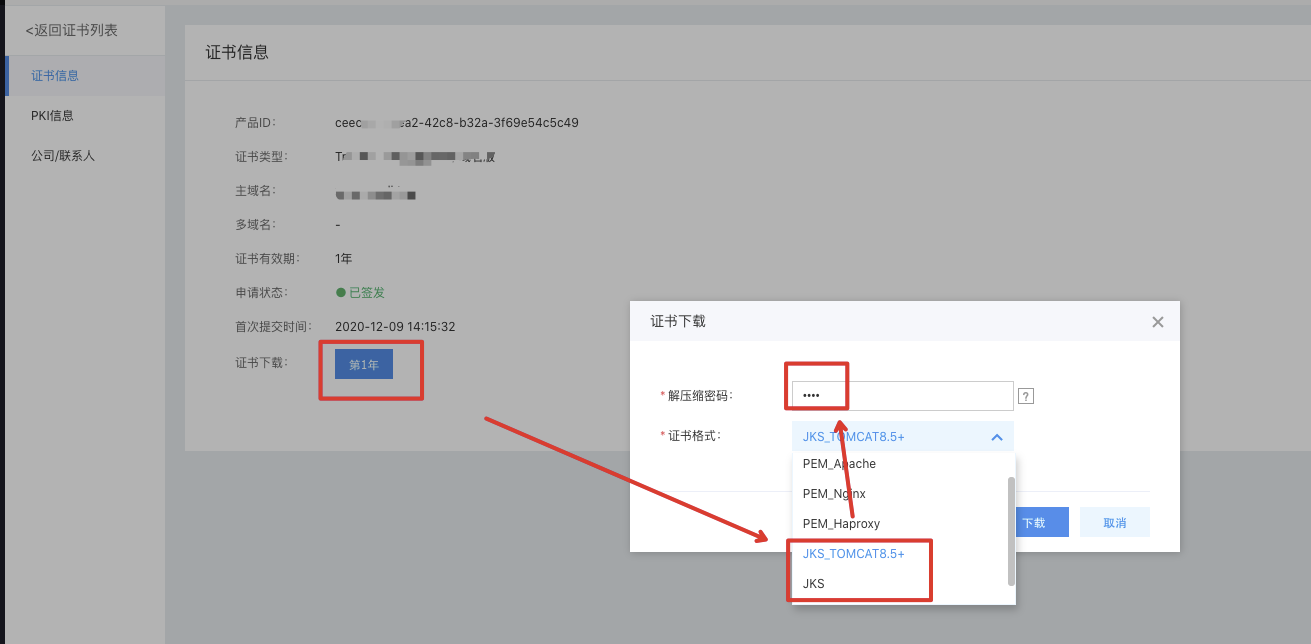
- Once open, click on the "Certificate Download" dialog, select the JKS format, and enter the unzip password for the certificate.
- Create a cert directory under the Tomcat installation directory and copy the certificate files into it
- Navigate to the Tomcat installation directory > conf folder > server.xml file. Locate the <Connector port="8443" tag in server.xml and modify it as necessary.
Refer to the following complete configuration (modify the port attribute as needed): <Connector port="443" protocol="HTTP/1.1" SSLEnabled="true" scheme="https" secure="true" keystoreFile="cert/domain.jks" #keystoreFile represents the path to the certificate file. Replace domain with your certificate filename. keystoreType="PKCS12" keystorePass="Certificate Password" #Replace "Certificate Password" with the password from your certificate password file. clientAuth="false" SSLProtocol="TLSv1+TLSv1.1+TLSv1.2" ciphers="TLS_RSA_WITH_AES_128_CBC_SHA,TLS_RSA_WITH_AES_256_CBC_SHA,TLS_ECDHE_RSA_WITH_AES_128_CBC_SHA,TLS_ECDHE_RSA_WITH_AES_128_CBC_SHA256,TLS_RSA_WITH_AES_128_CBC_SHA256,TLS_RSA_WITH_AES_256_CBC_SHA256"/>
- Save the changes made to the server.xml file.
- (Optional) Configure the web.xml file to enforce redirection from HTTP to HTTPS.
Add the following content after < /welcome-file-list >:
1<login-config>
2   <!-- Authorization setting for SSL -->
3   <auth-method>CLIENT-CERT</auth-method>
4   <realm-name>Client Cert Users-only Area</realm-name>
5</login-config>
6<security-constraint>
7    <!-- Authorization setting for SSL -->
8    <web-resource-collection>
9        <web-resource-name>SSL</web-resource-name>
10        <url-pattern>/*</url-pattern>
11    </web-resource-collection>
12    <user-data-constraint>
13         <transport-guarantee>CONFIDENTIAL</transport-guarantee>
14    </user-data-constraint>
15</security-constraint>- Restart Tomcat.
- Verify the configuration.
After installing the certificate, test its success by accessing the domain name associated with the certificate.
Enter the address https://domain:port in browser, and replace domain with the domain name bound to the certificate. By default, it can be omitted in case of 443 port. If a green lock icon appears in the address bar, it indicates the certificate has been successfully installed.
Confirm whether the certificate has been successfully installed. If the website is inaccessible via HTTPS, verify whether port 443 on the server is open and not blocked by additional tools.