NodeGroup Management
Overview
This document describes how to create, view, manage, and delete node groups in a cluster via the Cloud Container Engine (CCE) console. For related concepts and usage limitations, refer to Node group Introduction.
Create node group
- Sign in to the Baidu AI Cloud Cloud Container Engine (CCE) Console, click Cluster Management > Cluster List in the left navigation bar to enter the Cluster List page, click the Cluster Name to enter the Cluster Management page.
- Click Node Group in the left-hand navigation bar to access the Node Group List page.
- Click the Create Node Group button or the Create Now link to navigate to the Node Group Creation page.
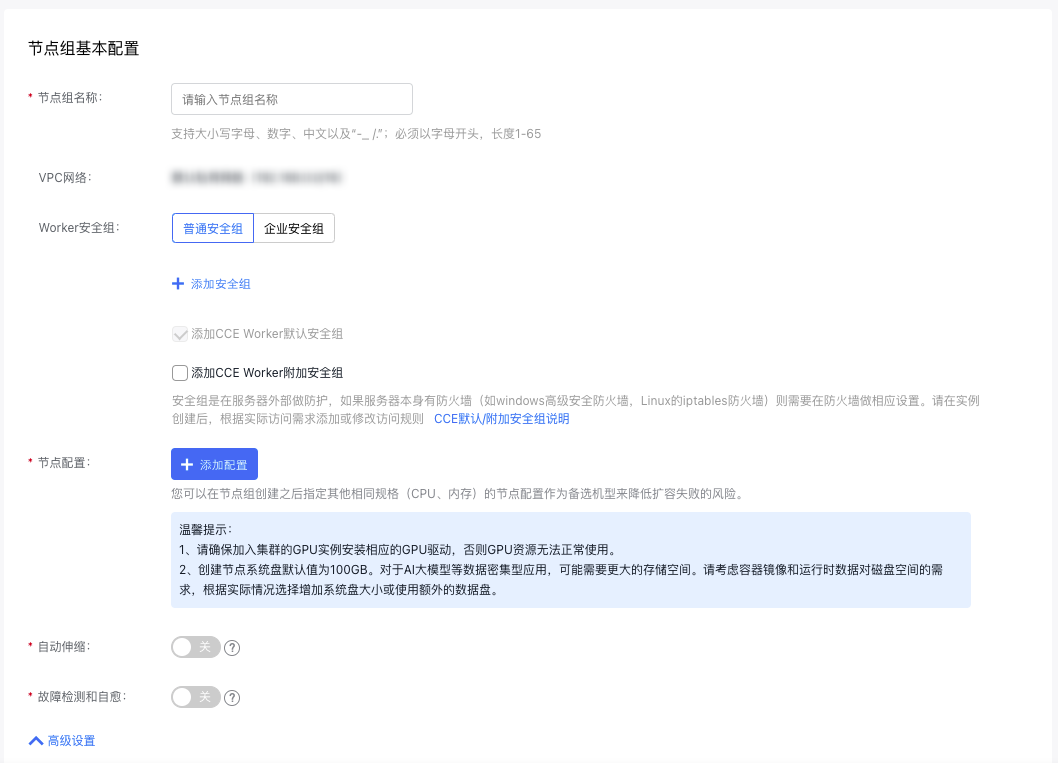
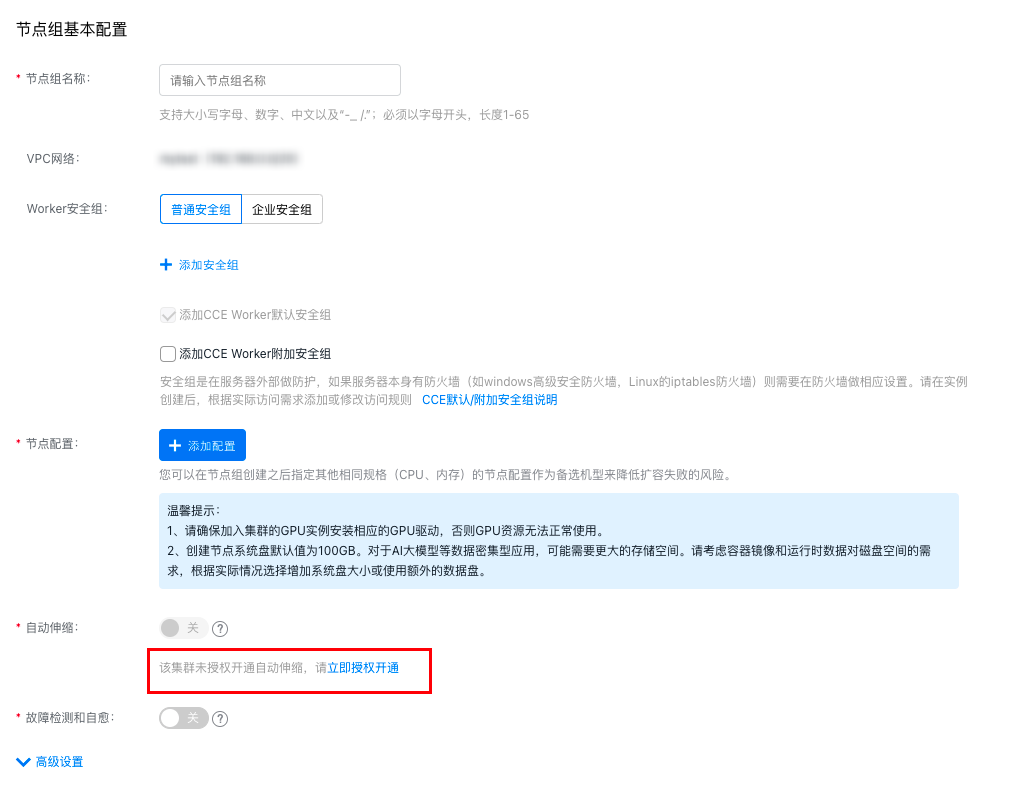
- Fill in the basic node group configuration. The configuration items and descriptions are as follows:
- Node group information
| ConfigMap | Description |
|---|---|
| Name of node group | The custom name supports a mix of uppercase and lowercase letters, numbers, Chinese characters, and -_/ special characters. It must start with a letter and be 1 to 65 characters long. |
| VPC network | The cluster’s default network is the VPC network, and it cannot be changed. |
| Worker security group | Support the configuration of "Use Default Security Group" and "Use Custom Security Group". If the default security group is used, the current security group of the cluster is bound. If it is unsuitable, you can customize a security group. After instance is created, add or modify access rules based on actual access requirements. Refer to CCE Default/Additional Security Group Description. |
- Node configuration: Subsequent node group scaling will use this configuration as the template for creating nodes.
| ConfigMap | Description |
|---|---|
| Node type | Choose as needed. Currently supported options include Baidu Cloud Compute (BCC), Elastic Bare Metal Compute (EBC), and Baidu Bare Metal Compute (BBC). |
| Bill type | Choose as needed: Currently supported payment methods are postpay, prepay, and spot instances. |
| Availability zone | An availability zone (AZ) is a physical area within a region that features independent power and network infrastructure, isolating any faults to a single AZ. It is used for filtering subnets available within a specific zone. |
| Node subnet | Choose the subnet to assign IP addresses to nodes. The available subnets differ across various availability zones. |
| Instance configuration | Based on different CPU-to-memory ratios, Baidu Cloud Compute offers various types of instance family. For specifications and applicable scenarios, refer to Specification. |
| Image types and OS | Choose the appropriate image type and operating system as per your actual requirements. |
| System disk | Used for OS installation. Non-heterogeneous computing instances with Linux as the operating system default to 20 GB; if using Windows, the default is 40 GB. Heterogeneous computing instances default to 40 GB regardless of the operating system. Available cloud disk types depend on the region and specifications and are displayed on the interface. |
| Data disk | It refers to the mounted data disk, used to increase the storage capacity of Baidu Cloud Compute and unselected by default. There is an upper limit to the count of cloud disk servers that can be mounted. If you wish to mount cloud disk servers beyond this limit, submit a ticket to contact us. Currently, both the system disk and data disk of Baidu Cloud Compute are Cloud Disk Servers (CDS). For details on the disk type and usage limitations of CDS, please refer to Disk Type and Usage Limitations. |
| Bind snapshot policy | Snapshot strategy binding is disabled by default. Through snapshot, you can realize disk data backup, disk data recovery and disk image creation. For more snapshot usage and limitations, please see Snapshot Usage Instructions. Snapshot is currently a paid service. Please refer to Snapshot Charge Instructions. |
| Public IP address | To enable public network access, purchase an EIP or bind an existing EIP after the instance purchase is successful. Public network bandwidth can be purchased in the following ways: |
| Instance name | You can either customize the instance name or allow the system to generate it randomly. |
| Domain switch | If enabled by the user, the hostname will include a domain suffix to support DNS resolution. |
| Administrator user name | For Windows systems, the administrator account is "Administrator," while for Linux systems, it is "root.\ |
| Administrator password | The available methods for setting passwords vary depending on the instance's operating system. |
| Count | The number of nodes you input represents the initially desired node count. The limits are as follows: |
| Deployment group | When creating Baidu Cloud Compute instances in a designated deployment group, they are distributed across physical servers with other Baidu Cloud Compute instances in the same deployment group, to ensure high availability of service during hardware failures. For specific settings, refer to Deployment Group. A maximum of 2 deployment groups can be added into an instance. |
| Auto scaling | Enable auto-scaling, and the system will automatically increase capacity based on conditions, node configurations, and auto-scaling settings. It will also calculate costs and generate orders automatically. Post-scaling, you can manually review node and order details. |
| Failure detection and self-healing | Supports node failure detection with customizable self-healing rules. |
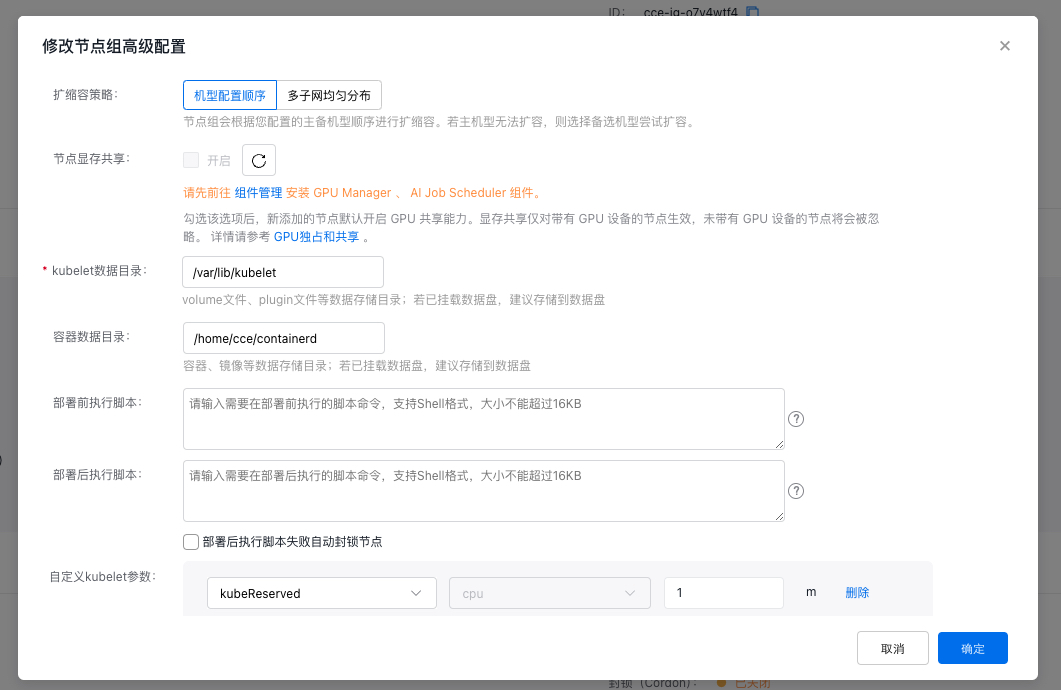
- Advanced configuration
| ConfigMap | Description |
|---|---|
| Scaling strategy | |
| Node memory sharing | By default, it is unchecked. When this option is checked, GPU sharing function is enabled for newly added nodes by default. Memory sharing applies only to nodes with GPU devices; nodes without GPUs will be ignored. For details, please refer to GPU Exclusive and Shared Type. |
| Kubelet data directory | Storage directories for volume files, plugin files, etc., include paths such as /var/lib/kubelet. |
| Container data directory | Storage directories for containers and images. Configure paths like /home/cce/containerd for container and image storage. |
| Pre-deployment execution script | This script will automatically run before node deployment. Ensure the script supports reentrancy and includes retry logic. The script content and logs generated will be saved in the node’s /usr/local/cce/scripts/ directory. |
| Post-deployment execution script | This script will automatically run after node deployment. You must manually verify the script's execution status. The script content and logs generated will be saved in the node’s /usr/local/cce/scripts/ directory. |
| Custom kubelet parameters | Support custom configuration of kubelet parameters. For details, refer to Custom Kubelet Parameters. |
| Block a node | Node blocking is disabled by default. When enabled, the node enters a non-schedulable state, and new Pods will not be assigned to it. To uncordon a node, execute the kubectl uncordon command. Blocking nodes reduces the cluster's remaining available resource quota and may affect the scheduling of future services and the performance of current ones if the reserved resources are insufficient. |
| Resource labels | Resource labels allow you to categorize cloud resources by various criteria (such as purpose, owner, or item). Each label consists of two part: key and value. For specific settings, please refer to Label Function. |
| IAM role | Set an IAM role for Baidu Cloud Compute instances. For details, refer to Set IAM Role. |
| Labels | K8S labels are identifiers for managing and selecting K8S objects and will be automatically bound to created nodes in a node group. Each label consists of two parts: key and value. For more information, refer to K8S Label Description. |
| Taints | Node taints and pod tolerations work in conjunction. After setting taints on a node, pod scheduling onto the node can be prevented, or pods can be evicted from the node. Unless the pod tolerations can match the node taints. For details, refer to Taints and Tolerance Description. |
| Annotations | Annotations are a mechanism for attaching non-identifying metadata to objects. Each annotation consists of two parts: key and value. For details, refer to Annotation Description. |
- Click the Finish button to complete node group creation.
View node group
- After completing the process, return to the node group list to view the node group.
- The node group list displays the following information:
| Column name | Description |
|---|---|
| Name of node group/ID | The node group ID, as a unique identifier for the node group, can be used to locate specific nodes in the cluster node list. |
| Bill type | The default billing method is post-pay. |
| Instance configuration | Details of the selected node configuration, including specifications and type, are shown during node group creation. |
| Actual node count | You can check the actual number of ready nodes, their statuses, and scaling progress in the node list. |
| Desired node count | The node count specified during node group creation reflects the desired number of available nodes maintained in the group. |
| Auto scaling range | When auto-scaling is enabled, the scaling range is displayed, and the desired node count adjusts automatically within this range. |
| Failure detection and self-healing | If failure detection and self-healing are activated, you can view the rules for self-healing failures. |
| Creation time | Time taken to create a node group. |
Configure auto scaling
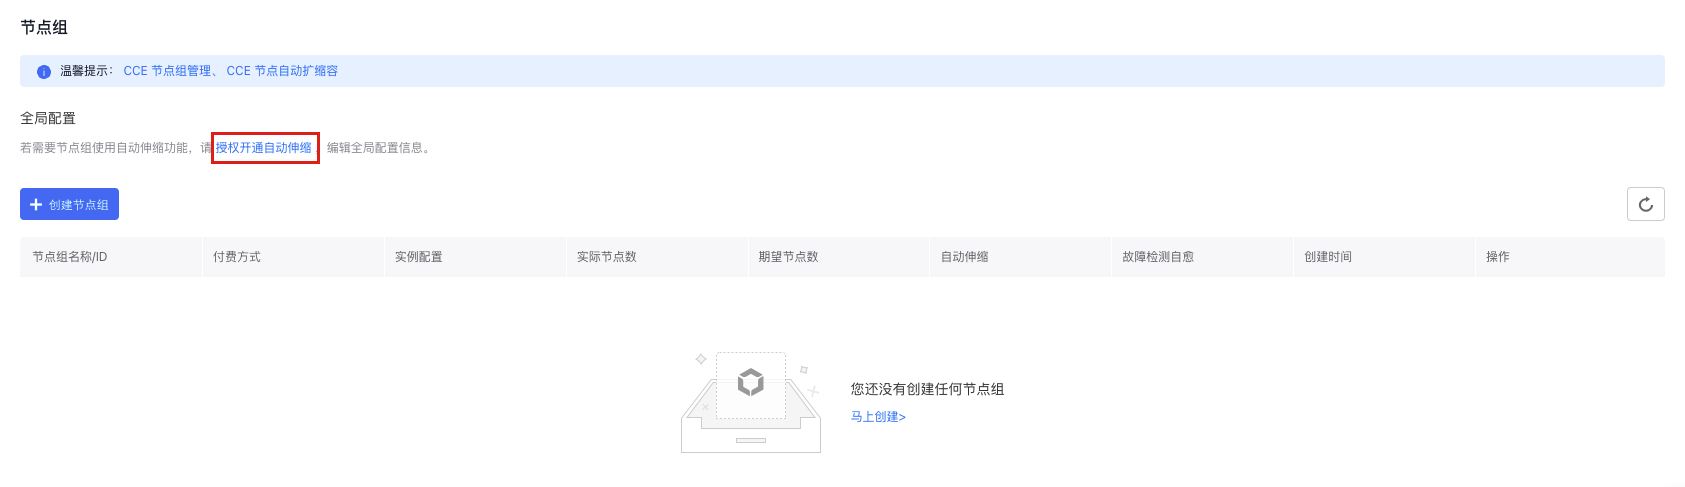
Step 1: Enable auto scaling
When using the node group function for the first time, you must obtain the Authorization to Enable Auto Scaling before activating the auto scaling function. You can enable auto scaling by clicking Authorization to Enable Auto Scaling in the Global Configuration module of the node group list, or enable it when creating a node group for the first time.
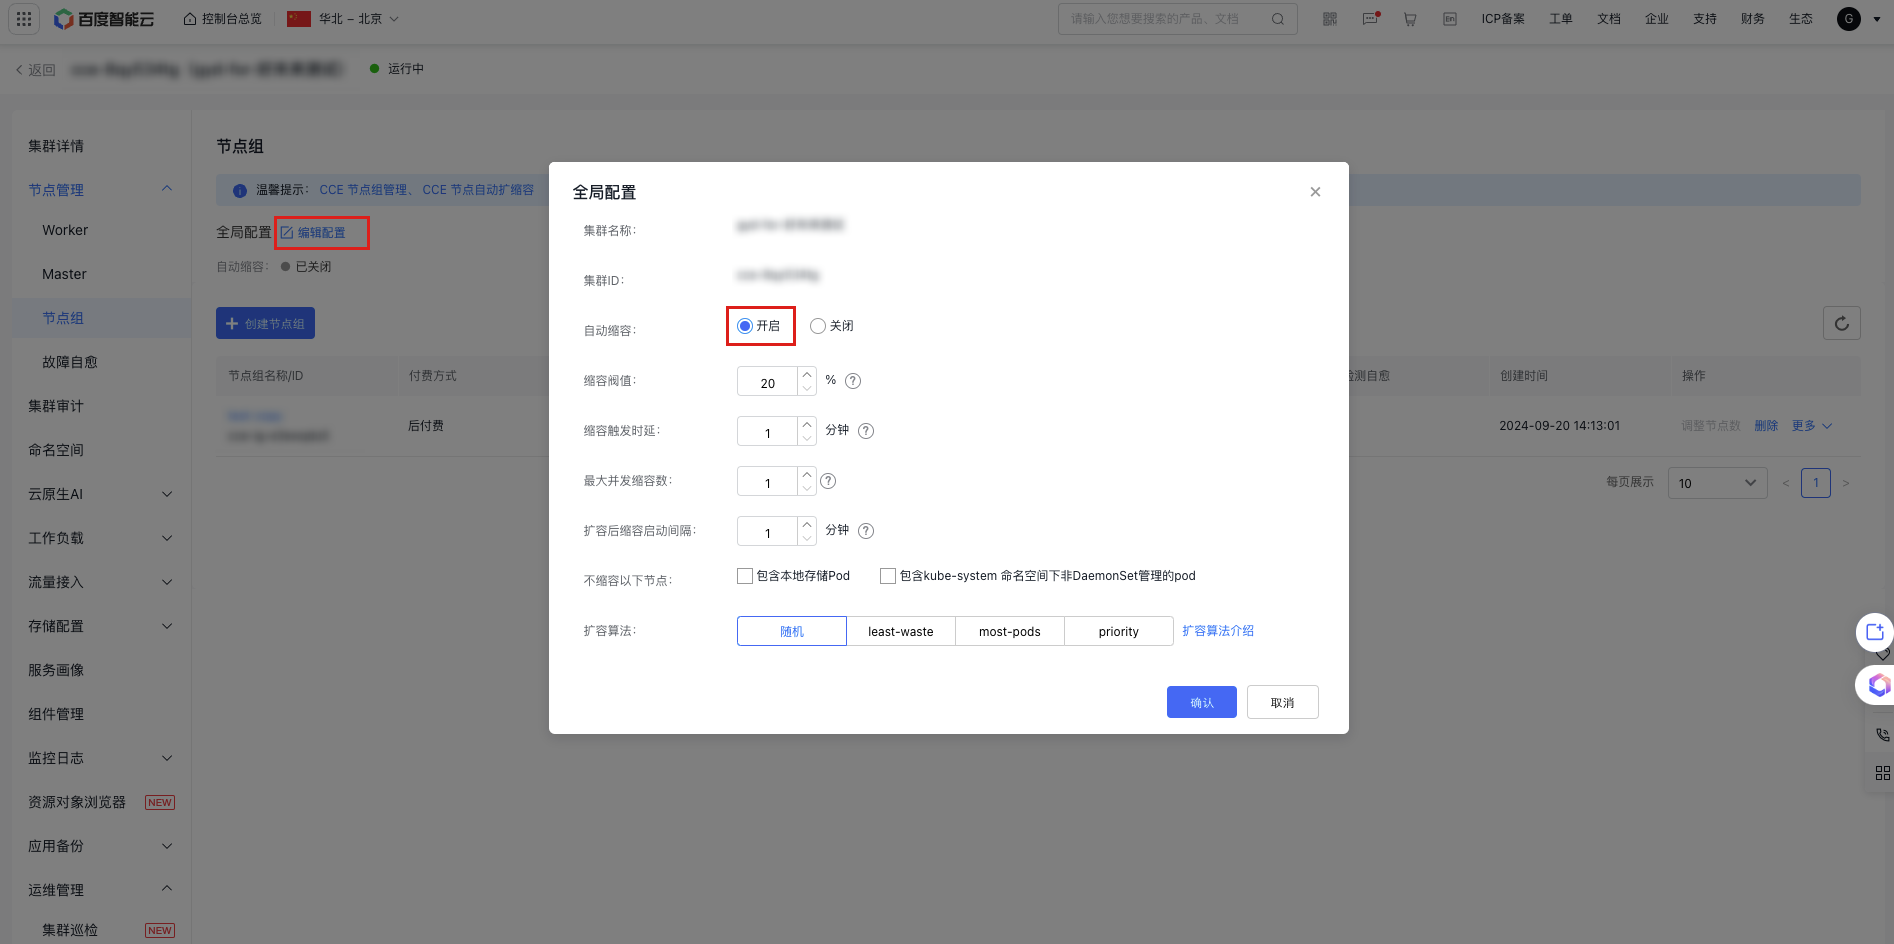
Step 2: Global configuration
After obtaining the authorization to enable auto scaling, click Edit Configuration in the Global Configuration module of the node group list to enable auto scale-down and configure scaling algorithms in the pop-up window. This configuration will be applied to all node groups that auto scaling is enabled in the cluster. The relevant configuration items and descriptions are as follows:
| ConfigMap | Optional | Description |
|---|---|---|
| Auto scale-down | Scale-down threshold | The cluster may automatically scale down when the resource utilization rate (CPU, GPU, memory) of the nodes in the scaling group falls below the defined threshold. Default range: 20–80. |
| Scale-down trigger latency | If node resource usage stays below the scale-down threshold for the specified scale-down trigger delay, the cluster may begin automatic scale-down. Default range: 1–60. | |
| Maximum concurrent scale-down count | The number of nodes that can be scaled down simultaneously when node utilization drops to 0. Default range: 1–20. | |
| Scale-down start interval after scale-up | After scaling up, newly created nodes will be assessed for scale-down potential once this interval is over. Default range: 1–60. | |
| Do not scale down the following nodes | Includes locally-stored pods, even those not managed by DaemonSet under the kube-system namespace. | |
| Scale-up algorithm | Random | For details, see Scale-up Algorithm Introduction. |
| least-waste | ||
| most-pods | ||
| priority |
Step 3: Auto scaling configuration
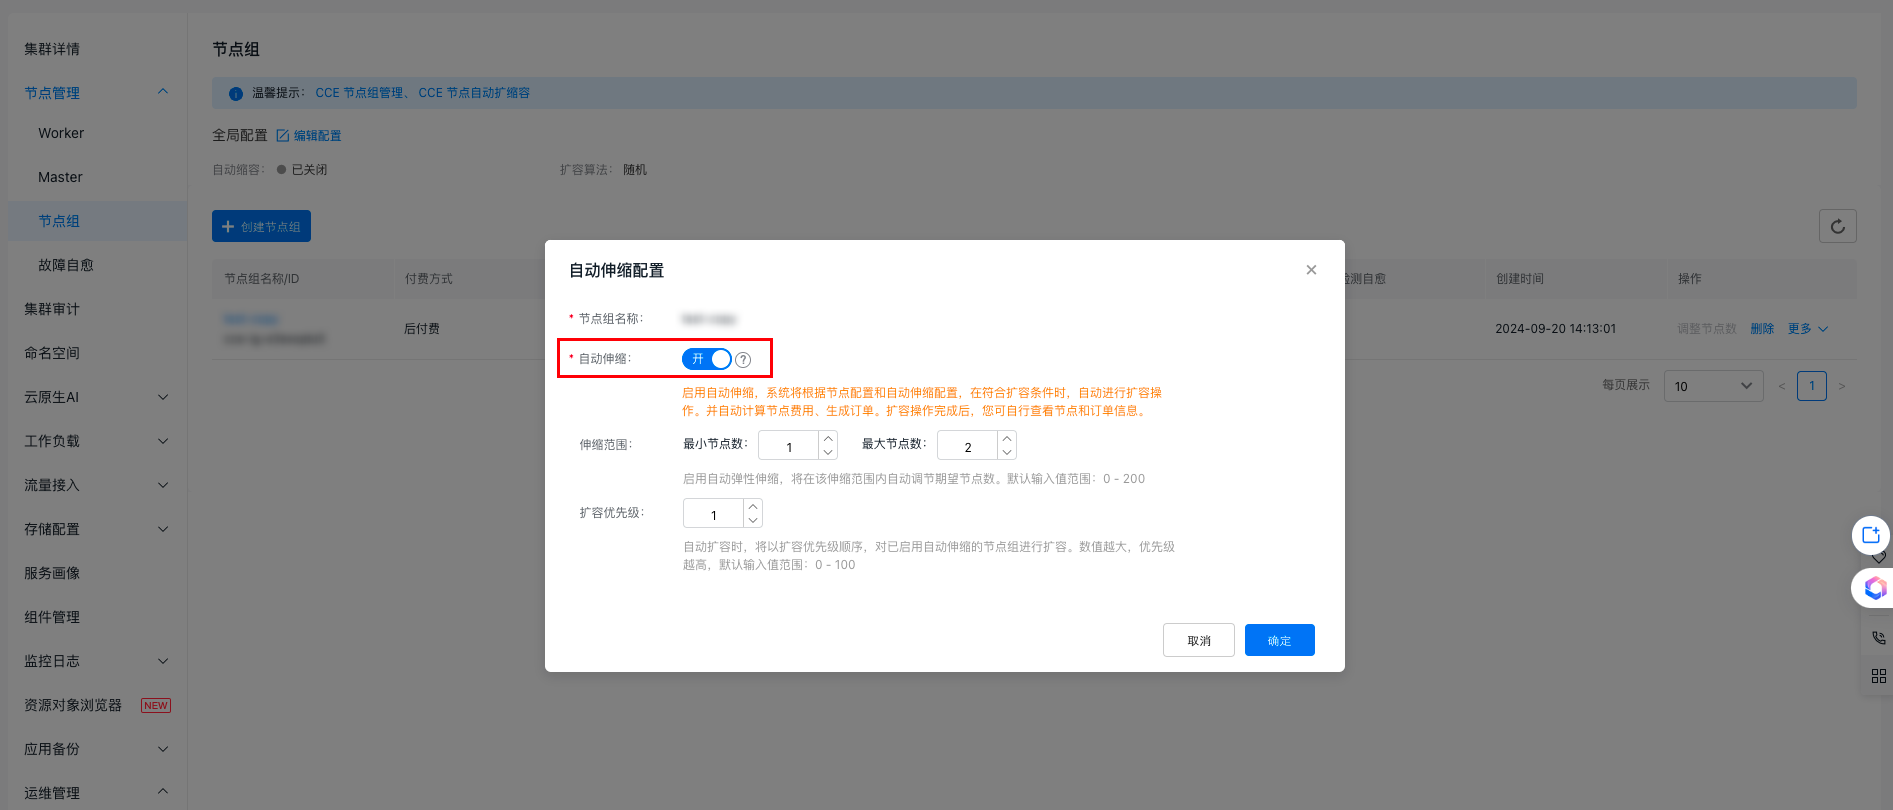
Once authorization is granted to enable auto scaling, you can activate or deactivate the auto scaling feature for a node group while creating or editing the node group from the list page. You can then set up relevant auto scaling strategies. These steps explain how to configure auto scaling for an existing node group.
- On the node group list page, locate the target node group and click More > Auto Scaling Configuration in the operation column.
- In the auto scaling settings pop-up window, enable auto scaling and define the scaling range and priority.
| ConfigMap | Description |
|---|---|
| Scaling range | When auto scaling is activated, the desired node count will be automatically adjusted within the specified range. You can input the minimum and maximum desired node counts. |
| Scale-up priority | Node groups with auto scaling enabled will scale up according to their set priority. A higher priority value denotes greater precedence. |
Adjust node count
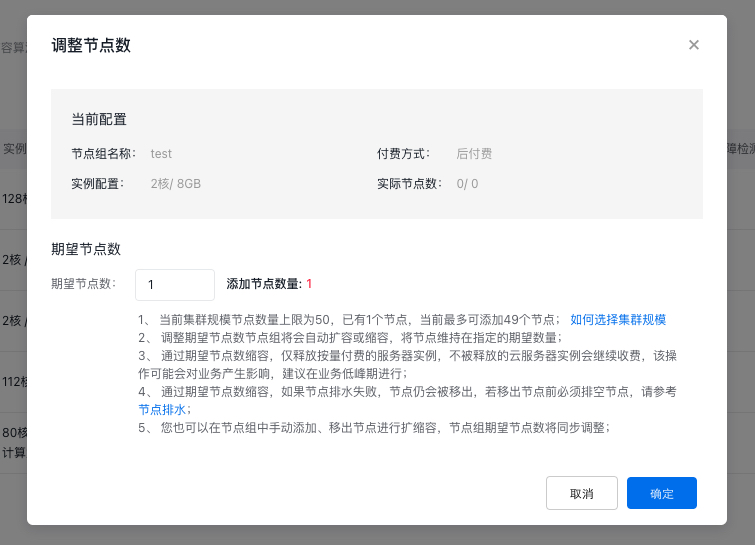
Adjusting node count manually means changing the desired node count in the node group to scale up or down.
- On the node group list page, locate the target node group requiring count adjustment, and click Adjust Node Count in the operation column.
- Enter the desired node count in the node group adjustment pop-up window, then click OK to adjust the expected node count of the node group.
Description:
- If auto scaling is active, manual adjustments to the desired node count won't be allowed when scaling conditions are met. CCE will automatically manage the count within the scaling range.
- To stop automatic desired node adjustments, disable auto scaling in the configuration first, then modify node counts manually.
The desired node count doesn't represent the number of new nodes. For instance, if a node pool with 3 nodes is scaled up with a desired node count of 5, the system will add 2 additional nodes, not 5.
- A single node group can accommodate up to 1,000 nodes.
- A maximum of 500 nodes can be adjusted per operation.
- The scaling limit depends on the total number of remaining IPs across the subnets in the node group and the model inventory.
Edit node group advanced configuration
After a node group is created, the CCE Kubernetes Cluster allows certain adjustments to the node group configuration through the console.
Description:
The operation of editing advanced configuration of node groups doesn't affect existing nodes or service operations within the node group. > After updating node group configuration, modifications will only apply to new nodes, and not affect the configuration of existing nodes in the node group, except for explicitly stated scenarios (e.g. synchronized update of labels, taints or annotations for existing nodes). > After updating the node group configuration, new nodes in the node groups will use this configuration by default. > To update node group configurations, refer to this step. If you have made modifications to the nodes through other means, these modifications will be overwritten during node group upgrade. > After checking the option to synchronize updates of labels, taints, and annotations for existing nodes, adding or modifying labels, taints or annotations in the node group will automatically apply to both new and existing nodes. Meanwhile, modifying labels and taints on existing nodes will refresh node configuration along with the node group configuration. > When the option to synchronize updates for labels, taints, and annotations on existing nodes is disabled, any additions or modifications to those parameters in the node group will only apply to new nodes. Changes made on existing nodes will take precedence and won't be affected by subsequent updates from the node group's configuration.
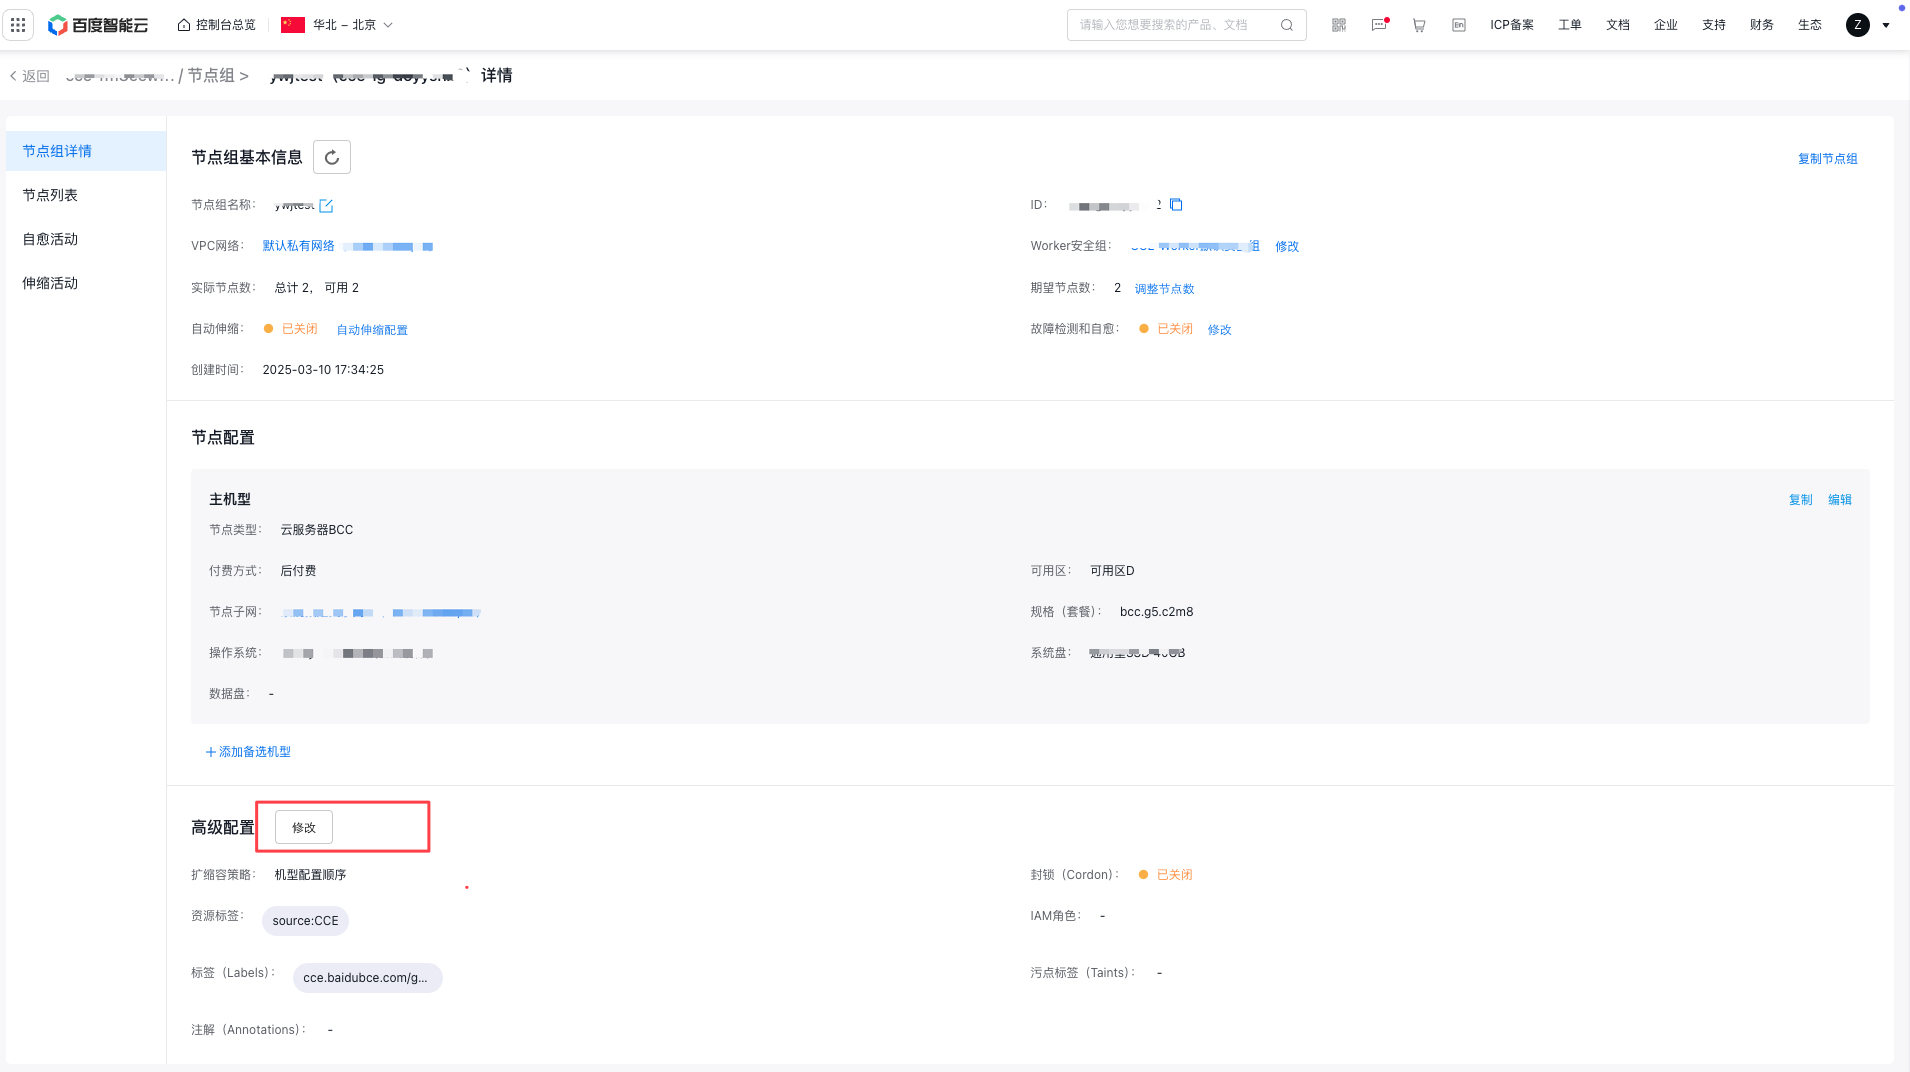
- Go to the node group list page, locate the target node group, and click its Node Group Name/ID to access the details page for removing nodes.
- On the node group details page, click Modify under advanced configuration to edit the advanced configuration items of node group and follow the prompts to complete the configuration.
Duplicate node group
The CCE console offers a simple way to replicate the configuration of an existing node group to create new ones based on this setup.
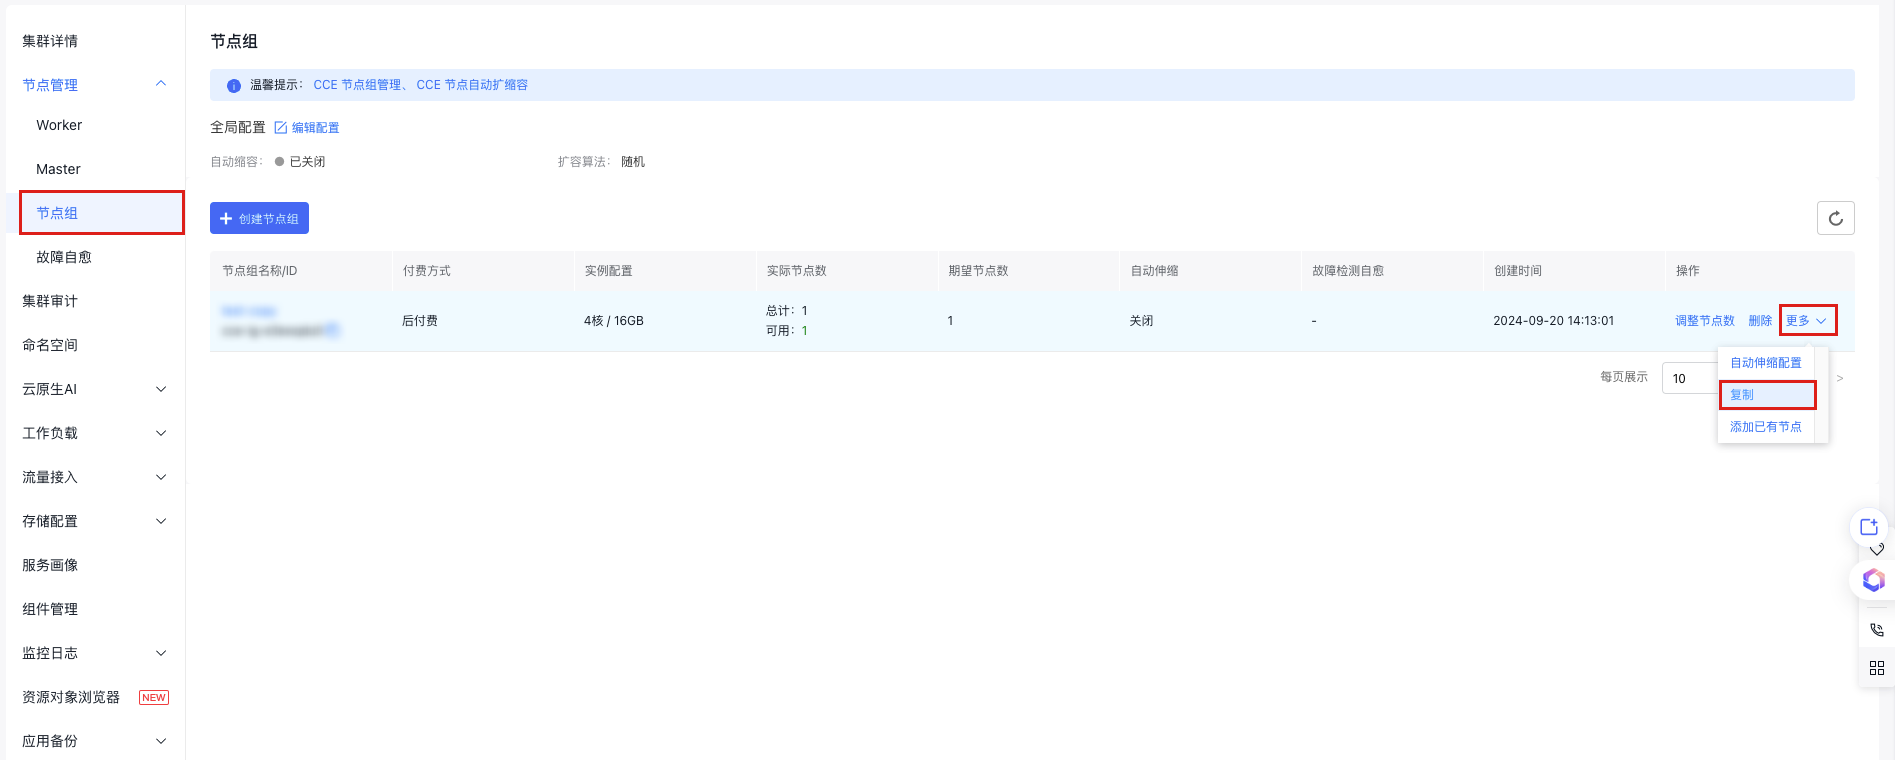
-
On the node group list page, locate the target node group to be replicated and click More > Replicate in the operation column.
- On the replicate node group page, you can view the configuration of replicated node group and modify it as needed. After confirming the configuration, click Complete to finish the replication of node group.
Delete node group
When deleting a node group, you can decide whether to keep/remove/delete nodes and whether to release the pay-as-you-go public IP or cloud disk attached to the instance based on your needs.
Note: The deleted node groups cannot be recovered. Please make data backup and proceed with caution.
- On the node group list page, locate the target node group to be deleted, and click Delete in the operation column.
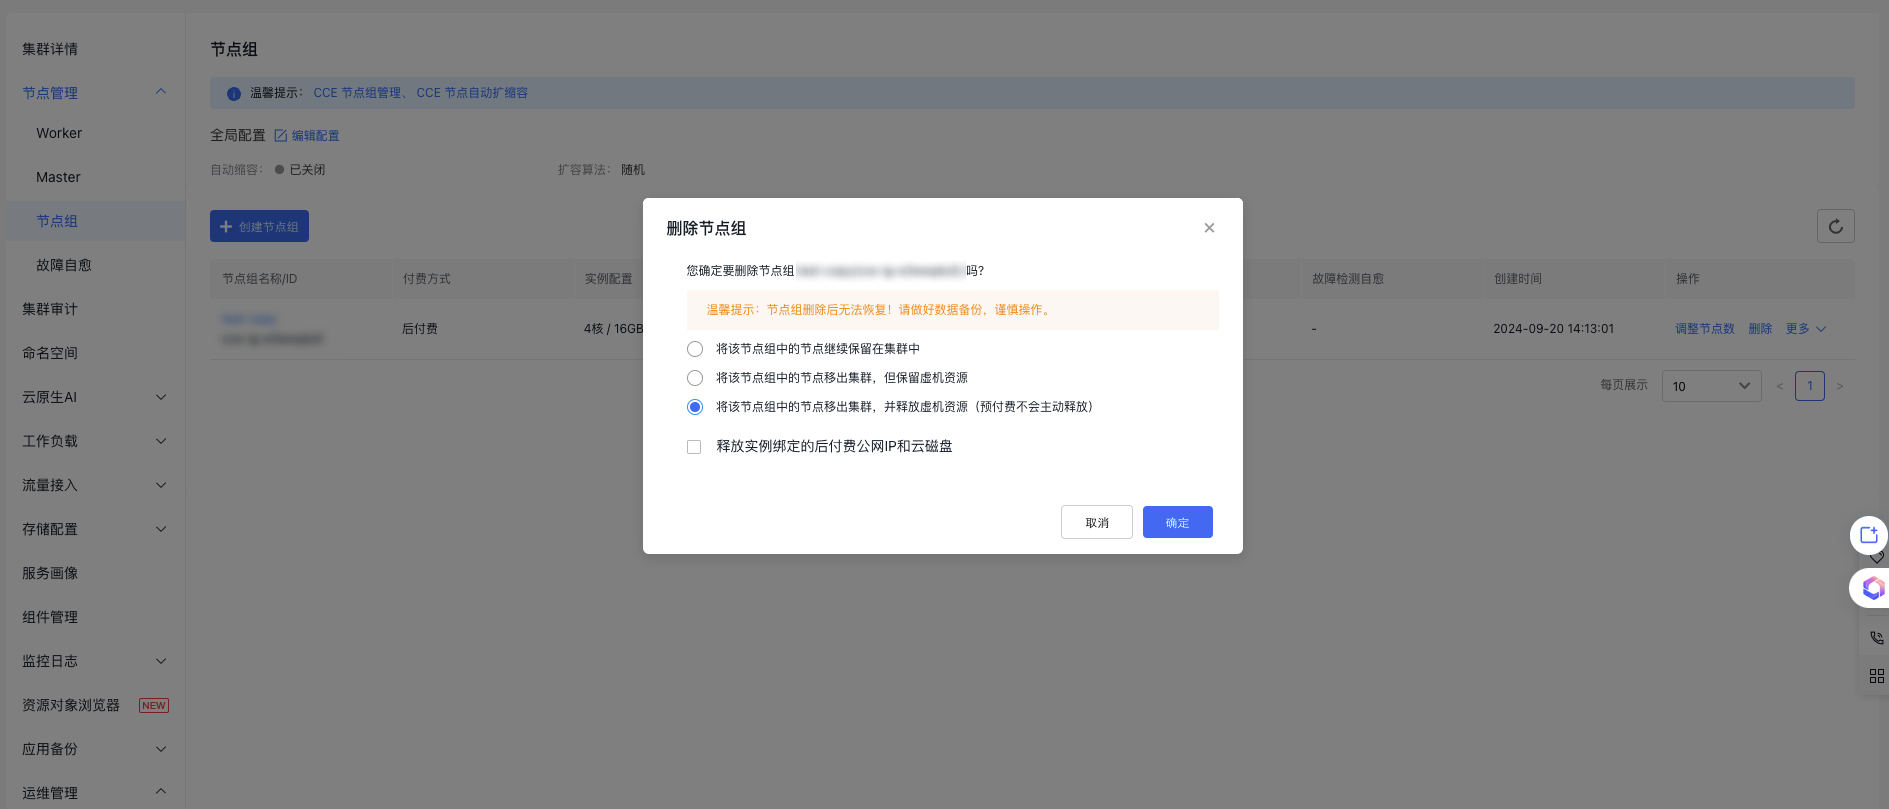
-
In the "Delete Node Group" pop-up, decide whether to keep, remove, or delete the nodes in this group, as well as whether to release the associated pay-as-you-go public IP and cloud disk server bound to the instance. When deleting a node group, you can perform the following actions:
- Keep the nodes in this node group in the cluster
- Remove nodes in this node group from the cluster, but retain the virtual machine resources
- Remove nodes in this node group from the cluster and release virtual machine resources (prepaid resources will not be automatically released)
- Release the postpay public IP and cloud disk server bound to the instance
Remove node
Note:
- Before using the node group feature, nodes that pre-existed in the cluster or were added through scale-up (not via the node group method) do not belong to any node group and are managed separately under "Node Management > Node List.\
- Removal of nodes from the cluster Node Group Management > Node List is performed with the nodes as object. This follows the operation logic of current node and does not affect the desired node count of node group. The node group will automatically adjust the node count based on the current desired count.
- Removing nodes from Node Management > Node Group > Node List will reduce the desired node count of the corresponding node group.
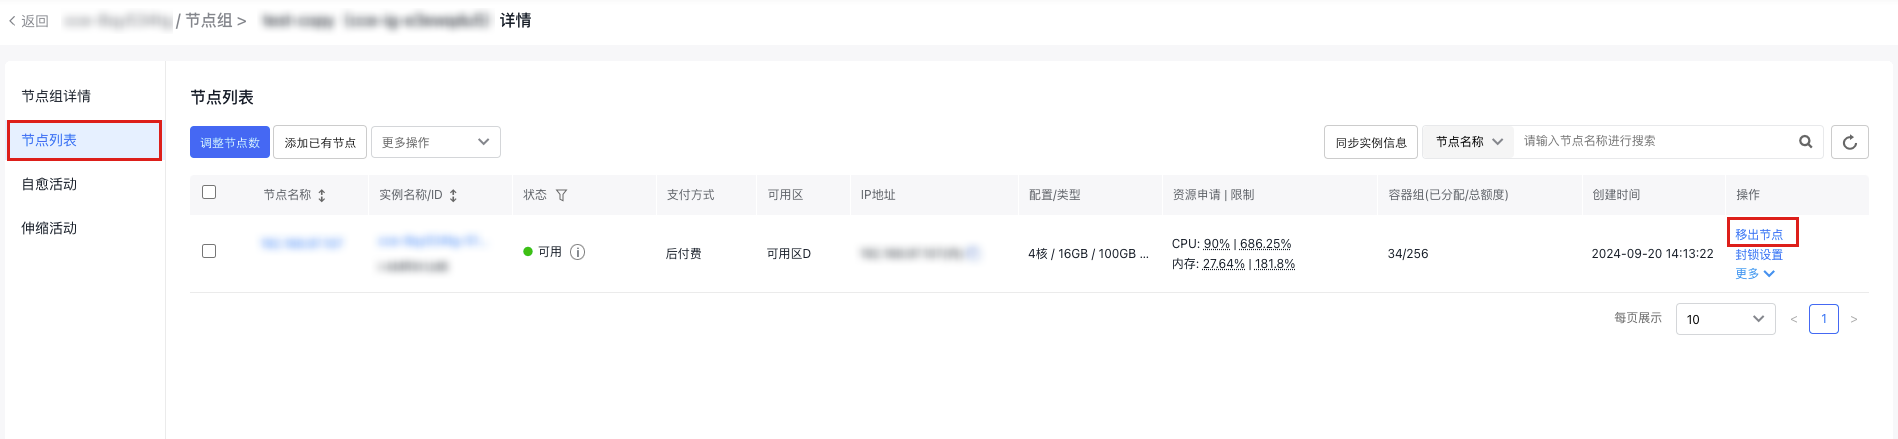
- On the node group list page, locate the target node group from which nodes need to be removed, and click the Node Group Name/ID to enter the Node Group Details page.
- In the left navigation bar, select Node List to view all nodes in the current node group.
- Locate the node to be removed from the node group, and select Remove Node in the operation column. To remove multiple nodes at the same time, you can check multiple nodes on the current page and then click More Operations > Remove Nodes at the top to perform the removal operation.
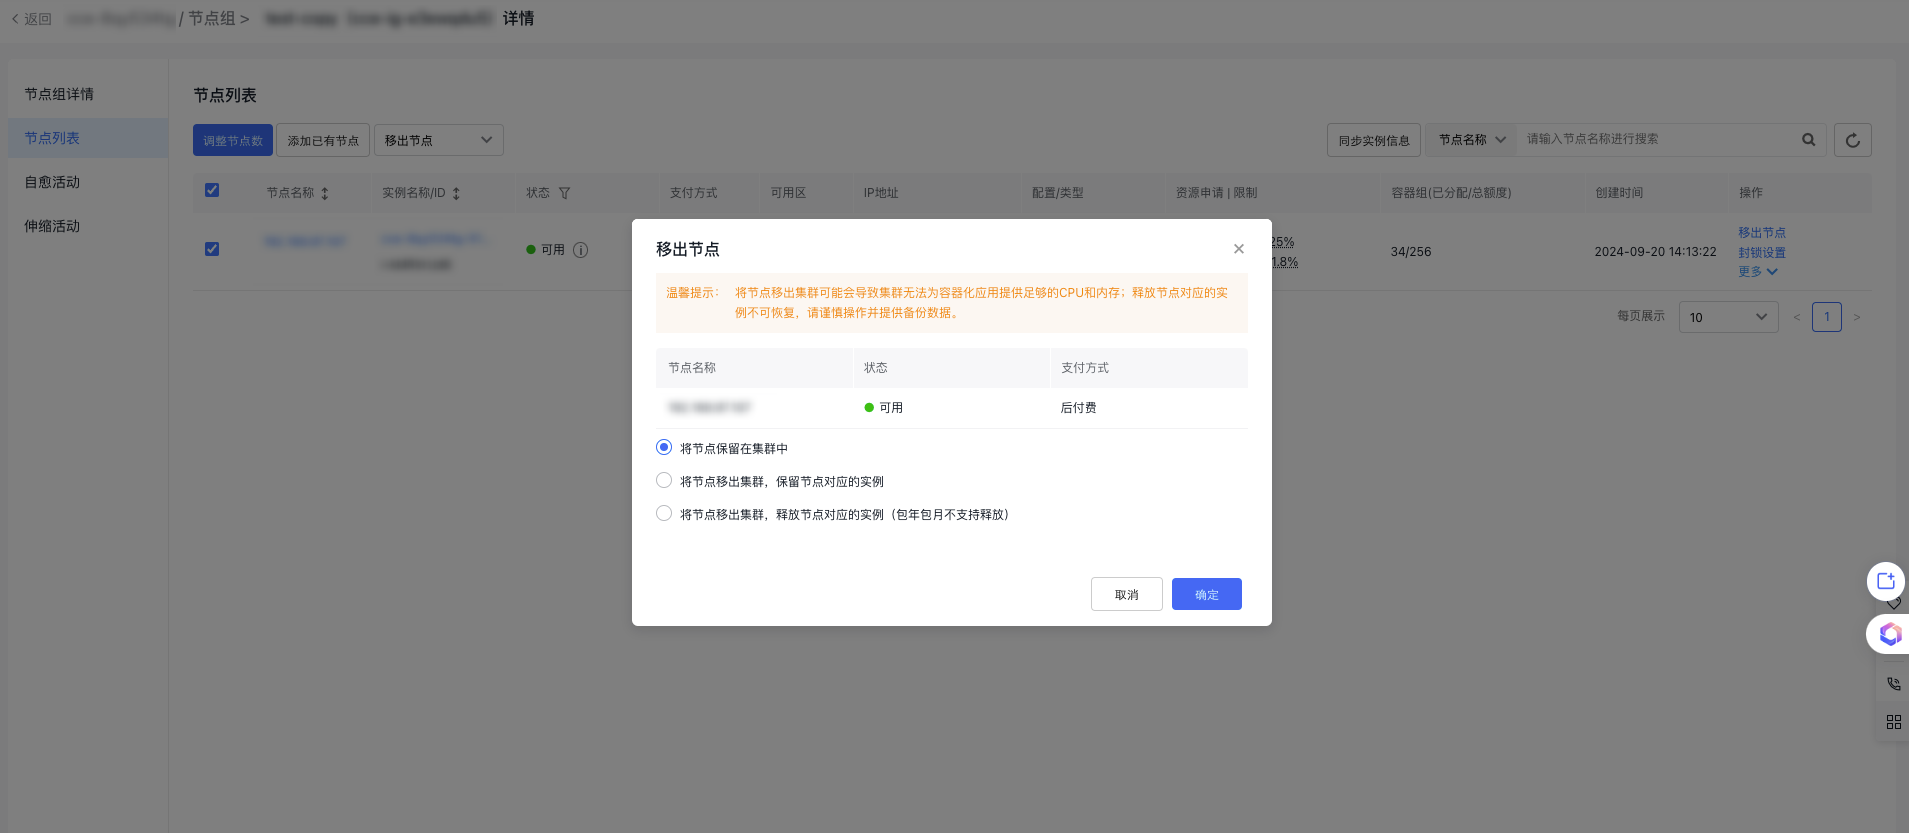
-
In the "Remove Node" pop-up, decide whether to retain or release the node from the cluster and whether to keep or release the corresponding instance of the node.
- Keep the nodes in this node group in the cluster
- Remove nodes in this node group from the cluster, but retain the virtual machine resources
- Remove nodes in this node group from the cluster and release virtual machine resources (prepaid resources will not be automatically released)
- Release the postpay public IP and cloud disk server bound to the instance
- Click OK. These nodes are now removed from the node group.