
Using Cloud File System
The Cloud Container Engine (CCE) supports the use of Baidu AI Cloud’s Cloud File System (CFS) by creating PV/PVC and mounting data volumes for workloads. This document will introduce how to dynamically and statically mount cloud file system in a cluster.
Usage restrictions
- The CFS instance and the mount target you create must reside in the same VPC as the cluster nodes.
Prerequisites
- Create a CFS instance. For specific operations, please refer to Create File System.
- Add a CFS mount target. For specific operations, please refer to Add Mount Target.
- Obtain the CFS instance domain name of a mount target. For specific operations, please refer to Obtain a Domain Name of a Mount Target.
Operation steps
This document uses the example address cfs-test.baidubce.com as the CFS mount target.
Dynamically mount CFS via PV/PVC
Method I: Operation via kubectl command line
1. Create StorageClass and Provisioner
The file dynamic-cfs-template.yaml serves as a YAML template containing details of the cluster resources to be created.
The content of the dynamic-cfs-template.yaml file is as follows:
1kind: ClusterRole
2apiVersion: rbac.authorization.k8s.io/v1
3metadata:
4  name: nfs-client-provisioner-runner
5rules:
6  - apiGroups: [""]
7    resources: ["persistentvolumes"]
8    verbs: ["get", "list", "watch", "create", "delete"]
9  - apiGroups: [""]
10    resources: ["persistentvolumeclaims"]
11    verbs: ["get", "list", "watch", "update"]
12  - apiGroups: ["storage.k8s.io"]
13    resources: ["storageclasses"]
14    verbs: ["get", "list", "watch"]
15  - apiGroups: [""]
16    resources: ["events"]
17    verbs: ["create", "update", "patch"]
18---
19kind: ClusterRoleBinding
20apiVersion: rbac.authorization.k8s.io/v1
21metadata:
22  name: run-nfs-client-provisioner
23subjects:
24  - kind: ServiceAccount
25    name: nfs-client-provisioner
26    namespace: kube-system
27roleRef:
28  kind: ClusterRole
29  name: nfs-client-provisioner-runner
30  apiGroup: rbac.authorization.k8s.io
31---
32kind: Role
33apiVersion: rbac.authorization.k8s.io/v1
34metadata:
35  name: leader-locking-nfs-client-provisioner
36  namespace: kube-system
37rules:
38  - apiGroups: [""]
39    resources: ["endpoints"]
40    verbs: ["get", "list", "watch", "create", "update", "patch"]
41---
42kind: RoleBinding
43apiVersion: rbac.authorization.k8s.io/v1
44metadata:
45  name: leader-locking-nfs-client-provisioner
46  namespace: kube-system
47subjects:
48  - kind: ServiceAccount
49    name: nfs-client-provisioner
50    # replace with namespace where provisioner is deployed
51    namespace: kube-system
52roleRef:
53  kind: Role
54  name: leader-locking-nfs-client-provisioner
55  apiGroup: rbac.authorization.k8s.io
56---
57kind: ServiceAccount
58apiVersion: v1
59metadata:
60  name: nfs-client-provisioner
61  namespace: kube-system
62---
63kind: PersistentVolume
64apiVersion: v1
65metadata:
66  name: pv-cfs
67spec:
68  capacity:
69    storage: 5Gi
70  accessModes:
71    - ReadWriteMany
72  persistentVolumeReclaimPolicy: Retain
73  mountOptions:
74    - hard
75    - nfsvers=4.1
76    - nordirplus
77  nfs:
78    path: {{NFS_PATH}}
79    server: {{NFS_SERVER}}
80---
81kind: PersistentVolumeClaim
82apiVersion: v1
83metadata:
84  name: pvc-cfs
85  namespace: kube-system
86spec:
87  accessModes:
88    - ReadWriteMany
89  resources:
90    requests:
91      storage: 5Gi
92---
93kind: Deployment
94apiVersion: apps/v1
95metadata:
96  name: nfs-client-provisioner
97  namespace: kube-system
98spec:
99  selector:
100    matchLabels:
101      app: nfs-client-provisioner
102  replicas: 1
103  strategy:
104    type: Recreate
105  template:
106    metadata:
107      labels:
108        app: nfs-client-provisioner
109    spec:
110      serviceAccountName: nfs-client-provisioner
111      containers:
112        - name: nfs-client-provisioner
113          image: registry.baidubce.com/cce-plugin-pro/nfs-client-provisioner:latest
114          imagePullPolicy: Always
115          volumeMounts:
116            - name: nfs-client-root
117              mountPath: /persistentvolumes
118          env:
119            - name: PROVISIONER_NAME
120              value: {{PROVISIONER_NAME}}
121            - name: NFS_SERVER
122              value: {{NFS_SERVER}}
123            - name: NFS_PATH
124              value: {{NFS_PATH}}
125      volumes:
126        - name: nfs-client-root
127          persistentVolumeClaim:
128            claimName: pvc-cfs
129---
130kind: StorageClass
131apiVersion: storage.k8s.io/v1
132metadata:
133  name: {{STORAGE_CLASS_NAME}}
134provisioner: {{PROVISIONER_NAME}}
135parameters:
136  archiveOnDelete: "{{ARCHIVE_ON_DELETE}}"
137  sharePath: "{{SHARE_PATH}}"
138mountOptions:
139  - hard
140  - nfsvers=4.1
141  - nordirplus
The customizable options and descriptions in the dynamic-cfs-template.yaml template file are as follows:
| Option | Description |
|---|---|
| NFS_SERVER | Address of the CFS mount target. |
| NFS_PATH | CFS remote mount directory. Ensure that this directory exists beforehand; if it doesn’t, the provisioner plugin will fail to start. |
| SHARE_PATH | Whether the CFS mount directories of different PVCs are isolated: true = not isolated, false = isolated. If isolation is specified, a subdirectory will be created for each PVC under the CFS mount directory, and the corresponding PVC will use this subdirectory as the mount directory; otherwise, all PVCs will share the mount directory. |
| ARCHIVE_ON_DELETE | Whether to retain the corresponding data after deleting the PVC. This takes effect only when the PVC mount directories are isolated: true = retain, false = not retain; when PVC mount directories are shared, deleting a PVC will not delete any data. If set to "not retain", the subdirectory of the corresponding PVC will be directly deleted; otherwise, only the original subdirectory name will be retained with the archive- prefix added. |
| STORAGE_CLASS_NAME | The name of the created StorageClass. |
| PROVISIONER_NAME | The name of the Provisioner. |
In a shell-enabled system, you can execute the following replace.sh script to substitute template variables in the YAML file.
1 # !/bin/sh
2 # user defined vars
3NFS_SERVER="cfs-test.baidubce.com"
4NFS_PATH="/cce/shared"
5 SHARE_PATH="true" # Whether mount directories of different PVCs are isolated: true = not isolated, false = isolated
6 ARCHIVE_ON_DELETE="false" # Whether to retain data when deleting PVC (takes effect only if PVC mount directories are isolated): true = retain, false = not retain
7 STORAGE_CLASS_NAME="sharedcfs" # StorageClass name
8 PROVISIONER_NAME="baidubce/cfs-provisioner" # provisioner name
9YAML_FILE="./dynamic-cfs-template.yaml"
10 # replace template vars in yaml file
11sed -i "s#{{SHARE_PATH}}#$SHARE_PATH#" $YAML_FILE
12sed -i "s#{{ARCHIVE_ON_DELETE}}#$ARCHIVE_ON_DELETE#" $YAML_FILE
13sed -i "s#{{STORAGE_CLASS_NAME}}#$STORAGE_CLASS_NAME#" $YAML_FILE
14sed -i "s#{{PROVISIONER_NAME}}#$PROVISIONER_NAME#" $YAML_FILE
15sed -i "s#{{NFS_SERVER}}#$NFS_SERVER#" $YAML_FILE
16sed -i "s#{{NFS_PATH}}#$NFS_PATH#" $YAML_FILE- Replace the shell variables in the first half of the script with expected values, place the replace.sh script and dynamic-cfs-template.yaml file in the same directory, and execute
sh replace.sh. - You can also use other methods to replace the template variables in the YAML file as needed.
- Finally, use the kubectl tool and execute
kubectl create -f dynamic-cfs-template.yamlto complete the creation of StorageClass and Provisioner.
1$ kubectl create -f dynamic-cfs-template.yaml
2clusterrole "nfs-client-provisioner-runner" created
3clusterrolebinding "run-nfs-client-provisioner" created
4role "leader-locking-nfs-client-provisioner" created
5rolebinding "leader-locking-nfs-client-provisioner" created
6serviceaccount "nfs-client-provisioner" created
7persistentvolume "pv-cfs" created
8persistentvolumeclaim "pvc-cfs" created
9deployment "nfs-client-provisioner" created
10storageclass "sharedcfs" created
11$ kubectl get pod --namespace kube-system  | grep provisioner
12nfs-client-provisioner-c94494f6d-dlxmj   1/1       Running   0          26s
If the corresponding Pod enters the running state, it indicates that the resources for dynamic PV binding have been successfully created.
2. Dynamically generate and bind PV when creating PVC
- Specify the name of the previously created StorageClass in the PVC Spec. When the PVC is created, the provisioner linked to the StorageClass will automatically generate and bind the required PV.
- Use kubectl and execute
kubectl create -f dynamic-pvc-cfs.yamlto complete the creation of the PVC. - Assuming that the name of the created StorageClass is
sharedcfs, the corresponding dynamic-pvc-cfs.yaml file is as follows:
1kind: PersistentVolumeClaim
2apiVersion: v1
3metadata:
4  name: dynamic-pvc-cfs
5spec:
6  accessModes:
7    - ReadWriteMany
8  storageClassName: sharedcfs
9  resources:
10    requests:
11 storage: 5Gi- After creating the PVC, you can see that the corresponding PV is automatically created, and the PVC status changes to
Bound, indicating that the PVC has been bound to the newly created PV.
1$ kubectl create -f dynamic-pvc-cfs.yaml
2persistentvolumeclaim "dynamic-pvc-cfs" created
3$ kubectl get pvc
4NAME              STATUS    VOLUME                                     CAPACITY   ACCESS MODES   STORAGECLASS   AGE
5dynamic-pvc-cfs   Bound     pvc-6dbf3265-bbe0-11e8-bc54-fa163e08135d   5Gi        RWX            sharedcfs      4s
6$ kubectl get pv
7NAME                                       CAPACITY   ACCESS MODES   RECLAIM POLICY   STATUS    CLAIM                     STORAGECLASS   REASON    AGE
8pv-cfs                                     5Gi        RWX            Retain           Bound     kube-system/pvc-cfs                                21m
9pvc-6dbf3265-bbe0-11e8-bc54-fa163e08135d   5Gi        RWX            Delete           Bound     default/dynamic-pvc-cfs   sharedcfs                7s
3. Mount the PVC in the Pod
- Specify the corresponding PVC name in the Pod spec, then use kubectl and execute
kubectl create -f dynamic-cfs-pod.yamlto complete resource creation. - The corresponding
dynamic-cfs-pod.yamlfile is as follows:
1kind: Pod
2apiVersion: v1
3metadata:
4  name: test-pvc-pod
5  labels:
6    app: test-pvc-pod
7spec:
8  containers:
9  - name: test-pvc-pod
10    image: nginx
11    volumeMounts:
12      - name: cfs-pvc
13        mountPath: "/cfs-volume"
14  volumes:
15    - name: cfs-pvc
16      persistentVolumeClaim:
17        claimName: dynamic-pvc-cfs
After the Pod is created, you can read and write to the /cfs-volume path in the container to access content on the corresponding CFS storage.
4. Dynamically destroy bound PV when releasing PVC
When a PVC is deleted, the dynamically bound PV will be deleted. The data will be retained or deleted according to the user-defined SHARE_PATH and ARCHIVE_ON_DELETE options.
1$ kubectl get pvc
2NAME              STATUS    VOLUME                                     CAPACITY   ACCESS MODES   STORAGECLASS   AGE
3dynamic-pvc-cfs   Bound     pvc-6dbf3265-bbe0-11e8-bc54-fa163e08135d   5Gi        RWX            sharedcfs      9m
4$ kubectl get pv
5NAME                                       CAPACITY   ACCESS MODES   RECLAIM POLICY   STATUS    CLAIM                     STORAGECLASS   REASON    AGE
6pv-cfs                                     5Gi        RWX            Retain           Bound     kube-system/pvc-cfs                                31m
7pvc-6dbf3265-bbe0-11e8-bc54-fa163e08135d   5Gi        RWX            Delete           Bound     default/dynamic-pvc-cfs   sharedcfs                9m
8$ kubectl delete -f dynamic-pvc-cfs.yaml
9persistentvolumeclaim "dynamic-pvc-cfs" deleted
10$ kubectl get pv
11NAME      CAPACITY   ACCESS MODES   RECLAIM POLICY   STATUS    CLAIM                 STORAGECLASS   REASON    AGE
12pv-cfs    5Gi        RWX            Retain           Bound     kube-system/pvc-cfs                            31m
13$ kubectl get pvc
14No resources found.
Method II: Operation via console
- Log in to the CCE console and click on the cluster name to view the cluster details.
-
Create a new provisioner.
a. In the left navigation bar, select Workloads - Custom Resources to enter the Custom Resource Management page.
b. Click the Create Resource via YAML button at the top of the page, and create the following resources in the pop-up box.
Plain Text1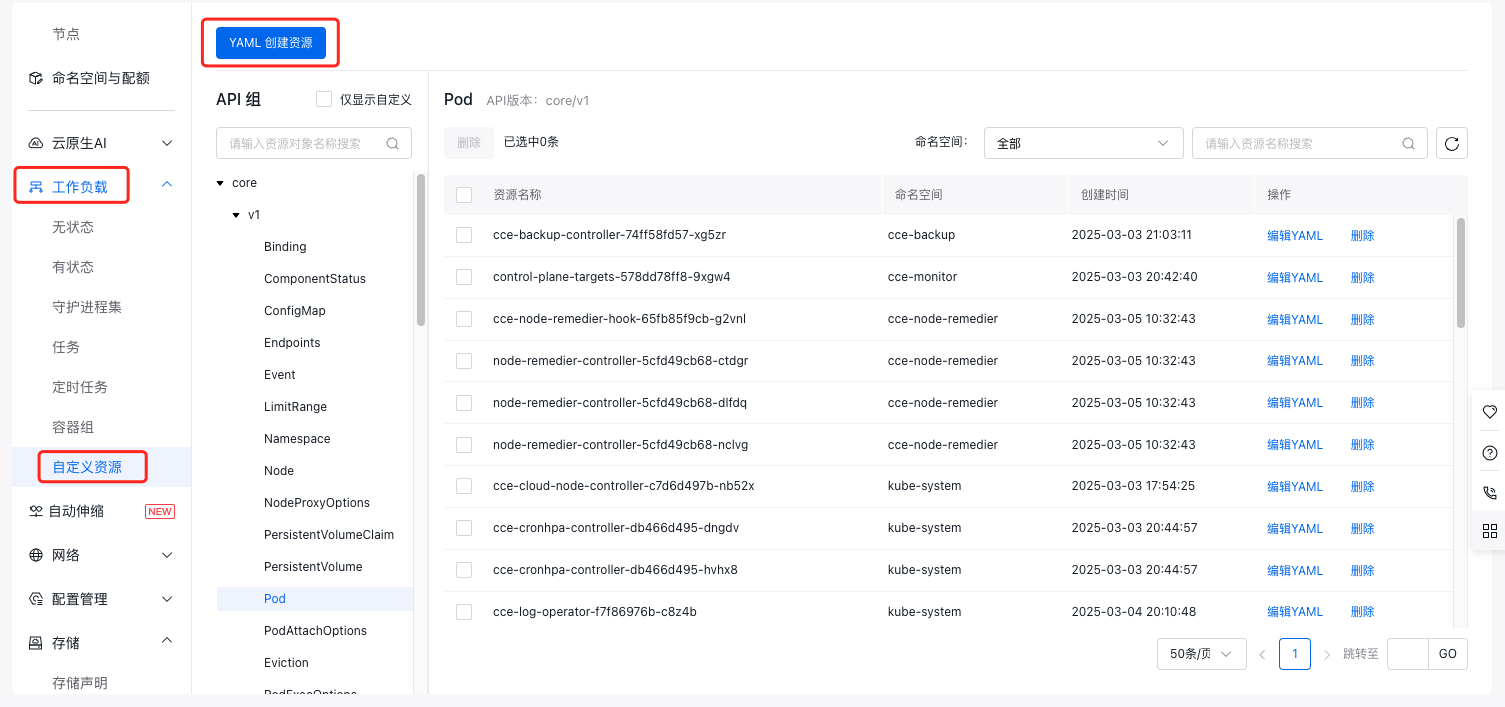YAML1kind: ClusterRole 2apiVersion: rbac.authorization.k8s.io/v1 3metadata: 4 name: nfs-client-provisioner-runner 5rules: 6 - apiGroups: [""] 7 resources: ["persistentvolumes"] 8 verbs: ["get", "list", "watch", "create", "delete"] 9 - apiGroups: [""] 10 resources: ["persistentvolumeclaims"] 11 verbs: ["get", "list", "watch", "update"] 12 - apiGroups: ["storage.k8s.io"] 13 resources: ["storageclasses"] 14 verbs: ["get", "list", "watch"] 15 - apiGroups: [""] 16 resources: ["events"] 17 verbs: ["create", "update", "patch"] 18--- 19kind: ClusterRoleBinding 20apiVersion: rbac.authorization.k8s.io/v1 21metadata: 22 name: run-nfs-client-provisioner 23subjects: 24 - kind: ServiceAccount 25 name: nfs-client-provisioner 26 namespace: kube-system 27roleRef: 28 kind: ClusterRole 29 name: nfs-client-provisioner-runner 30 apiGroup: rbac.authorization.k8s.io 31--- 32kind: Role 33apiVersion: rbac.authorization.k8s.io/v1 34metadata: 35 name: leader-locking-nfs-client-provisioner 36 namespace: kube-system 37rules: 38 - apiGroups: [""] 39 resources: ["endpoints"] 40 verbs: ["get", "list", "watch", "create", "update", "patch"] 41--- 42kind: RoleBinding 43apiVersion: rbac.authorization.k8s.io/v1 44metadata: 45 name: leader-locking-nfs-client-provisioner 46 namespace: kube-system 47subjects: 48 - kind: ServiceAccount 49 name: nfs-client-provisioner 50 # replace with namespace where provisioner is deployed 51 namespace: kube-system 52roleRef: 53 kind: Role 54 name: leader-locking-nfs-client-provisioner 55 apiGroup: rbac.authorization.k8s.io 56--- 57apiVersion: v1 58kind: ServiceAccount 59metadata: 60 name: nfs-client-provisioner 61 namespace: kube-system 62--- 63kind: PersistentVolume 64apiVersion: v1 65metadata: 66 name: pv-cfs 67spec: 68 capacity: 69 storage: 5Gi 70 accessModes: 71 - ReadWriteMany 72 persistentVolumeReclaimPolicy: Retain 73 mountOptions: 74 - hard 75 - nfsvers=4.1 76 - nordirplus 77 nfs: 78 path: {{NFS_PATH}} 79 server: {{NFS_SERVER}} 80--- 81kind: PersistentVolumeClaim 82apiVersion: v1 83metadata: 84 name: pvc-cfs 85 namespace: kube-system 86spec: 87 accessModes: 88 - ReadWriteMany 89 resources: 90 requests: 91 storage: 5Gi 92--- 93kind: Deployment 94apiVersion: apps/v1 95metadata: 96 name: nfs-client-provisioner 97 namespace: kube-system 98spec: 99 selector: 100 matchLabels: 101 app: nfs-client-provisioner 102 replicas: 1 103 strategy: 104 type: Recreate 105 template: 106 metadata: 107 labels: 108 app: nfs-client-provisioner 109 spec: 110 serviceAccountName: nfs-client-provisioner 111 containers: 112 - name: nfs-client-provisioner 113 image: registry.baidubce.com/cce-plugin-pro/nfs-client-provisioner:latest 114 imagePullPolicy: Always 115 volumeMounts: 116 - name: nfs-client-root 117 mountPath: /persistentvolumes 118 env: 119 - name: PROVISIONER_NAME 120 value: {{PROVISIONER_NAME}} # Specify the Provisioner Name 121 - name: NFS_SERVER 122 value: {{NFS_SERVER}} # Specify CFS Mount Target Address 123 - name: NFS_PATH 124 value: {{NFS_PATH}} # Specify CFS remote mount directory. Note that this directory must pre-exist before use; if the directory does not exist, it will cause the provisioner plugin to fail to start 125 volumes: 126 - name: nfs-client-root 127 persistentVolumeClaim: 128 claimName: pvc-cfs -
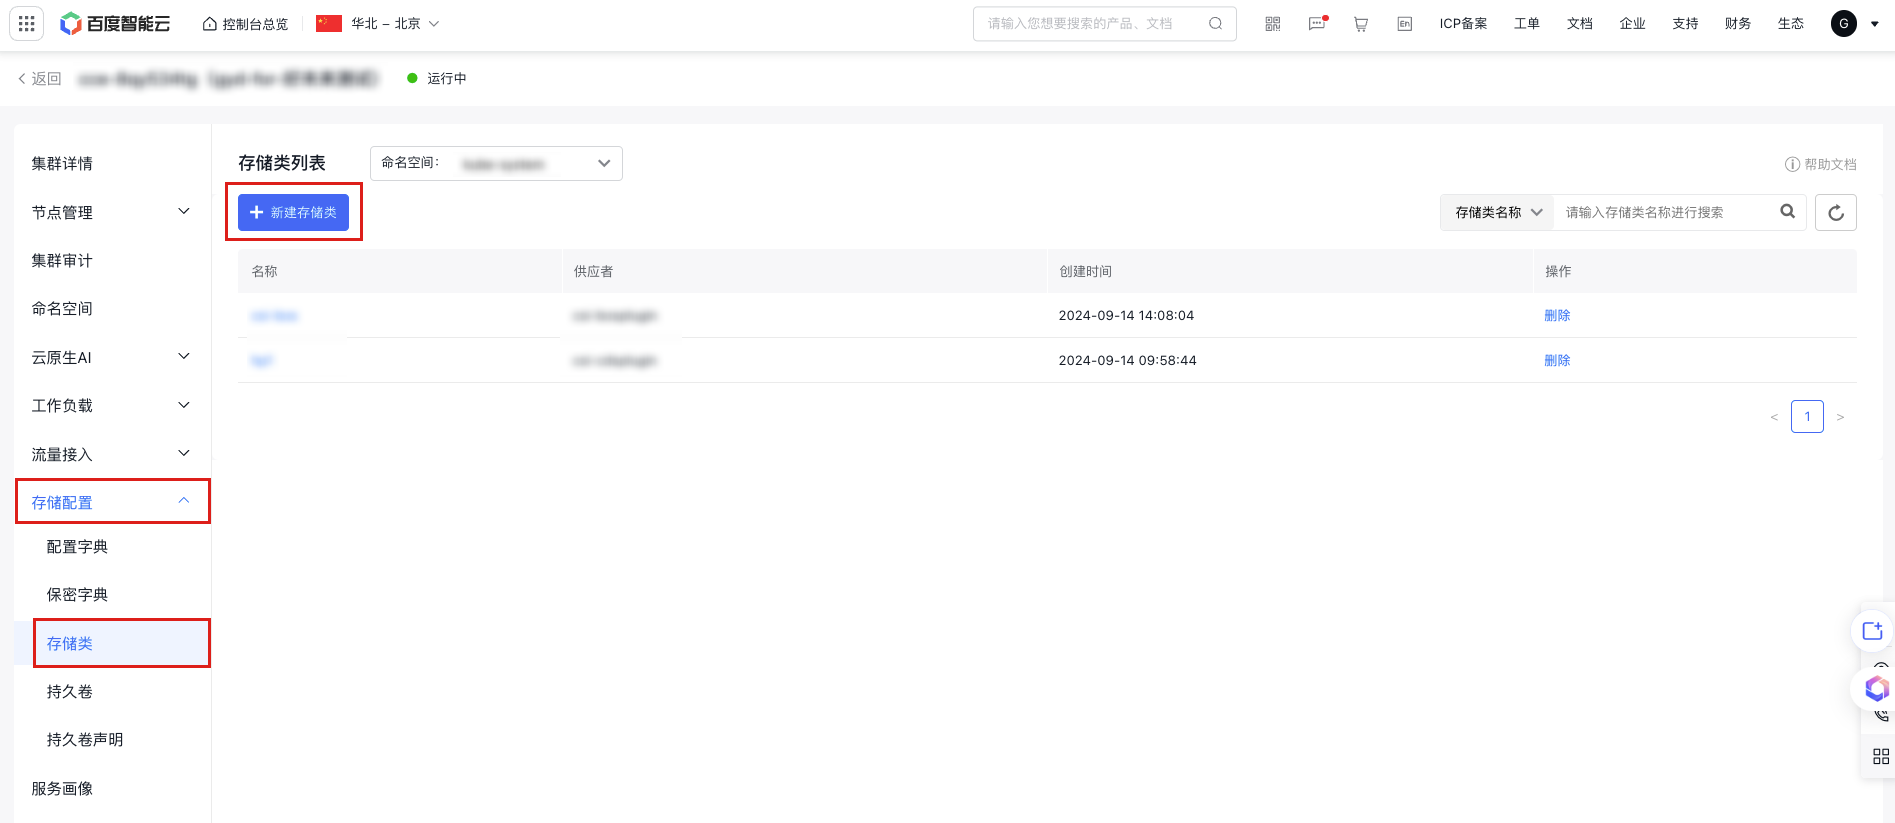
Create a new StorageClass.
a. In the left navigation bar, select Storage Configuration - Storage Class to enter the Storage Class List page.
b. Click the Create Storage Class button at the top of the storage class list, and enter the following yaml content in the file template:
 YAML
YAML1kind: StorageClass 2apiVersion: storage.k8s.io/v1 3metadata: 4 Name: {{STORAGE_CLASS_NAME}} # Specify StorageClass Name 5 provisioner: {{PROVISIONER_NAME}} # Specify name of created Provisioner 6parameters: 7 archiveOnDelete: "{{ARCHIVE_ON_DELETE}}" # Whether to retain the corresponding data after deleting the PVC. This takes effect only when the PVC mount directories are isolated: true = retain, false = not retain; when PVC mount directories are shared, deleting a PVC will not delete any data. If set to "not retain", the subdirectory of the corresponding PVC will be directly deleted; otherwise, only the original subdirectory name will be retained with the archive- prefix added. 8 sharePath: "{{SHARE_PATH}}" # Whether CFS mount directories of different PVCs are isolated: true = not isolated, false = isolated. If isolation is specified, a subdirectory will be created for each PVC under the CFS mount directory, and the corresponding PVC will use this subdirectory as the mount directory; otherwise, all PVCs will share the mount directory. 9mountOptions: 10 - hard 11 - nfsvers=4.1 12 - nordirplusc. Click OK to create the storage class.
-
Automatically generate and bind a PV after creating a persistent volume claim (PVC).
a. In the left navigation bar, select Storage Configuration - Persistent Volume Claims to enter the persistent volume claim list.
b. Click the Create Newly Persistent Volume Claim button at the top of the list, and select Form Creation or YAML Creation.
c. If Form Creation is selected, fill in the relevant parameters. For details on the three access modes, refer to Storage Management Overview. After clicking OK, enter the value of
storageClassName(i.e., the name of the storage class) in the Confirm Configuration pop-up window. Click OK after the configuration is correct.Plain Text1 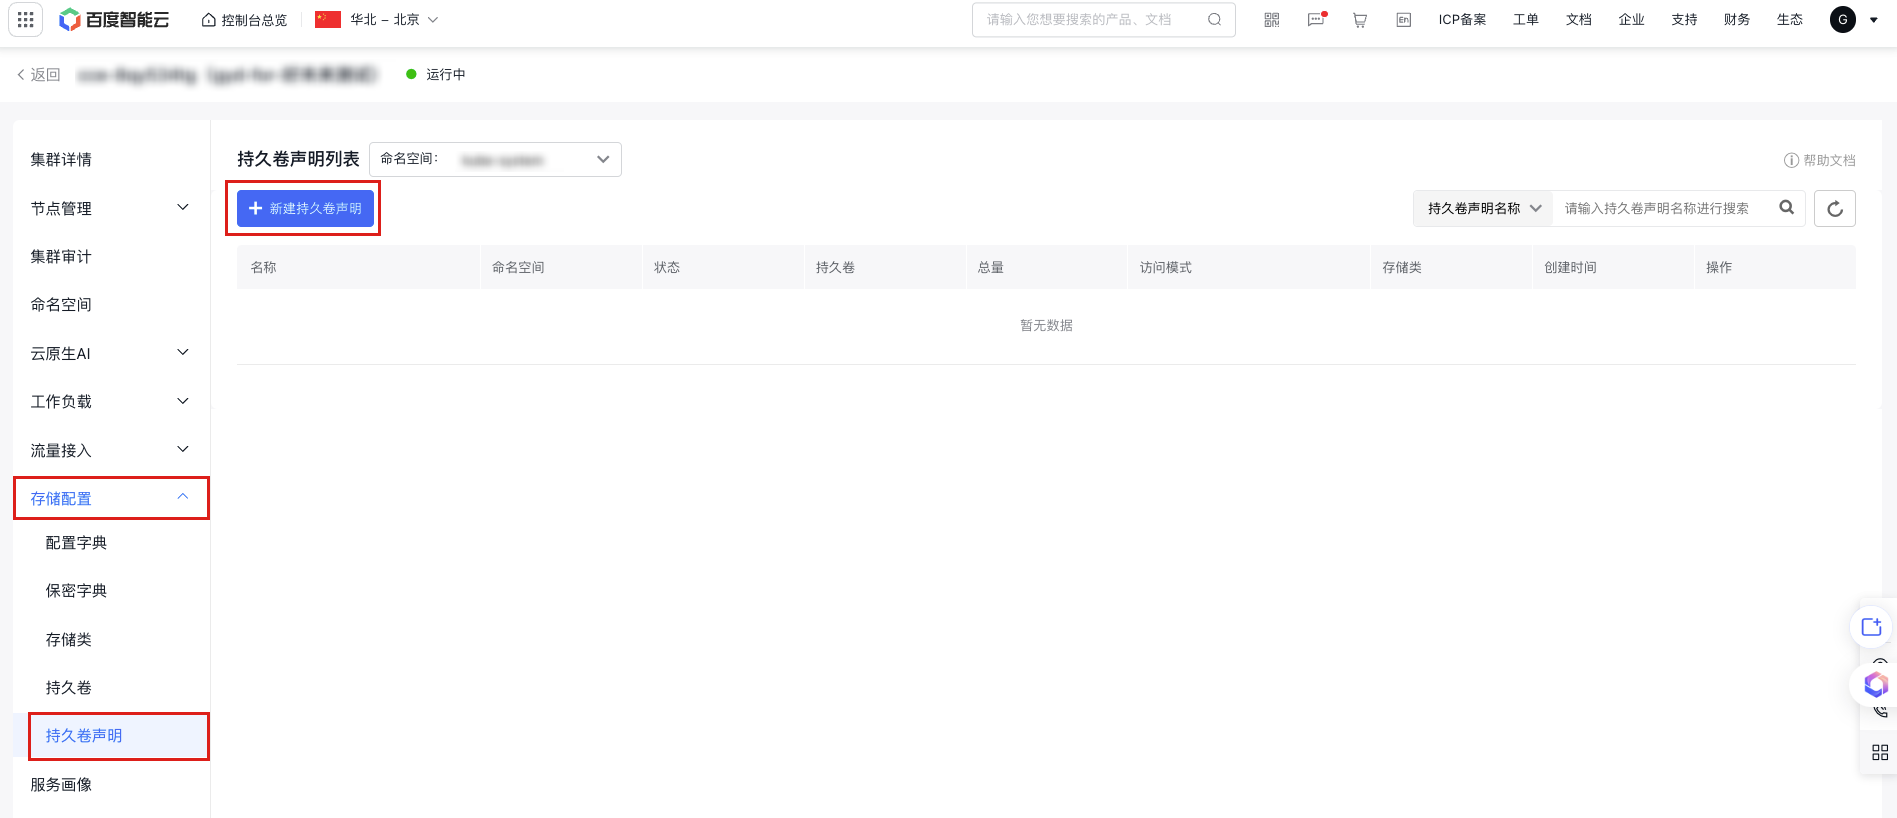 2 3 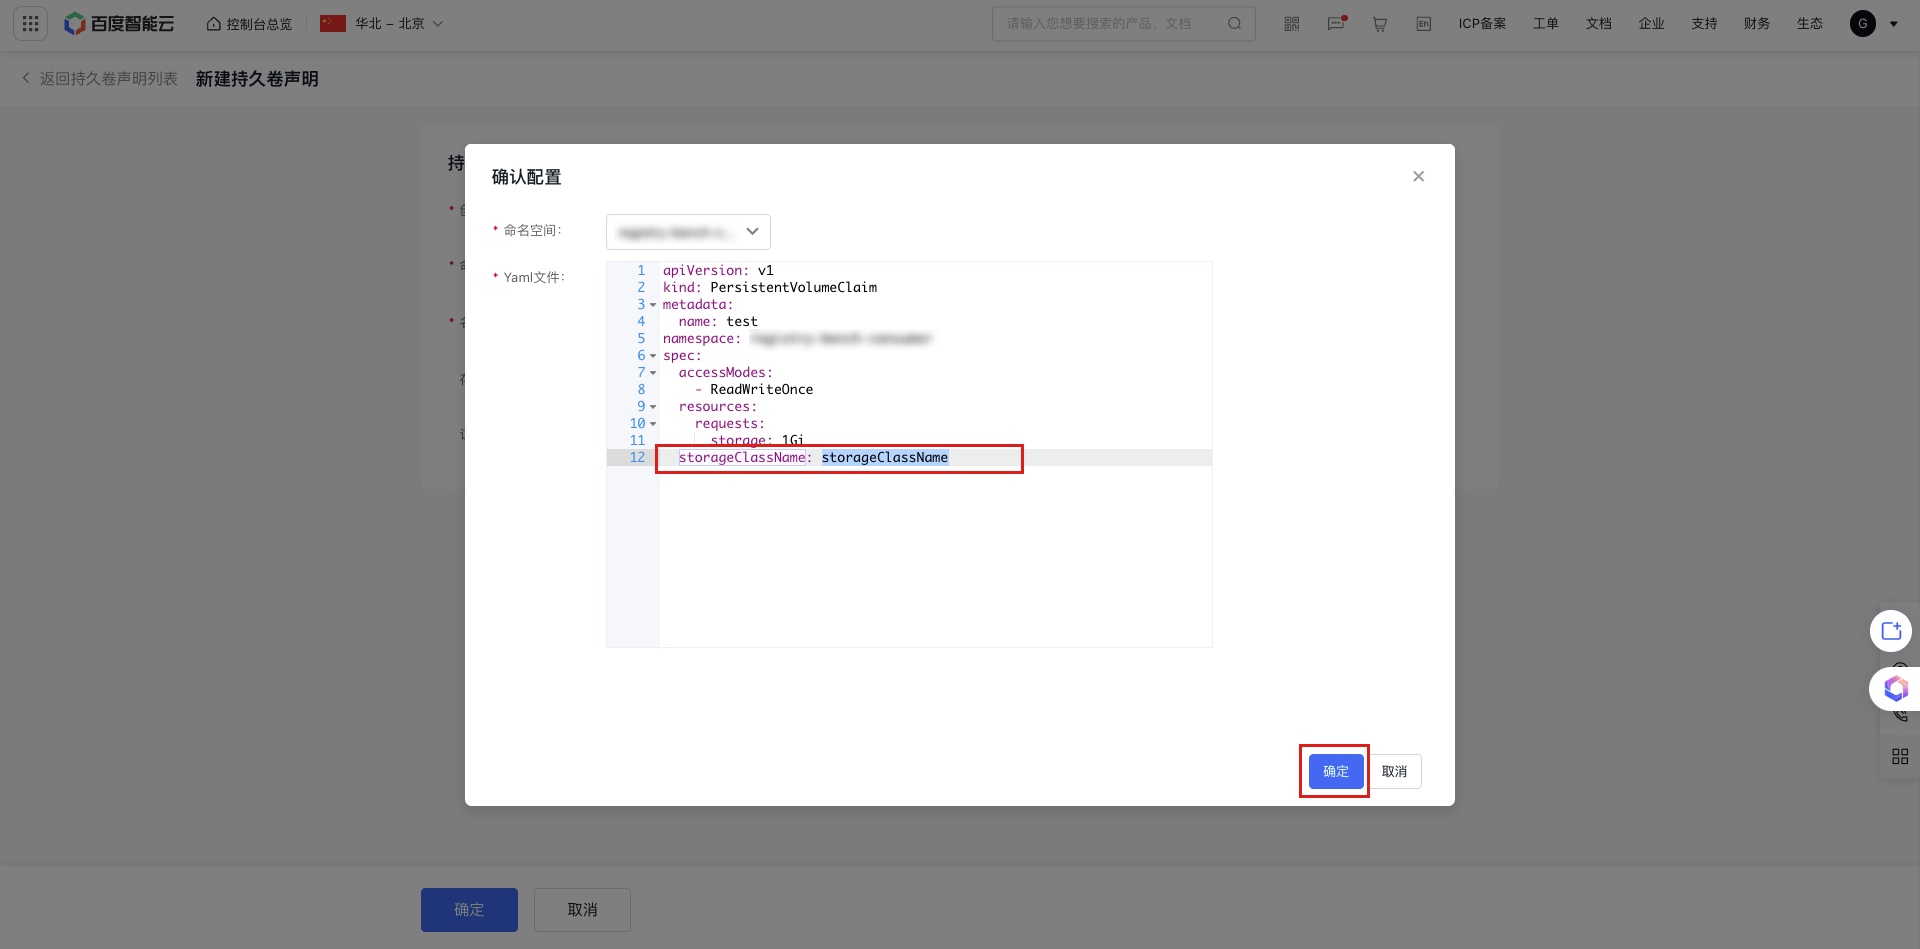d. If you choose YAML Creation, input the following YAML content into the template file.
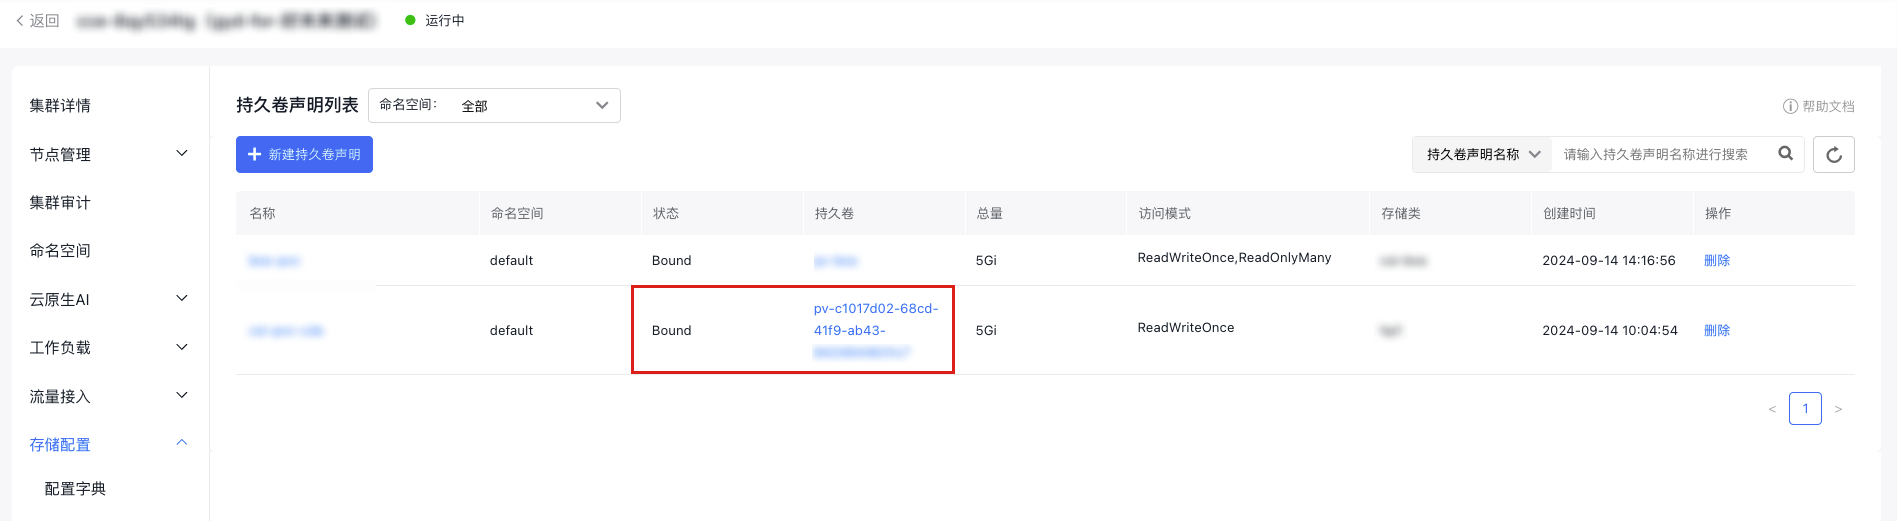
YAML1kind: PersistentVolumeClaim 2apiVersion: v1 3metadata: 4 name: pvc-cfs 5 namespace: kube-system 6spec: 7 accessModes: 8 - ReadWriteMany 9 storageClassName: {{STORAGE_CLASS_NAME}} # Specify name of created StorageClass 10 resources: 11 requests: 12 storage: 5Gie. After creating the PVC, you can see in Persistent Volume Claims List - Persistent Volumes Column that the corresponding PV is automatically created, and the PVC status column shows "bound", indicating that the PVC has been bound to the newly created PV.
- Create an application, mount the PVC, and specify the corresponding PVC name in the Pod spec. Once the Pod is created, you can read and write to the /cfs-volume path in the container to access the corresponding CFS storage content.
Statically mount CFS via PV/PVC
Method I: Operation via kubectl command line
1. Create PV and PVC resources in the cluster
- Use kubectl and execute
kubectl create -f pv-cfs.yamlto complete the creation of the PV - The corresponding
pv-cfs.yamlfile is as follows:
1kind: PersistentVolume
2apiVersion: v1
3metadata:
4  name: pv-cfs
5spec:
6  capacity:
7    storage: 8Gi
8  accessModes:
9    - ReadWriteMany
10  persistentVolumeReclaimPolicy: Retain
11  mountOptions:
12    - hard
13    - nfsvers=4.1
14    - nordirplus
15  nfs:
16    path: /
17    server: cfs-test.baidubce.com
Note:
- In the YAML configuration, the server field corresponds to the CFS mount target address.
- In the YAML configuration, the path field corresponds to the CFS mount directory, which must already exist before mounting.
After creating the PV, enter kubectl get pv to see a PV in the "available" status, as shown below:
1$ kubectl get pv
2NAME      CAPACITY   ACCESS MODES   RECLAIM POLICY   STATUS      CLAIM     STORAGECLASS   REASON    AGE
3pv-cfs    8Gi        RWX            Retain           Available                                      3s
Create a PVC that can bind to the PV
Use kubectl and execute kubectl create -f pvc-cfs.yaml to complete the creation of the PVC
The corresponding pvc-cfs.yaml file is as follows:
1kind: PersistentVolumeClaim
2apiVersion: v1
3metadata:
4  name: pvc-cfs
5spec:
6  accessModes:
7    - ReadWriteMany
8  resources:
9    requests:
10      storage: 8Gi
Before binding, the PVC is in the pending status
1$ kubectl get pvc
2NAME      STATUS    VOLUME    CAPACITY   ACCESS MODES   STORAGECLASS   AGE
3pvc-cfs   Pending                                                      2s                                                  2s
After binding, both the PV and PVC statuses change to bound
1$ kubectl get pv
2NAME      CAPACITY   ACCESS MODES   RECLAIM POLICY   STATUS    CLAIM             STORAGECLASS   REASON    AGE
3pv-cfs    8Gi        RWX            Retain           Bound     default/pvc-cfs                            36s
4$ kubectl get pvc
5NAME      STATUS    VOLUME    CAPACITY   ACCESS MODES   STORAGECLASS   AGE
6pvc-cfs   Bound     pv-cfs    8Gi        RWX                           1m
For more settings and field descriptions of PV and PVC, refer to K8S Official Documentation
2. Mount the PVC in the Pod
Specify the corresponding PVC name in the Pod spec, then use kubectl and execute kubectl create -f demo-cfs-pod.yaml to complete resource creation
The corresponding demo-cfs-pod.yaml file is as follows:
1kind: Pod
2apiVersion: v1
3metadata:
4  name: demo-cfs-pod
5  labels:
6    app: demo-cfs-pod
7spec:
8  containers:
9  - name: nginx
10    image: nginx
11    volumeMounts:
12      - name: cfs-pvc
13        mountPath: "/cfs-volume"
14  volumes:
15    - name: cfs-pvc
16      persistentVolumeClaim:
17        claimName: pvc-cfs
After the Pod is created, you can read and write to the /cfs-volume path in the container to access content on the corresponding CFS storage.
Since accessModes is set to ReadWriteMany when creating the PV and PVC, the PVC can be mounted and read/written by Pods on multiple nodes.
3. Release PV and PVC resources
After utilizing the storage resources, you can release the PVC and PV. Before doing so, ensure all Pods that have mounted the corresponding PVC are deleted.
Use the following command to release the PVC
1$ kubectl delete -f pvc-cfs.yamlAfter releasing the PVC, the status of the previously bound PV will change to release, as shown below:
1NAME      CAPACITY   ACCESS MODES   RECLAIM POLICY   STATUS     CLAIM             STORAGECLASS   REASON    AGE
2pv-cfs    8Gi        RWX            Retain           Released   default/pvc-cfs                            16m
Enter the following command to release the PV resource
1$ kubectl delete -f pv-cfs.yamlMethod II: Operation via console
- Log in to the CCE console and click on the cluster name to view the cluster details.
-
Create a Persistent Volume (PV).
a. In the left navigation bar, select Storage Configuration - Persistent Volume to enter the persistent volume list.
b. Click the Create Newly Persistent Volume button at the top of the persistent volume list, and select Form Creation or YAML Creation.
c. If Form Creation is selected, fill in the relevant parameters, set the storage usage as needed, and select Cloud File System (CFS) for the storage class. For the mount target address, refer to Obtain a Domain Name of a Mount Target. Click OK, then confirm the configuration in the second pop-up window, and click OK to create the PV.
Plain Text1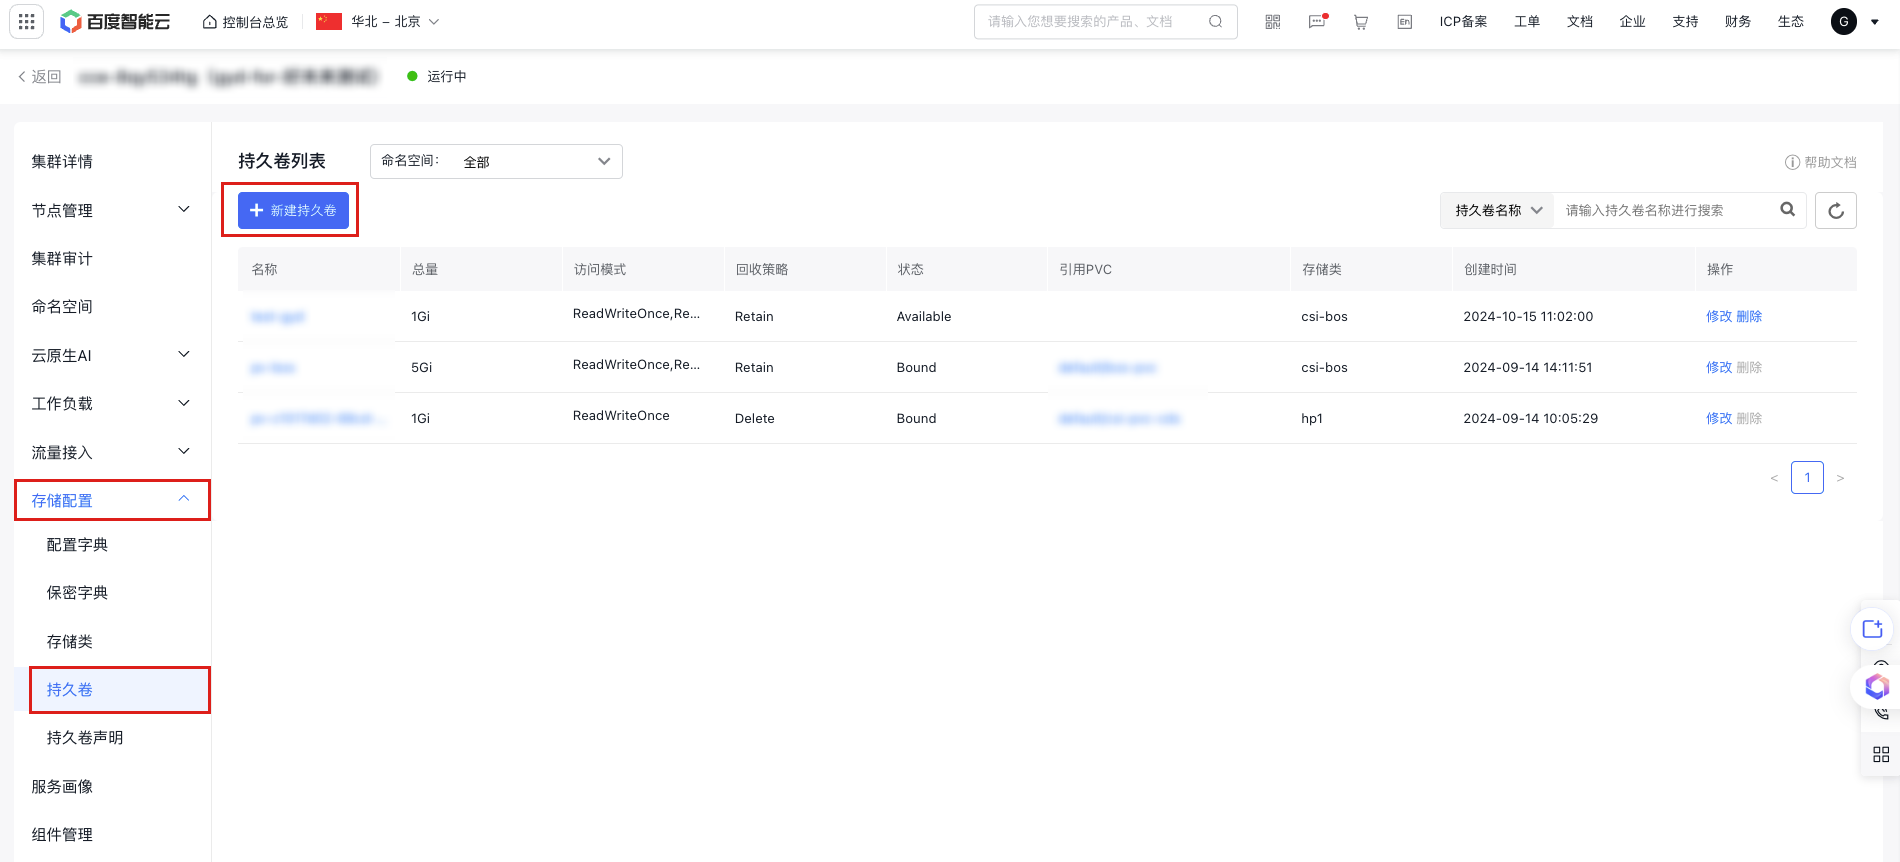 2 3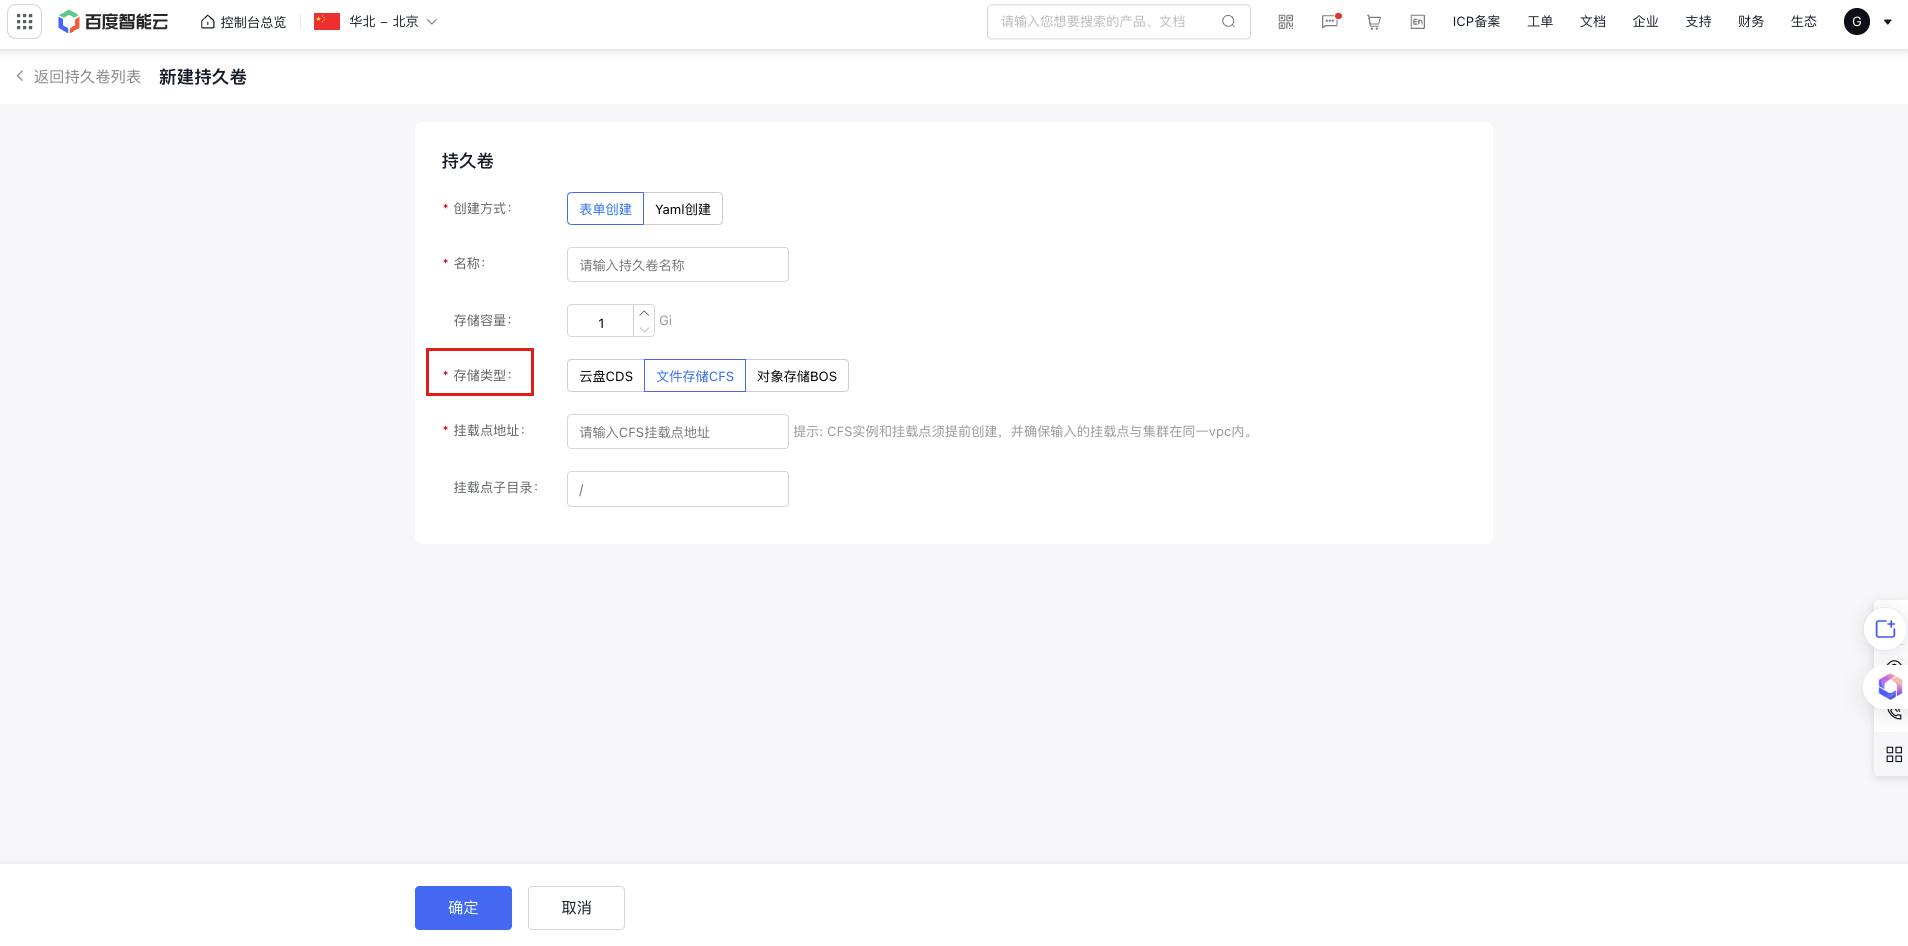 -
Create a Persistent Volume Claim (PVC) that can be bound to a Persistent Volume (PV).
a. In the left navigation bar, select Storage Configuration - Persistent Volume Claims to enter the persistent volume claim list.
b. Click the Create Newly Persistent Volume Claim button at the top of the persistent volume list, and select Form Creation or YAML Creation.
c. Configure the storage usage, access mode and storage class (optional) of the PVC according to the previously created PV, then click OK to create the PVC. The system will search for existing PV resources to find a PV that matches the PVC request.
Once bound, you can see the status columns of the PV and PVC change to "Bound" in the Persistent Volume list and Persistent Volume Claim list, respectively.
- Deploy an application, mount the PVC, and specify the corresponding PVC name in the Pod specification.