
Managing virtual nodes
Managing virtual nodes
This document introduces virtual nodes and BCI, including how to create virtual nodes in CCE and deploy BCI pods via virtual nodes.
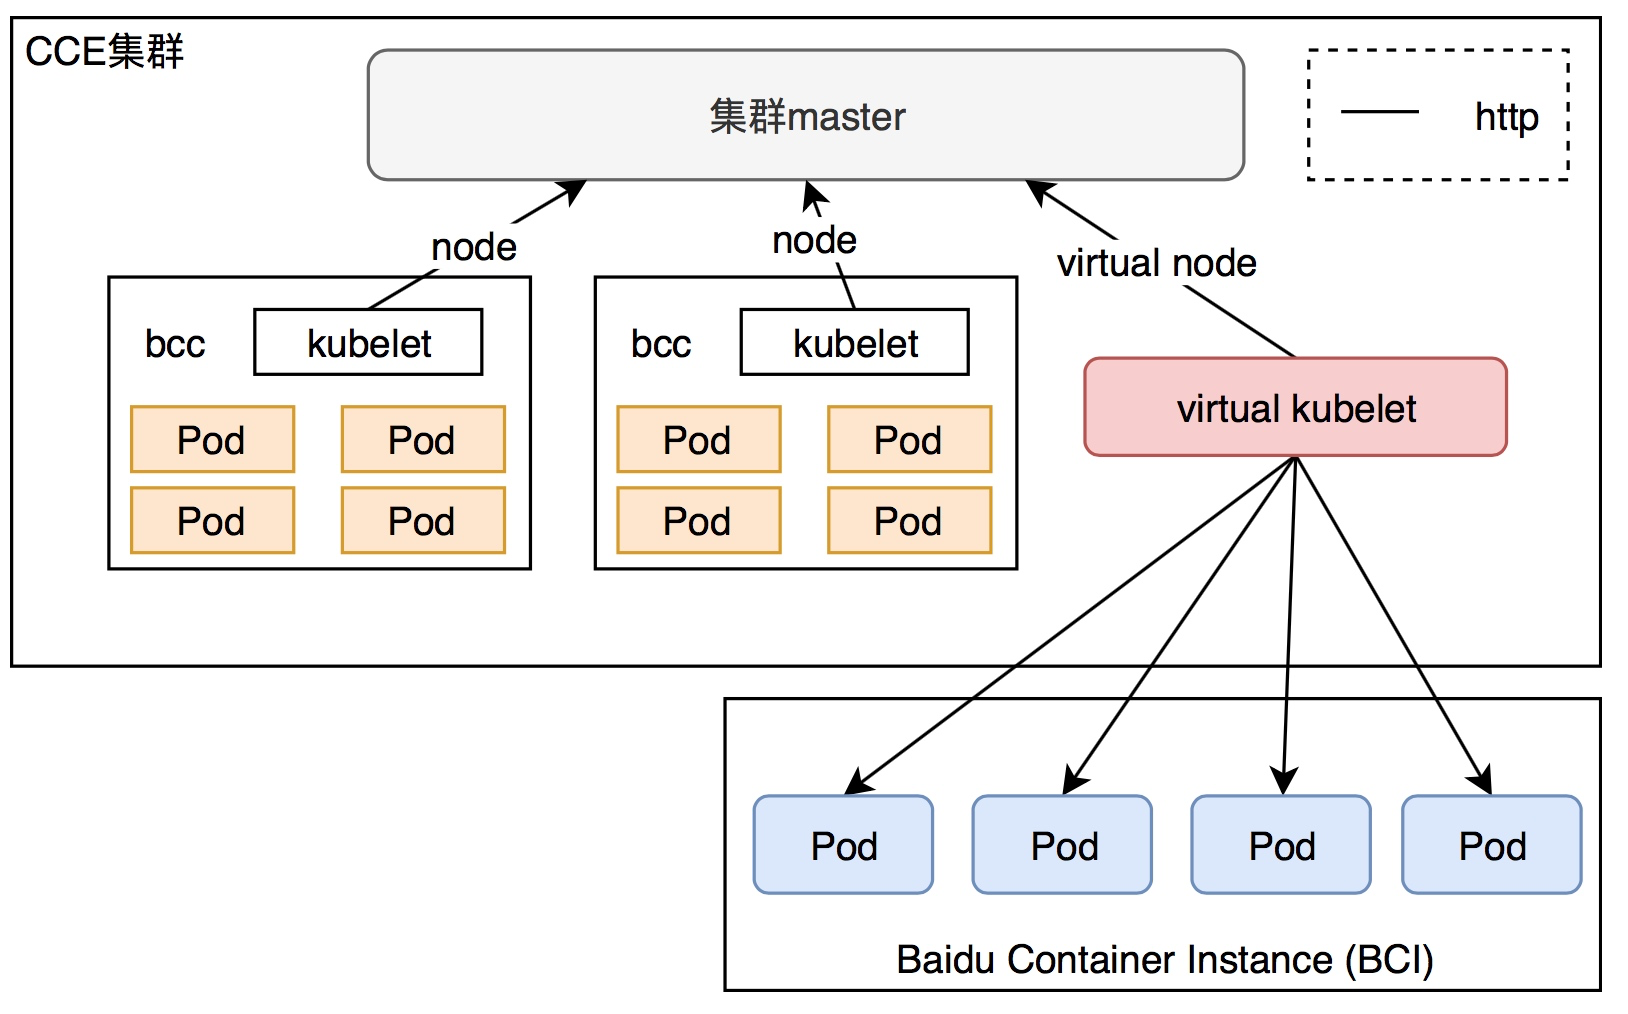
Virtual nodes and Baidu AI Cloud Container Instance (BCI)
[Baidu AI Cloud Container Instance (BCI)](BCI/Product Description/What is BCI?.md) provides serverless container resources. You only need to provide container images and configuration parameters required to start containers to run the containers, and do not need to worry about how these containers are scheduled and deployed to underlying physical server resources. The BCI service will complete the scheduling and operation of IaaS layer resources for you, simplifying your container usage process and reducing deployment and maintenance costs. Meanwhile, BCI only charges for the resources you apply for when creating containers, thus realizing true pay-as-you-go billing.
Virtual Node is derived from the virtual-kubelet technology in the Kubernetes community. It enables scheduling BCI instances in CCE clusters, allowing users to quickly start and orchestrate containers without purchasing physical cluster nodes. The number of containers that can be started is not limited by the capacity of physical nodes, giving the cluster significant auto-scaling capabilities.
Preparation
- [Register a Baidu account](UserGuide/Register an account.md#Register a Baidu Account) and complete [real-name certification](UserGuide/Certification/Basic Introduction to Real-name Verification.md).
- Activate the Baidu AI Cloud Container Instance service. Log in to the Container Instance Console to activate the corresponding service.
-
Create a container cluster. For operation steps, refer to [Create Cluster](CCE/Operation guide/Cluster management/Create cluster.md).
- Recommendation: Select Standard Kubernetes Managed Cluster as the cluster type; select Managed Master for the master configuration.
- Recommendation: Use Kubernetes version 1.20 or later
- Once the cluster is successfully created, add two worker BCC nodes (to run system components). It is recommended to configure the BCC nodes with at least 2C8G.
Operation guide
Operations vary depending on the cluster version: new-version clusters (cluster IDs starting with cce-) and old-version clusters (cluster IDs starting with c-). Choose the appropriate operations based on the target cluster where you want to add virtual nodes.
- [Operations for new-version clusters](#New-version clusters (cluster ID starts with cce-))
- [Operations for old-version clusters](#Old-version clusters (cluster ID starts with c-))
New-version clusters (cluster ID starts with cce-)
Prerequisites
- A CCE standard managed cluster or CCE standard independent cluster has been created, and the cluster version is 1.18.9/1.20.8/1.22.5/1.24.4/1.26.9/1.28.8 If you need to create a new cluster, refer to Create Cluster.
- The elastic container instance service has been activated, and it is confirmed that the region where the cluster is located is in the list of regions supported by BCI. Log in to the Elastic Container Instance Console to activate the corresponding service and view the currently supported regions and availability zones.
Step I: Deploy the CCE Virtual Kubelet component
In the CCE cluster, deploy the CCE Virtual Kubelet component via the Component Management page. Follow the steps below based on the two cluster types:
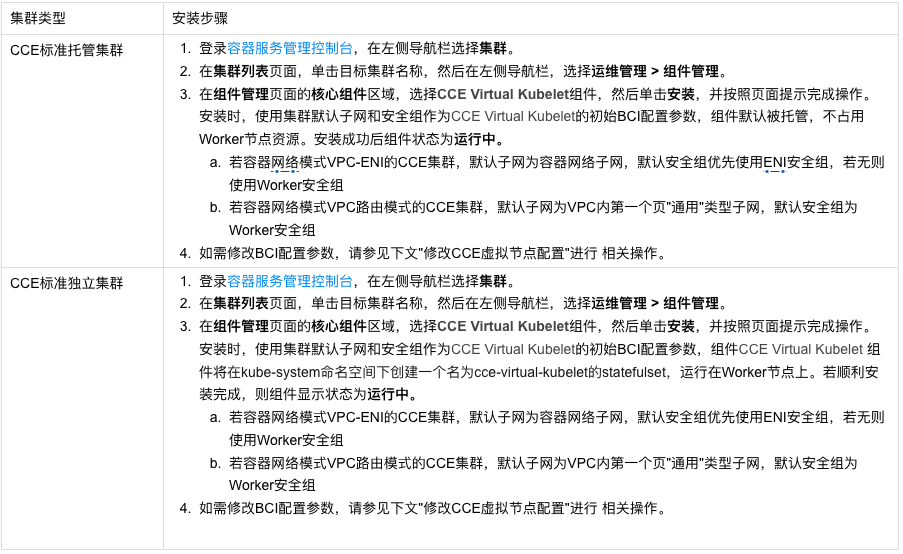
Note: If you have installed cce-virtual-kubelet via a Helm template, installation via Component Management is not supported temporarily. If you want to install it via the Component Center, you can submit a ticket to contact us for assistance.
Step II: Schedule Pods to run on BCI
Start pods on virtual nodes
Compared with regular pods, you need to add the following nodeSelector and tolerations fields to the Pod Spec to schedule the pod to a virtual node.
Pod Spec example:
1spec:
2  nodeSelector:
3    type: "virtual-kubelet"
4  tolerations:
5  - key: "virtual-kubelet.io/provider"
6    operator: "Equal"
7    value: "baidu"
8    effect: "NoSchedule"
Pods scheduled to virtual nodes will be launched in BCI Pod format. For more introductions to BCI Pod configuration items, please refer to Configure BCI Pod.
Delete the virtual node
- Stop all pods on the virtual node by executing the command:
kubectl drain <node name> --force. - Go to the Helm > Helm Instances page, select the corresponding cluster and namespace, and delete the
cce-virtual-kubeletinstance corresponding to the virtual node. - Delete the virtual node by executing the command:
kubectl delete node <node name>.
Note: If there are BCI pods allocated to virtual nodes in the cluster, uninstalling the
cce-virtual-kubeletcomponent will cause residual BCI instances.
Old-version clusters (cluster ID starts with c-)
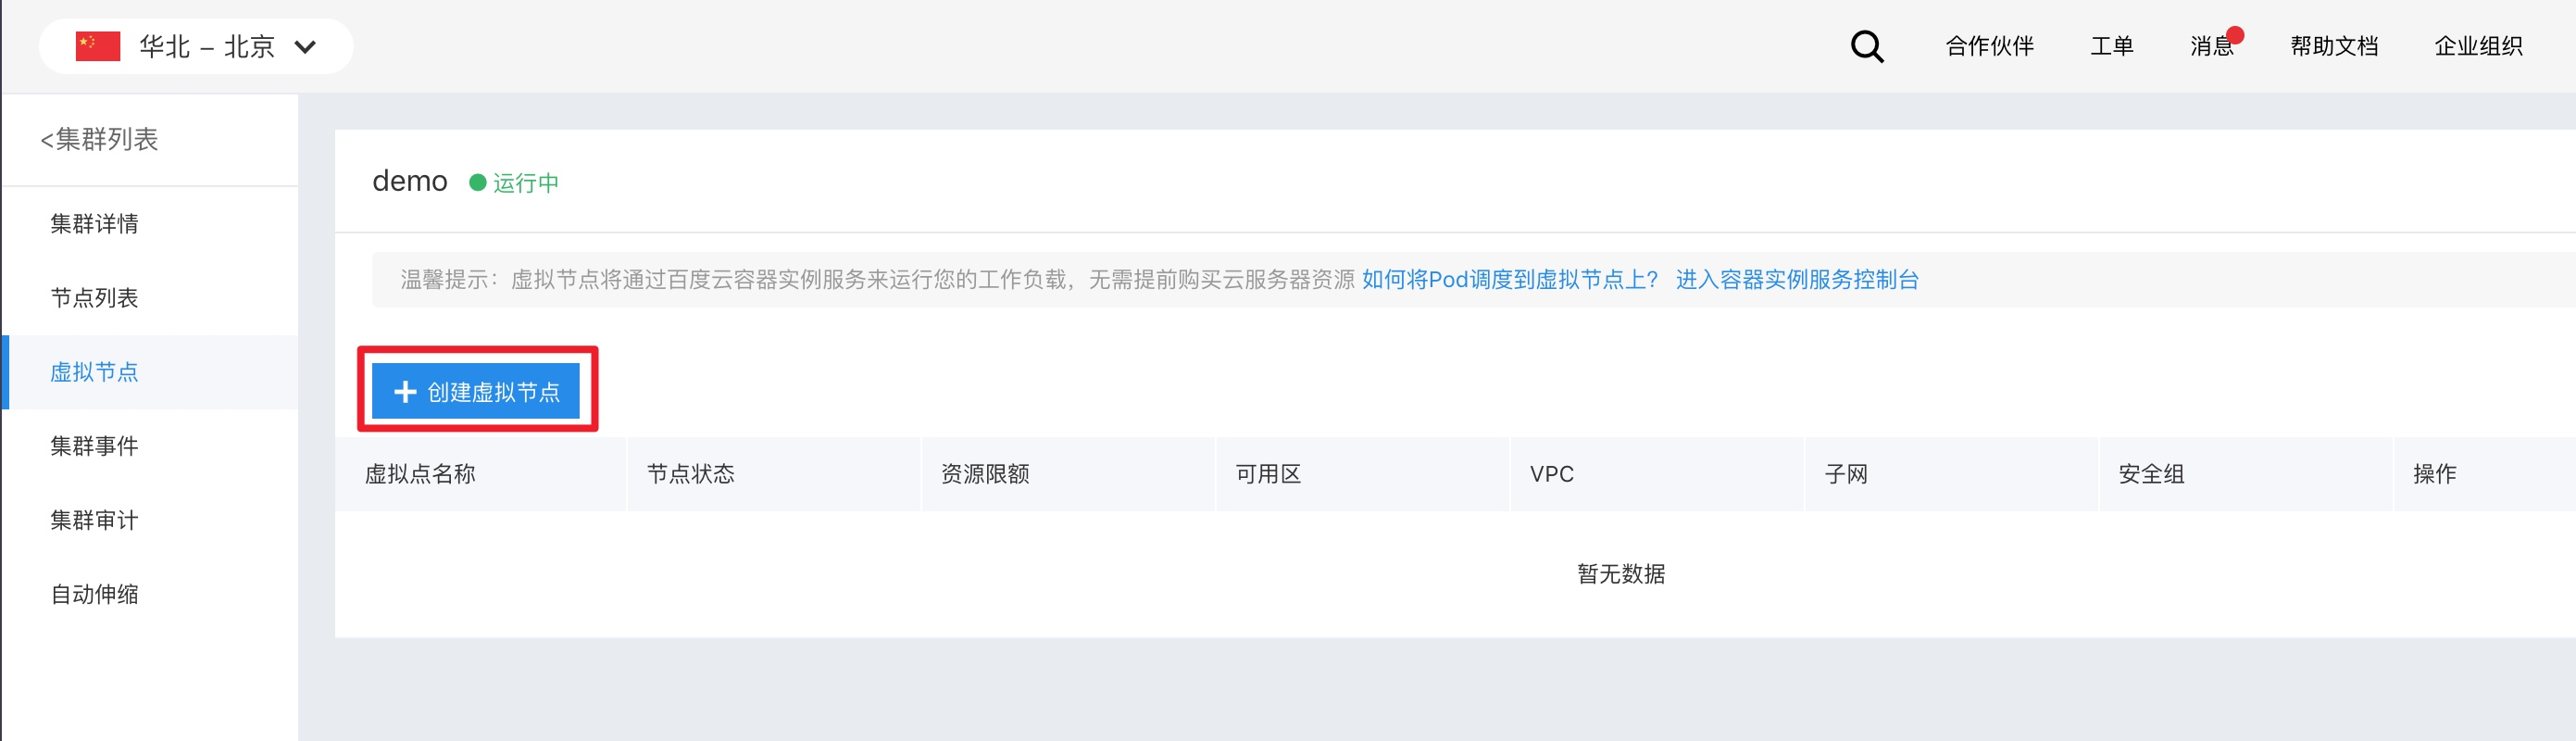
Create the virtual node
Log in to the CCE Management Console, click the cluster where you want to add a virtual node, select the Virtual Nodes tab in the left navigation bar, and click the Create Virtual Node button on the page.
Note: If you have not activated the container instance service, the Create button will be disabled. Clicking it will prompt you to activate the service first.
After clicking Create, enter the virtual node creation page. The parameter descriptions are as follows:
Basic information defines the properties of the virtual node:
| Parameters | Meaning | Remarks |
|---|---|---|
| Name of virtual node | The virtual node name is displayed in the virtual node list (console) and Kubernetes node list | Duplicate names are not allowed in the same cluster |
| CPU quota | CPU quota limits the total CPU of BCI instances that can be scheduled on the virtual node | It takes effect only if the resource quota of BCI pods is explicitly declared |
| Memory quota | Memory quota limits the total memory of BCI instances that can be scheduled on the virtual node | It takes effect only if the resource quota of BCI pods is explicitly declared |
Container instance properties defines the properties of BCI instances started on the virtual node:
| Parameters | Meaning | Remarks |
|---|---|---|
| VPC | VPC for BCI instances | If a different VPC from the cluster’s VPC is selected, network address conflicts may occur. For details, see [Network Conflict Description](#Why is a Network Conflict prompt displayed when creating a virtual node) |
| Availability zone and subnet | Availability zone and subnet for BCI instances | It only displays availability zones and subnets under the selected VPC where BCI instances can be created |
| Security group | Security group for BCI instances | - |
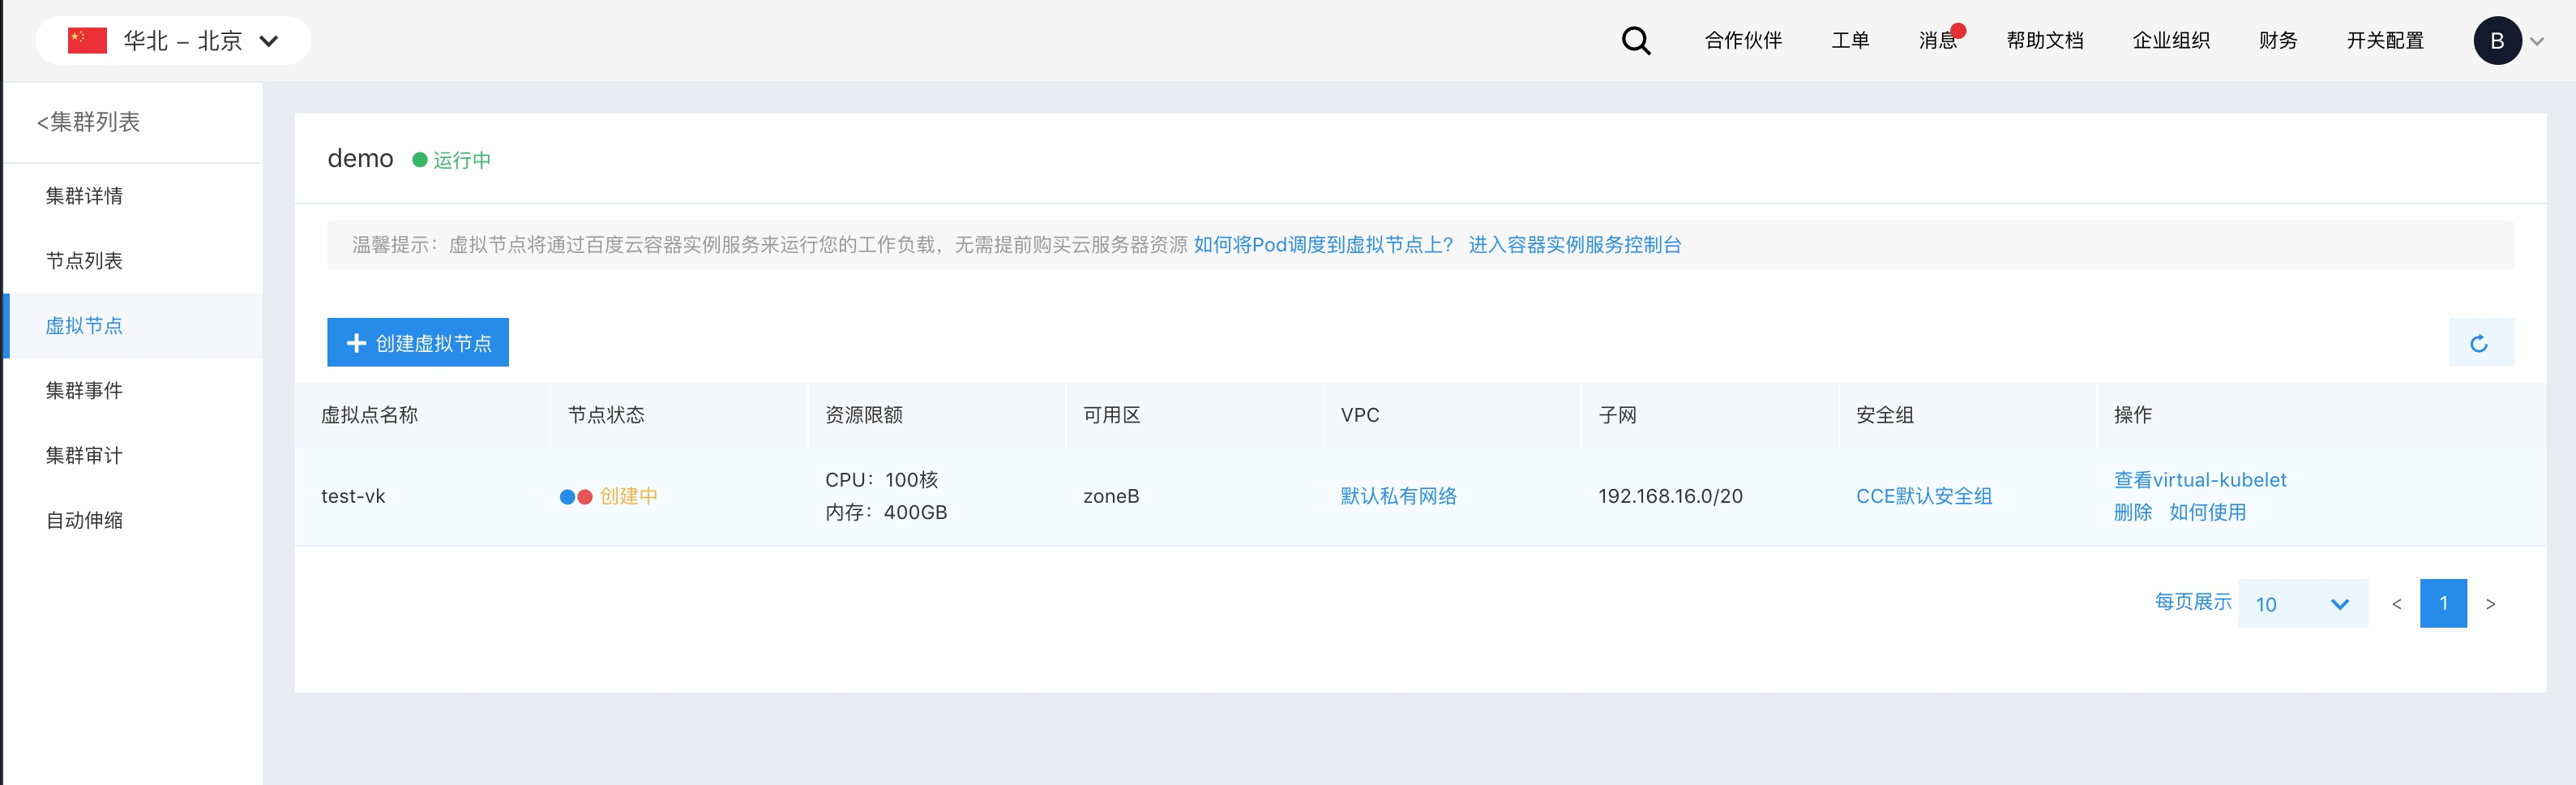
Click OK to navigate to the virtual node list page. The newly added virtual node and its status will be shown in the list.
Managing virtual nodes
In the virtual node list, you can check the current status and property details of virtual nodes.
- Virtual node name: The name of the virtual node.
-
Virtual node status:
- Creating: The virtual node is being created (normally takes less than one minute).
- Normal: The virtual node is in Ready state, and pods can be scheduled to it to initiate BCI instances.
- Abnormal: The virtual node is in NotReady state. Inspect the related virtual-kubelet to identify and resolve the issue.
- Deleting: When the Delete action is initiated, the virtual node status changes to “Deleting” until the process is fully completed.
-
Operation:
- View virtual-kubelet: Check the status of the virtual-kubelet associated with the virtual node to ensure it is running properly.
- Delete: Remove the virtual node from the system.
- How to use: Lists the Pod Spec fields required for scheduling pods to the corresponding virtual node.
Start Pods on virtual nodes
Compared with regular pods, you need to add the following nodeSelector and tolerations fields to the Pod Spec to schedule the pod to a virtual node.
1spec:
2  nodeSelector:
3    type: "virtual-kubelet"
4  tolerations:
5  - key: "virtual-kubelet.io/provider"
6    operator: "Equal"
7    value: "baidu"
8    effect: "NoSchedule"
Pods scheduled to virtual nodes will be deployed in the BCI Pod format.
For more BCI Pod configuration items, please refer to [Configure BCI Pod](CCE/Operation guide/Virtual Node/Configuring BCIPod.md).
Delete the virtual node
In the virtual node list, click "Delete" for the desired virtual node. Confirm the deletion and click "OK." The virtual node will enter the "Deleting" state and be successfully deleted once it disappears from the list.
If a Deletion Prohibited prompt appears, refer to [Why can’t I delete the virtual node](#Why can’t I delete the virtual node).
Why is a Network Conflict prompt displayed when creating a virtual node
When creating a virtual node, if you select a VPC other than the cluster's VPC (VPC A) as the container instance VPC (e.g., VPC B), the BCI instances on the virtual node will run in VPC B.
The address spaces of VPC A and VPC B could overlap. Additionally, the CCE cluster's container network occupies an address segment outside VPC A, which might also overlap with the address range of VPC B. Consequently, the IP address of a BCI pod in VPC B might correspond to a network address that also exists in VPC A. When accessing the IP address of the BCI instance in the cluster, you're likely to reach the entity with the same IP in VPC A (not the BCI instance), leading to unexpected behavior.
In the diagram, traffic targeting 172.16.0.3 in VPC A will not follow the dashed path to the BCI instance. Instead, it will take the solid path to another pod in the cluster.
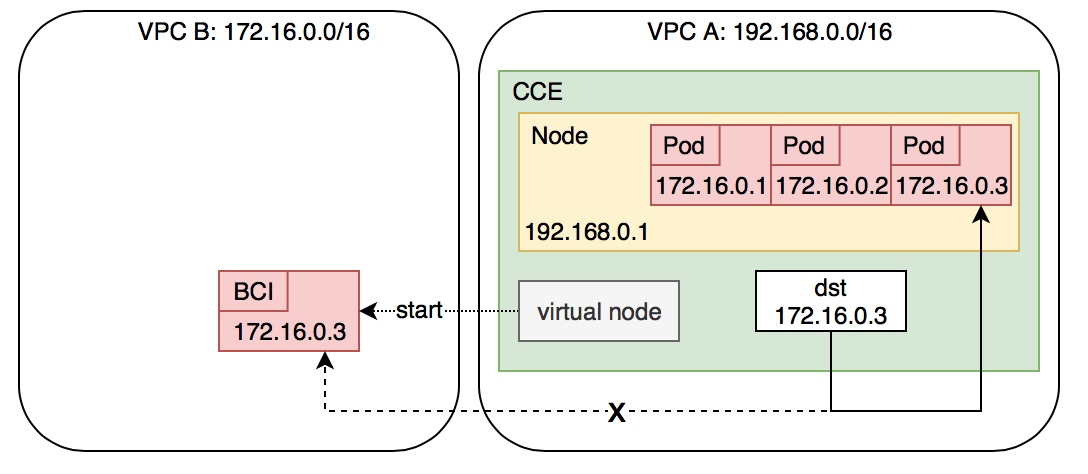
If you are fully aware of the risks associated with this scenario but still need to deploy container instances in VPC B for your business needs, you may proceed with the creation.
We strongly recommend restricting the scheduling of BCI instances to the same VPC as the CCE cluster.
Why can’t I delete the virtual node
CCE prevents the deletion of a virtual node if there are active BCI instances on it—direct deletion could lead to leaks of the BCI instances running on that node.
Generally, there is no need to delete virtual nodes. Unlike physical nodes, virtual nodes do not consume cluster computing resources. If deletion is necessary, ensure all pods are stopped or evicted manually from the node.
To evict pods from a virtual node, use the kubectl command-line interface to execute the following command (assuming the virtual node to be deleted is named bci-virtual-kubelet-0):
1$ kubectl drain bci-virtual-kubelet-0 --force