
Deployment Management
Overview
Users can create deployments using images via forms or by creating and modifying deployments with YAML file templates provided by Baidu AI Cloud. They can monitor deployed applications' resources in real time, conveniently manage and control the lifecycle, deployment methods, and associated services and Pods of the applications.
Prerequisites
- A K8S Cluster CCE has been created successfully. For specific operations, refer to Create a K8S Cluster CCE.
Create a stateless workload (deployment)
Create a new stateless workload via the CCE console using forms, YAML, or kubectl commands.
Method I: Create via console form
- Sign in to Cloud Container Engine Console (CCE).
- In the left navigation bar, click Cluster Management -> Cluster List to enter the cluster list page. Click the Cluster Name to enter the Cluster Management page.
- In the left navigation bar of the Cluster Management page, click Workload > Stateless.
- Click Create Stateless in the upper left corner of the stateless workload list to enter the Workload Creation page.
- Complete the configuration in the basic information module and click Next to proceed to container configuration.
| Parameters | Description |
|---|---|
| Workload name | Name the workload as prompted by the system. Ensure the name is unique within the same namespace. |
| Namespace | Select the namespace for workload deployment (default: default). Custom namespaces are supported; for details, refer to Namespace Operations. |
| Workload type | Select a stateless workload (deployment). |
| Desired Pod count | Specify the number of Pod instances for the workload. |
| K8S label | Specify labels for the workload (corresponding to labels in Kubernetes) to identify the key-value pairs of workloads, and help Kubernetes quickly filter target workloads combined with selectors. For details, refer to K8S Label Description. |
| Annotation | Specify annotation information for the workload (corresponding to annotations in Kubernetes) to mainly record additional information for application deployment, security policies and scheduling policies, and fail to identify or distinguish resources. For details, refer to K8S Annotation Description. |
-
Complete the relevant configurations in the container configuration module, fill in the container name and image address, and then click Select the Image to select the image address in CCR in the pop-up window. Click Next to enter the advanced configuration module.
Notes:
- Multiple containers can be added to a Pod. Click Add Container on the right to configure additional containers for the Pod.
- If a private image is used, configure repository access credentials in the advanced settings on this page.
| Parameters | Description |
|---|---|
| Container name | Name the container following the system's rules. Each container name must be unique within the same workload. |
| Image address | Click Select Image to pick the image for the container. Two types of images are supported.
|
| Image version | Choose the image version to deploy. |
| Image pull policy | Select an image pull policy. CCE provides three pull policies (imagePullPolicy):
|
| Container resources | Configure resources.limits and resources.requests for container resources. If the request value and limit value are not filled in, the quota is not limited. For instructions and recommendations for configuration of request value and limit value, please refer to Requests and Limits.
|
| Container ports | Define the port name, protocol, and port number for the container. |
| Environment variables | Click Add Environment Variable to set up environment variables. Kubernetes automatically injects these variables into containers when creating Pods. Supported types include: |
| Container startup item | Add startup parameters to the container, and currently support the following container startup parameters: kubectl exec -i -t command (configured during Pod startup). |
| Privileged container | Default: Disabled. When enabled, the container gains elevated privileges similar to the host OS of the worker node, such as accessing hardware devices or mounting file systems. |
| Init container | Default: disable. Select whether the container is used as an Init container. Init containers do not support health checks. The Init container is a special container that can run before other application containers in the Pod start. Each Pod can contain multiple containers, and there can also be one or more Init containers in the Pod that start before the application container. The application container in the Pod will only start and run when all Init containers have completed running. For details, refer to Init Container. |
| Health check | Support configuring Liveness Check, Readiness Check and Startup Check. Detect whether the load in the container is normal based on HTTP request check, TCP port check, command execution check and GRCP check. Taking the configuration liveness check as an example, the following introduces configuration parameters.
|
| Lifecycle | Configure the operations that need to be performed at specific stages of the container's lifecycle, such as startup commands, post-processing after startup and pre-processing before stopping. For details, please refer to Set the Container Lifecycle. |
| Volume | Support mounting various types of volumes for containers for data persistence, including subpath mounting via subPath and extended path mounting via subPathExpr: cm1:path1;cm2:path2.sc1:path1;sc2:path2. |
| Repository access credentials | If a container uses a private image, be sure to add the corresponding access credentials for the image repository. Support creating credentials or selecting existing ones. For details, refer to Configure Access Credentials. |
- In the advanced settings module, configure the scaling policy, update policy and scheduling policy. Click Finish to create the workload.
| Parameters | Description |
|---|---|
| Autoscaler configuration | Two autoscaler configuration types are supported: Horizontal Pod Autoscaler and Cron Horizontal Pod Autoscaler.
|
| Update strategy | When Pod configurations change, the workload uses a new Pod to replace the old Pod mechanism, which includes two strategies:
|
| Scheduling policies | Enable flexible workload scheduling by defining affinity and anti-affinity rules, which support both load and node affinity.
|
| Pod labels | Add labels to each Pod belonging to the workload (corresponding to labels in Kubernetes), to identify key-value pairs of Pods, and use selectors to help Kubernetes quickly filter target Pods. For details, refer to K8S Label Description. |
| Pod annotations | Add annotations to each Pod belonging to this workload (corresponding to annotations in Kubernetes) to mainly record additional information for application deployment, security policies and scheduling policies, and fail to identify or distinguish resources. For details, refer to K8S Annotation Description. |
Method II: Create via YAML
- Click Create via YAML in the upper left corner of the deployment list to enter the New Workload page.
- Select a namespace from the drop-down list, fill in the YAML file, and click OK.
Description:
- Template type: Create using either the example template or "My Template."
- Replication: Duplicate the content of the current YAML file.
- Save as: Save the current file template under the name "My Template."
- Cancel: Return to the list page.
Workload YAML Example
1apiVersion: apps/v1
2kind: Deployment
3metadata:
4  name: deployment-example
5  labels:
6    app: nginx
7spec:
8  replicas: 2
9  minReadySeconds: 0
10  strategy:
11 type: RollingUpdate # Strategy: Rolling Update
12    rollingUpdate:
13      maxSurge: 25%
14      maxUnavailable: 25%
15  selector:
16    matchLabels:
17      app: nginx
18  template:
19    metadata:
20      labels:
21        app: nginx
22    spec:
23      restartPolicy: Always
24      # restartPolicy: OnFailure
25      # restartPolicy: Never
26      containers:
27        - name: nginx
28          image: registry.baidubce.com/cce/nginx-alpine-go:latest
29          imagePullPolicy: Always
30          # imagePullPolicy: IfNotPresent
31          # imagePullPolicy: Never
32          ports:
33            - containerPort: 80
34 resources: # Limit Range
35            limits:
36              cpu: 250m
37              memory: 512Mi
38            requests:
39              cpu: 250m
40              memory: 512Mi
41 livenessProbe: # Health Check: Liveness Probe
42            httpGet:
43              path: /
44              port: 80
45            initialDelaySeconds: 20
46            timeoutSeconds: 5
47            periodSeconds: 5
48 readinessProbe: # Health Check: Readiness Probe
49            httpGet:
50              path: /
51              port: 80
52            initialDelaySeconds: 5
53            timeoutSeconds: 1
54            periodSeconds: 5
55          # volumeMounts:
56          #   - name: nginx-volume
57          #     mountPath: "/usr/share/nginx"
58      # volumes:
59      #   - name: nginx-volume
60      #     flexVolume:
61      #       driver: "baidubce/cds"
62      #       fsType: "ext4"
63      #       options:
64#         volumeID: "{id}" # Fill in the CDS ID. Note: CDS must be in the same availability zone as the Pod!!
65      # nodeSelector:
66      #   beta.kubernetes.io/os: linux
67# tolerations: # Toleration Taints
68      #   - effect: NoExecute
69      #     operator: Exists
70      #   - effect: NoSchedule
71      #     operator: Exists
72# affinity: # Affinity
73      #   nodeAffinity:
74      #     requiredDuringSchedulingIgnoredDuringExecution:
75      #       nodeSelectorTerms:
76      #         - matchExpressions:
77      #             - key: failure-domain.beta.kubernetes.io/zone
78      #               operator: In
79      #               values:
80      #                 - zoneA
81      #                 - zoneB
82      #                 - zoneC
Method III: Create via kubectl
- Prepare the YAML file for deployment.
- Install kubectl and connect to the cluster. For details, refer to Connect to a Cluster via Kubectl.
- Duplicate the YAML provided below and save it as deployment.yaml. This YAML specifies both a deployment and a ClusterIP-type service.
1apiVersion: apps/v1
2 kind: Deployment    # Workload type
3metadata:
4  name: nginx-test
5 namespace: default  # Modify the namespace as needed
6  labels:
7    app: nginx
8spec:
9 replicas: 2  # Specify the number of Pods
10  selector:
11    matchLabels:
12      app: nginx
13 template: # Pod configuration
14    metadata:
15 labels: # Pod labels
16        app: nginx
17    spec:
18      containers:
19 - name: nginx  # Container name
20 image: registry.baidubce.com/cce/nginx-alpine-go:latest # Use a specific version of the Nginx image
21        ports:
22 - containerPort: 80  # Port exposed by the container
23 protocol: TCP  # Specify the protocol as TCP/UDP (default is TCP)
24---
25# service
26apiVersion: v1
27kind: Service
28metadata:
29  name: nginx-test-svc
30 namespace: default  # Modify the namespace as needed
31  labels:
32    app: nginx
33spec:
34  selector:
35 app: nginx  # Match labels to ensure that the service points to the correct Pods
36  ports:
37 - port: 80           # Port provided by the service within the cluster
38 targetPort: 80     # Point to the port monitored by the application inside the container (containerPort)
39 protocol: TCP      # Protocol (default is TCP)
40 type: ClusterIP      # Service type (default is ClusterIP for internal access)
41 sessionAffinity: None # Default value; no client session affinity is used-
Run the following command to create the deployment and service.
Bash1kubectl apply -f deployment.yamlExpected output:
Bash1deployment.apps/nginx-test created 2service/nginx-test-svc created -
Execute the following command to view the public IP address of the service.
Bash1kubectl get svc -
Execute the following command to verify whether the deployment is created successfully:
Bash1 kubectl get deployments
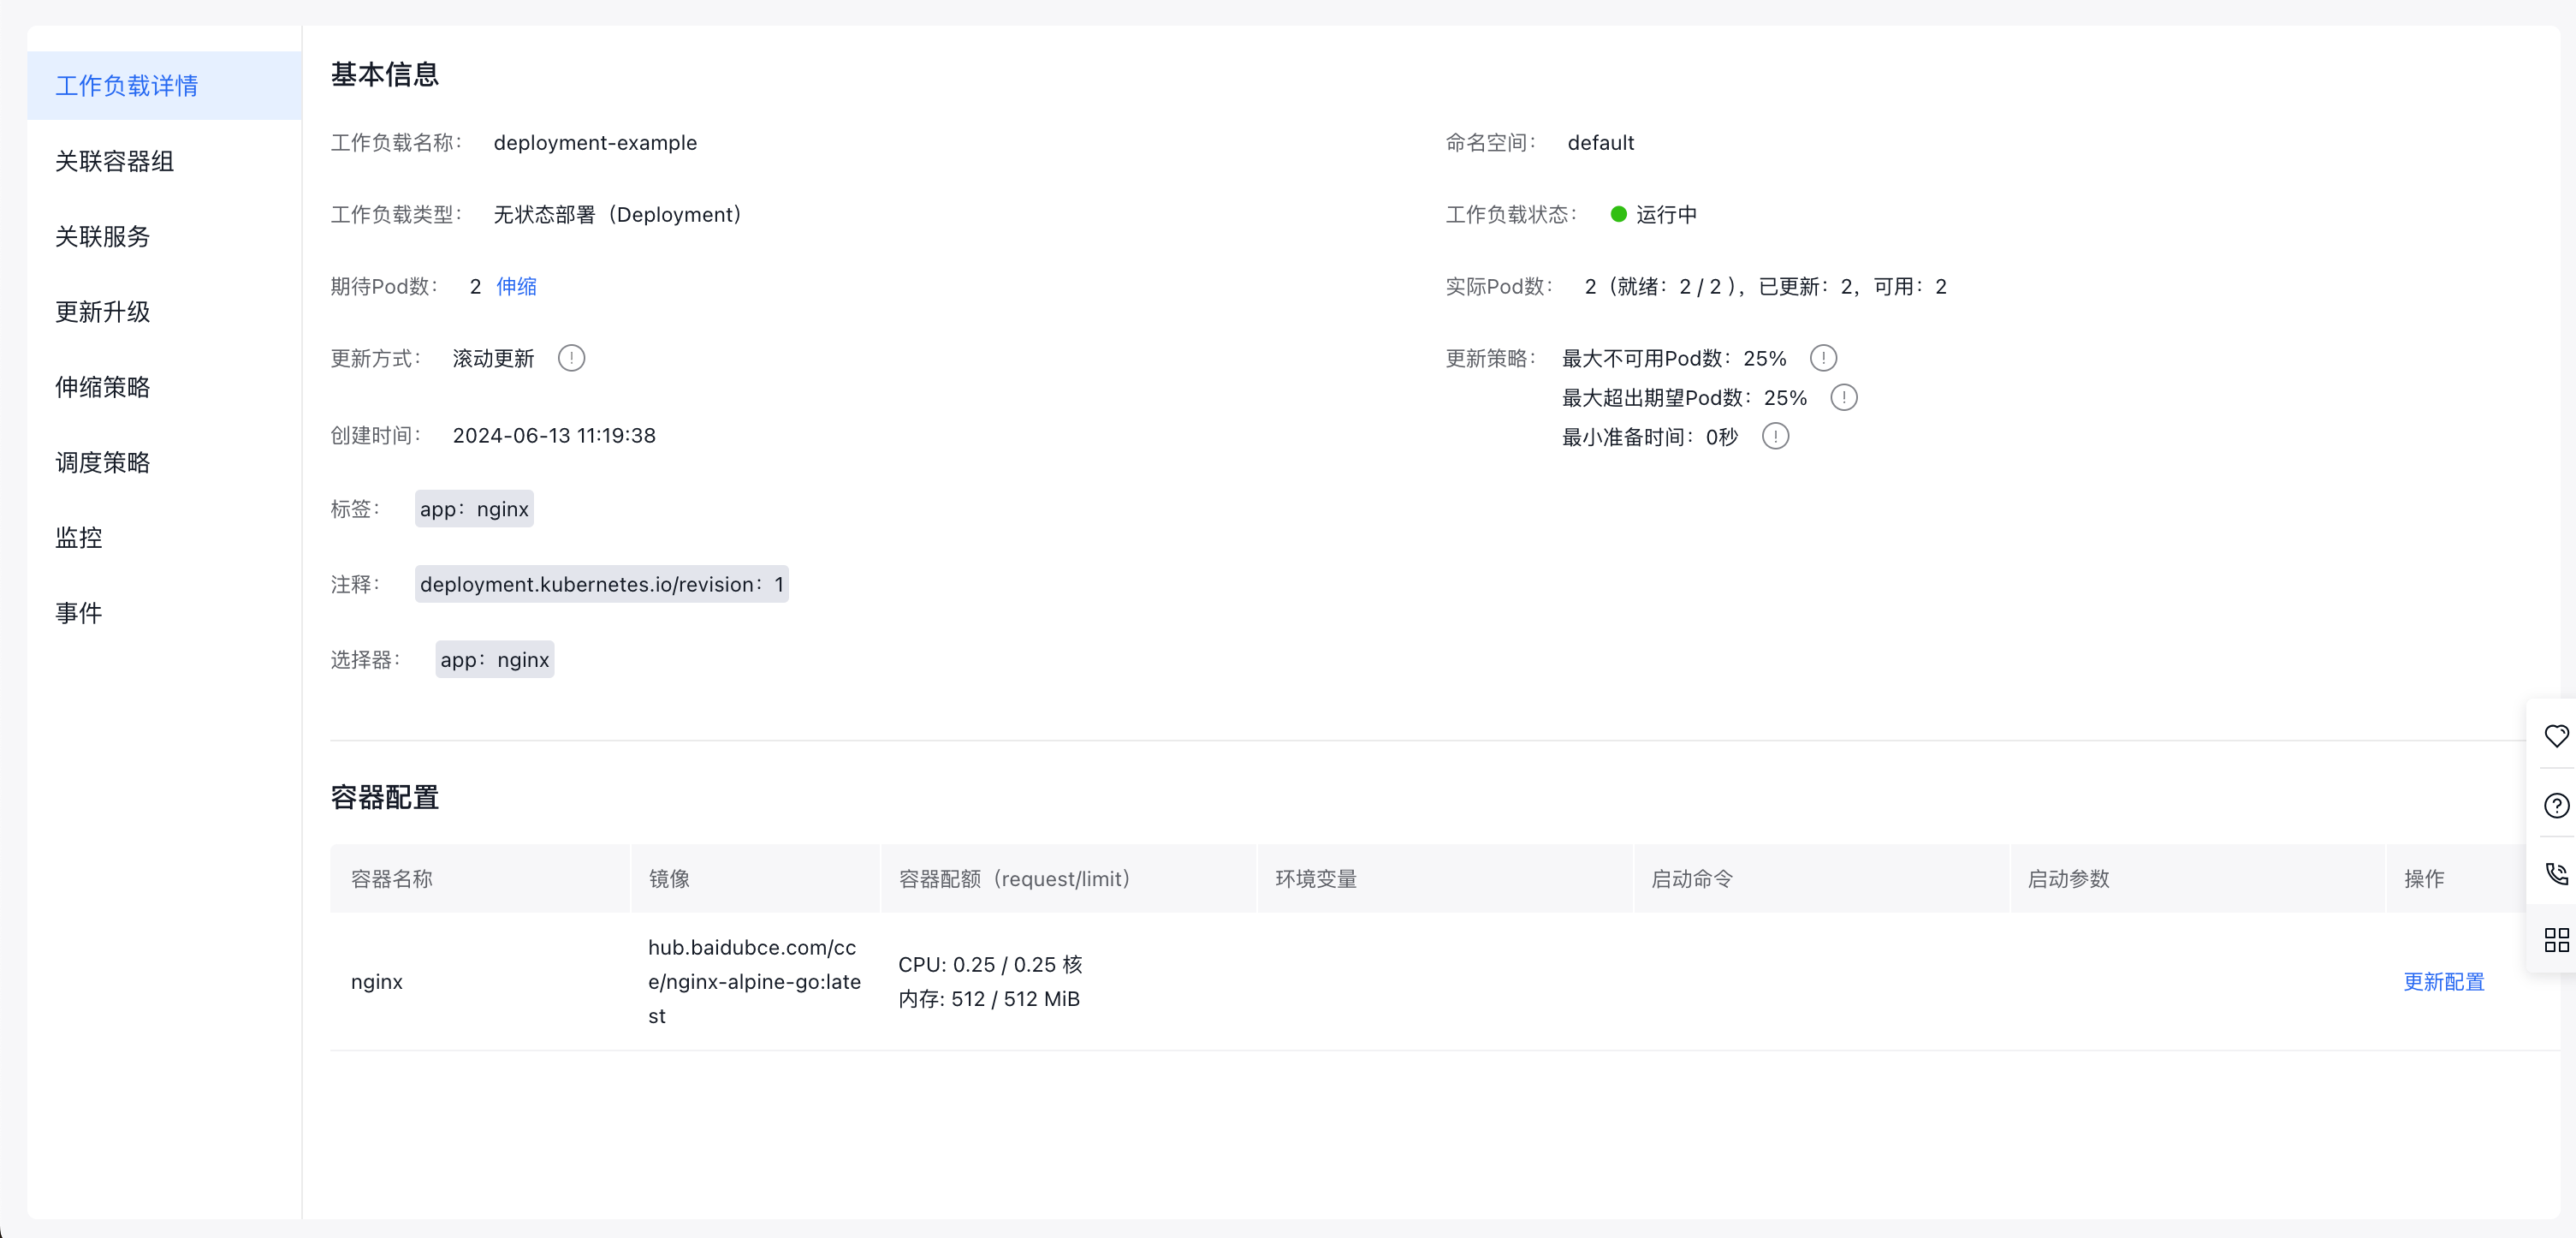
View workload details
Click the name of any workload in the list to enter its details page, which includes: workload details, associated Pods, associated services, updates/upgrades, scaling policies, scheduling policies, monitoring data, events, etc.
Update Pod count
Enable efficient updates to the Pod count for a stateless workload using the console.
-
Log in to the Stateless Workload Management page.
a. Sign in to Cloud Container Engine Console (CCE).
b. In the left navigation bar, click Cluster Management -> Cluster List to enter the Cluster List page. Click the Cluster Name to enter the Cluster Management page.
c. In the left navigation bar of the Cluster Management page, click Workload > Stateless. - In the target stateless workload list, click Scale in the row of the stateless workload to be adjusted. In the scaling pop-up window, enter the required Pod count and click OK.
Update stateless workloads
Allow modifications to the created stateless workload through either the console interface or a YAML file.
-
Log in to the Stateless Workload Management page.
a. Sign in to Cloud Container Engine Console (CCE).
b. In the left navigation bar, click Cluster Management -> Cluster List to enter the Cluster List page. Click the Cluster Name to enter the Cluster Management page.
c. In the left navigation bar of the Cluster Management page, click Workload > Stateless Workload. - In the operation column of the target stateless workload, click Update and Upgrade or Edit YAML.
Description:
Neither console interface updates nor YAML file editing support updating the stateless workload name or namespace.
1a. Update: Update configuration information on the console. For detailed parameter descriptions, please refer to [Create via Console] (https://cloud.baidu.com/doc/CCE/s/cjxpoxrgi). <br>
2 b. Edit YAML: Update configuration information by editing the YAML file. For detailed YAML configuration descriptions, please refer to [Create via YAML] (https://cloud.baidu.com/doc/CCE/s/cjxpoxrgi). <br>- Click Submit after completing the update.
Restart the workload
Allow restarting of stateless workloads through the console. After a restart, all Pods in the workload will also restart.
-
Log in to the Stateless Workload Management page.
a. Sign in to Cloud Container Engine Console (CCE).
b. In the left navigation bar, click Cluster Management -> Cluster List to enter the Cluster List page. Click the Cluster Name to enter the Cluster Management page.
c. In the left navigation bar of the Cluster Management page, click Workload > Stateless. - Select the Stateless tab, and click More > Restart next to the workload.
- In the pop-up confirmation message, click OK to finalize the workload restart.
Label and annotation management
Labels are applied to stateless workloads as key-value pairs. Once labels are added, you can organize and filter stateless workloads using these labels. A single workload or multiple workloads can be labeled.
Description:
Label format requirements: Labels must start and end with letters or numbers, contain letters, numbers, hyphens (-), underscores (_) or dots (.), and be within 63 characters. For details, refer to K8S Label Description.
-
Log in to the Stateless Workload Management page.
a. Sign in to Cloud Container Engine Console (CCE).
b. In the left navigation bar, click Cluster Management -> Cluster List to enter the Cluster List page. Click the Cluster Name to enter the Cluster Management page.
c. In the left navigation bar of the Cluster Management page, click Workload > Stateless. - Select the Stateless tab, and click More > Labels and Annotations next to the workload.
- Click Add Label, enter the key and value, and then click Update.
View monitor
Check the CPU and memory usage of workloads and Pods in the CCE console to assess the required resource specifications.
Description:
Viewing workload monitoring information depends on the cluster being connected to the Cloud Managed Service for Prometheus. If the cluster is not connected to the Cloud Managed Service for Prometheus, please follow the prompts on the interface to connect. For details, refer to Monitor Clusters with Prometheus.
-
Log in to the Stateless Workload Management page.
a. Sign in to Cloud Container Engine Console (CCE).
b. In the left navigation bar, click Cluster Management -> Cluster List to enter the Cluster List page. Click the Cluster Name to enter the Cluster Management page.
c. In the left navigation bar of the Cluster Management page, click Workload > Stateless. - In the target stateless workload list, click Monitor in the row of the stateless workload to be monitored.
- View the monitor data of the stateless workload on the Monitor page. For descriptions of container-related monitor metrics, please refer to Monitor Metrics Description.
View logs
Use the "Log" function to examine log information for stateless workloads.
Description:
Currently displayed logs are container standard output logs, which do not support persistence or advanced operation and maintenance capabilities. For more comprehensive logging, enable the Log Center Function.
-
Log in to the Stateless Workload Management page.
a. Sign in to Cloud Container Engine Console (CCE).
b. In the left navigation bar, click Cluster Management -> Cluster List to enter the Cluster List page. Click the Cluster Name to enter the Cluster Management page.
c. In the left navigation bar of the Cluster Management page, click Workload > Stateless. - In the target stateless workload list, click More > Log next to the workload.
- Examine container log data on the log page.
Delete stateless workloads
If a workload is no longer required, you can remove it.
Description:
Deleting a stateless workload may cause service unavailability; please proceed with caution.
-
Log in to the Stateless Workload Management page.
a. Sign in to Cloud Container Engine Console (CCE).
b. In the left navigation bar, click Cluster Management -> Cluster List to enter the Cluster List page. Click the Cluster Name to enter the Cluster Management page.
c. In the left navigation bar of the Cluster Management page, click Workload > Stateless. - In the target stateless workload list, click More > Delete next to the workload.
- In the secondary confirmation dialog box that pops up in the system, confirm the information and click OK.