
Best Practice for GPU Virtualization with Optimal Isolation
1. Overview
This guide is designed to help users make the most of Baidu AI Cloud’s GPU virtualization isolation-optimized service. With this document, you’ll learn how to choose and configure GPU resources, use GPU-exclusive and shared modes, and ensure task stability and security.
2. Business workflow

3. Prerequisites
Before using the GPU virtualization isolation-optimized service, complete the following operations to proceed with remaining configurations.
3.1 Cluster creation
(For reference, see the Cluster Creation documentation)
- Sign in to Baidu AI Cloud Platform:
- If no username exists, sign up first. Refer to Register a Baidu Account for operations
- If a username exists, refer to {Sign in for operations.
- After logging in successfully, go to Product Services - Cloud Native - Cloud Container Engine (CCE) to access the Cluster Management - Cluster List page.
- (Optional) The Cluster List page shows all created K8S Cluster CCE names/IDs, statuses, versions, etc., and allows users to search for clusters by name.
- (Optional) Choose a region and switch as needed. The Cloud Container Engine (CCE) service currently supports regions such as North China - Beijing, North China - Baoding, South China - Guangzhou, East China - Suzhou, and Hong Kong (China).
- Click on Create Cluster to navigate to the Select Template page. Choose a template that aligns with the template description and your business needs.
- By default, the cluster limit in a single region is 20 clusters, with a maximum of 200 nodes per cluster.
- To increase the quota, submit a ticket.
- Click OK and configure the cluster based on the cluster creation guide and your business requirements.
- Billing and Region

- Basic configuration
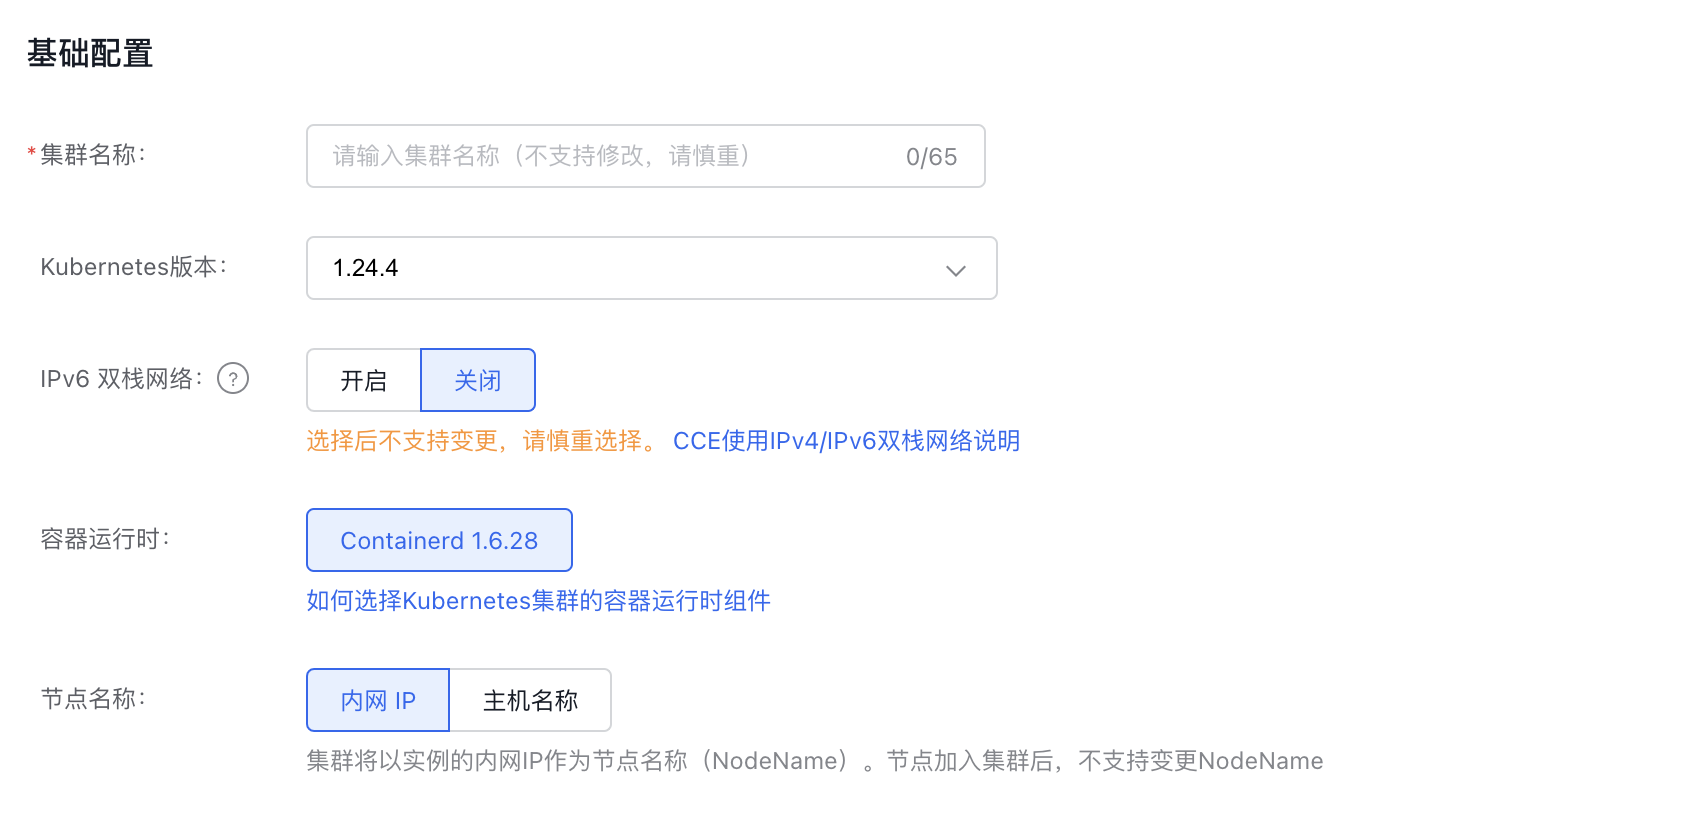
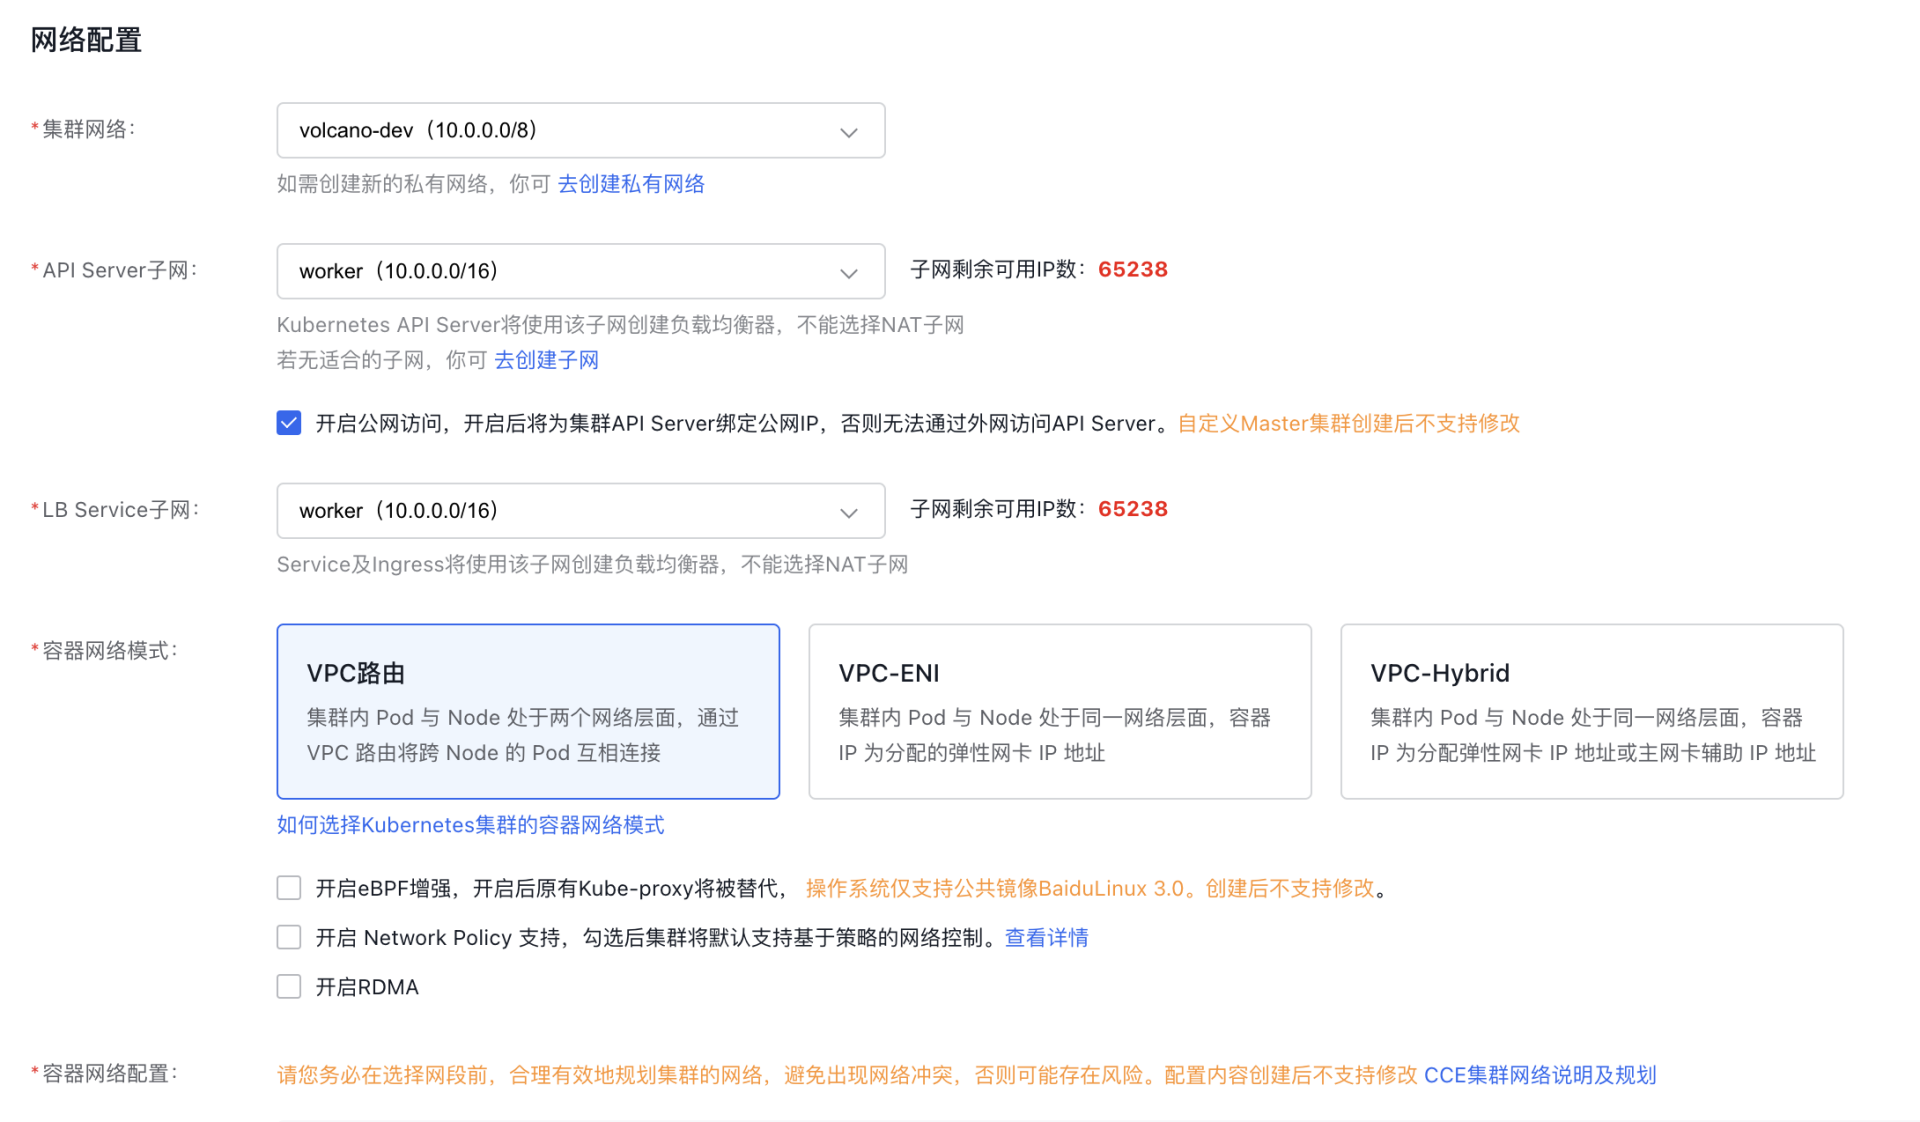
- Network configuration
The container network uses a separate address space, which must remain isolated from the node network, node subnet, and other clusters' container networks.
- Node configuration
- You can choose Create New Node.
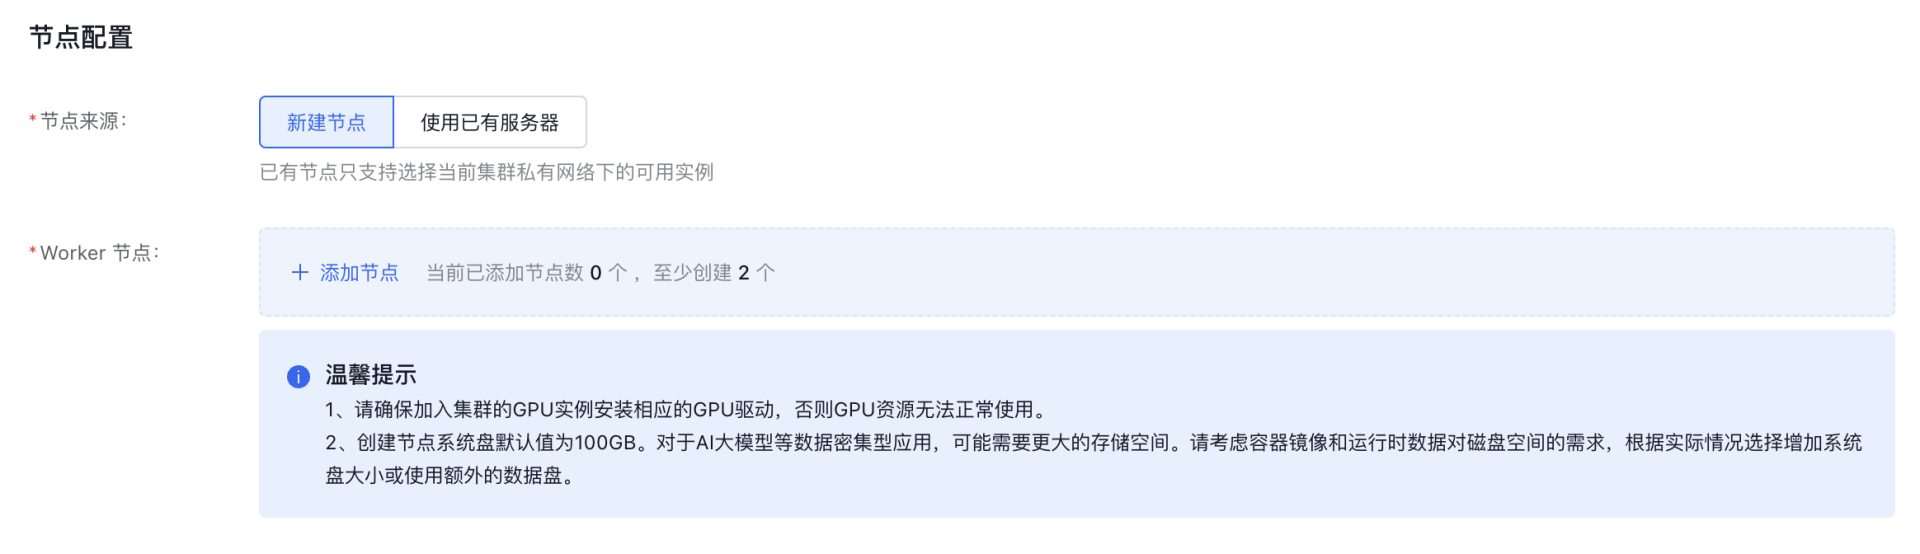
- Once selected, click Add Node to open the Add Node dialog box.
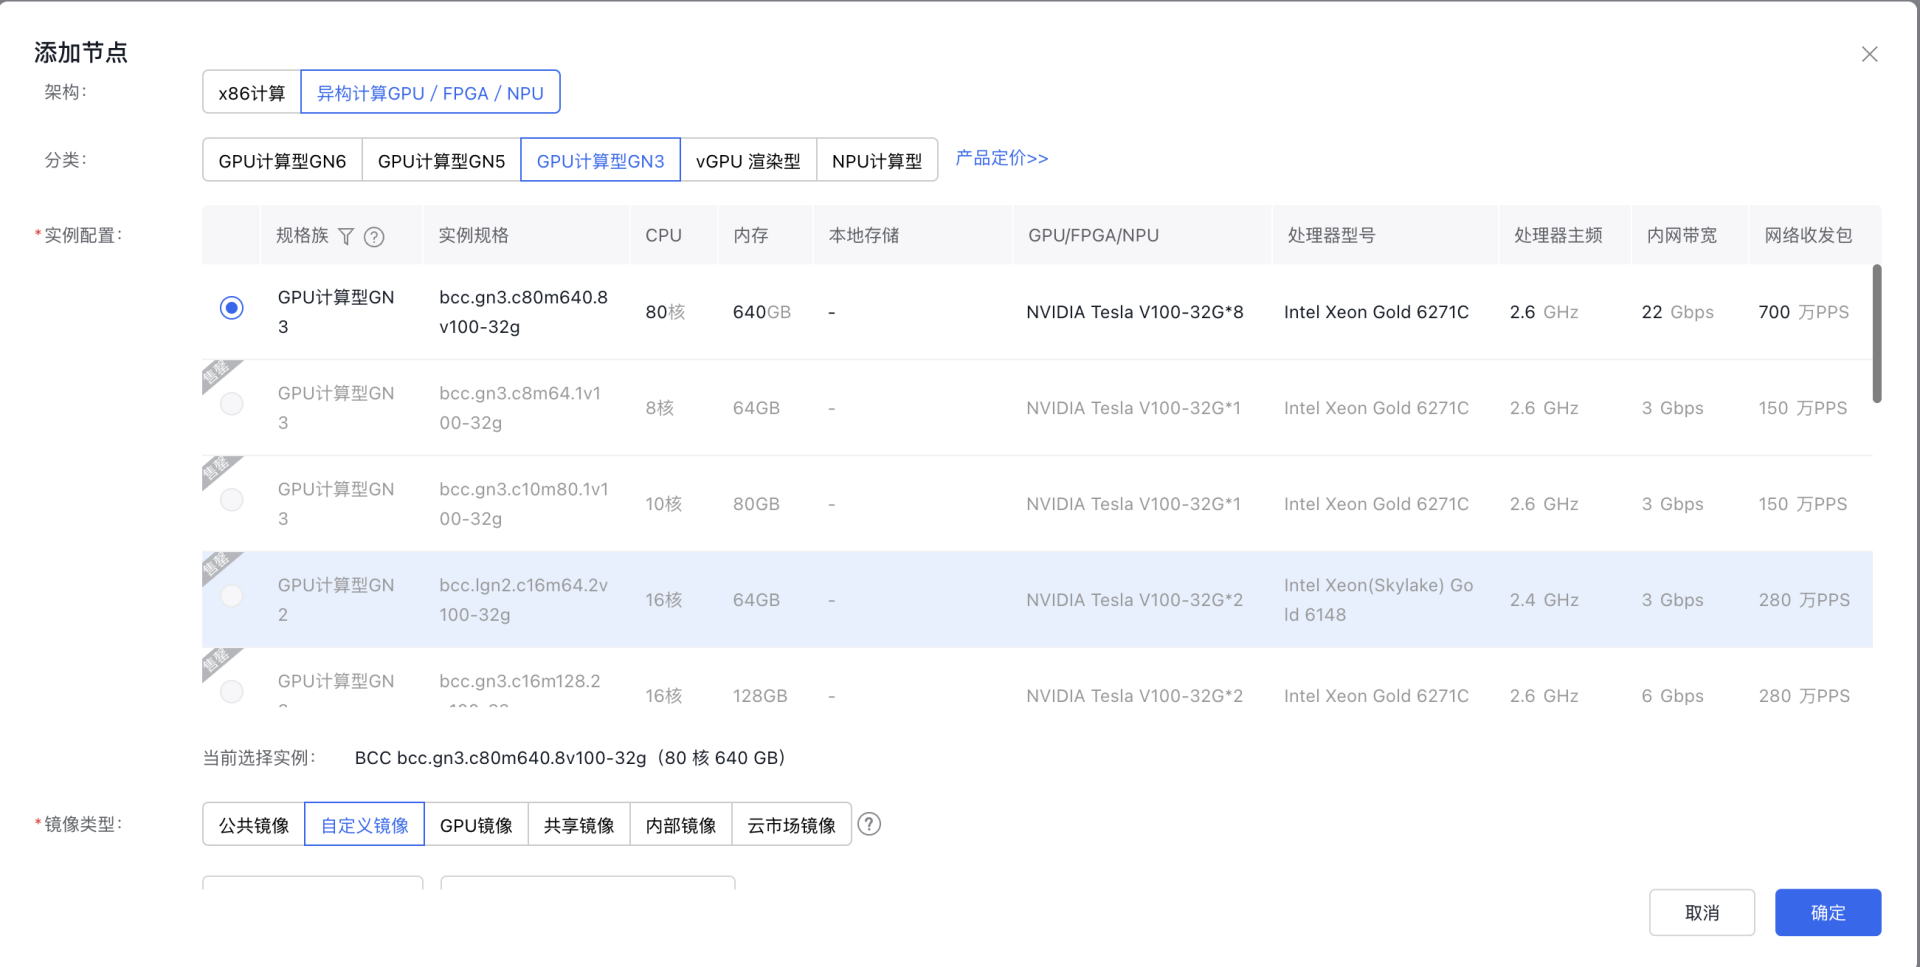
Note: In the instance configuration section, if GPU virtualization is required for the node, refer to the GPU virtualization compatibility list for isolation-optimized types during configuration. To ensure successful task creation, select a compatible instance as per the list—otherwise, incompatible GPUs will not be detected during task setup.
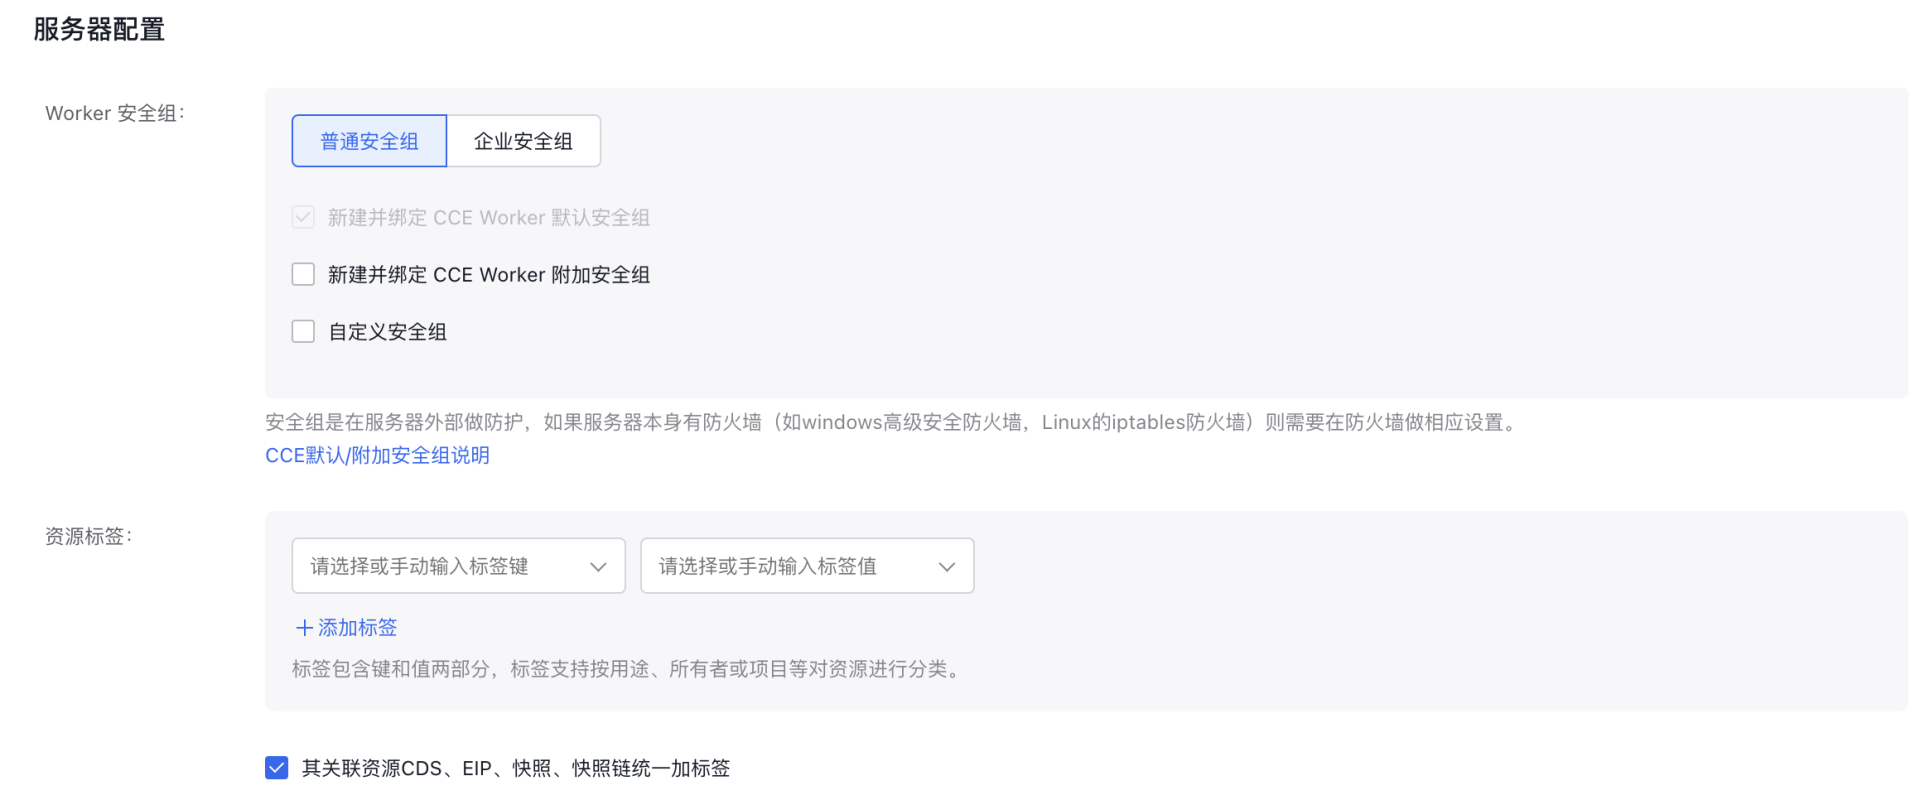
- Server configuration
3.2 Install required components:
You need to install the following components in Cluster - Component Management - Cloud Native AI: CCE GPU Manager, CCE Deep Learning Frameworks Operator and CCE AI Job Scheduler.
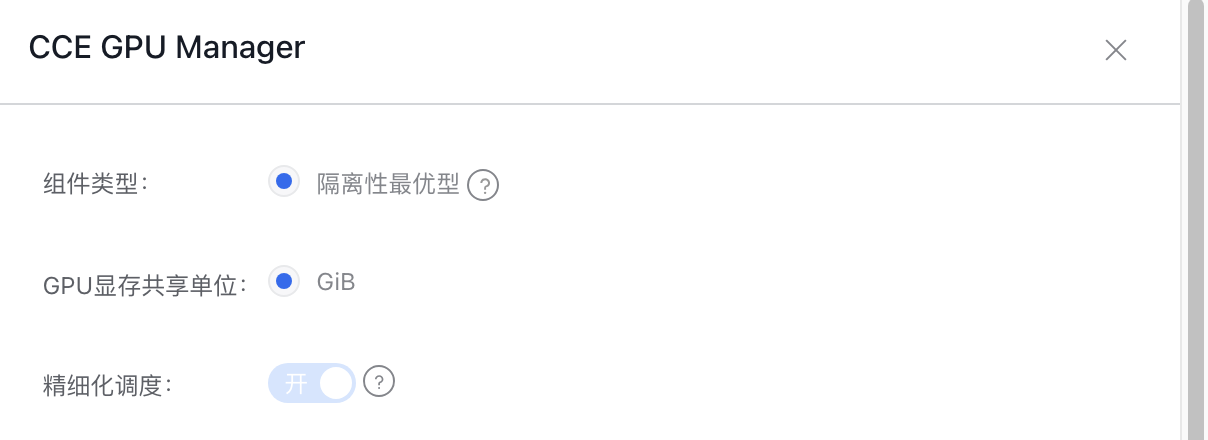
3.2.1 CCE GPU Manager component:
Component parameter description:
| Parameters | Optional values | Description |
|---|---|---|
| Component type | Isolation-optimized type | Refer to the relevant GPU virtualization compatibility list. |
| GPU memory sharing unit | GiB | The minimum unit for GPU memory partitioning, currently only supporting GiB |
| Fine-grained scheduling | Enable/disable | After disabling fine-grained scheduling, resource reporting does not distinguish between specific GPU models. After enabling fine-grained scheduling, you can select specific GPU models when creating queues and tasks. |
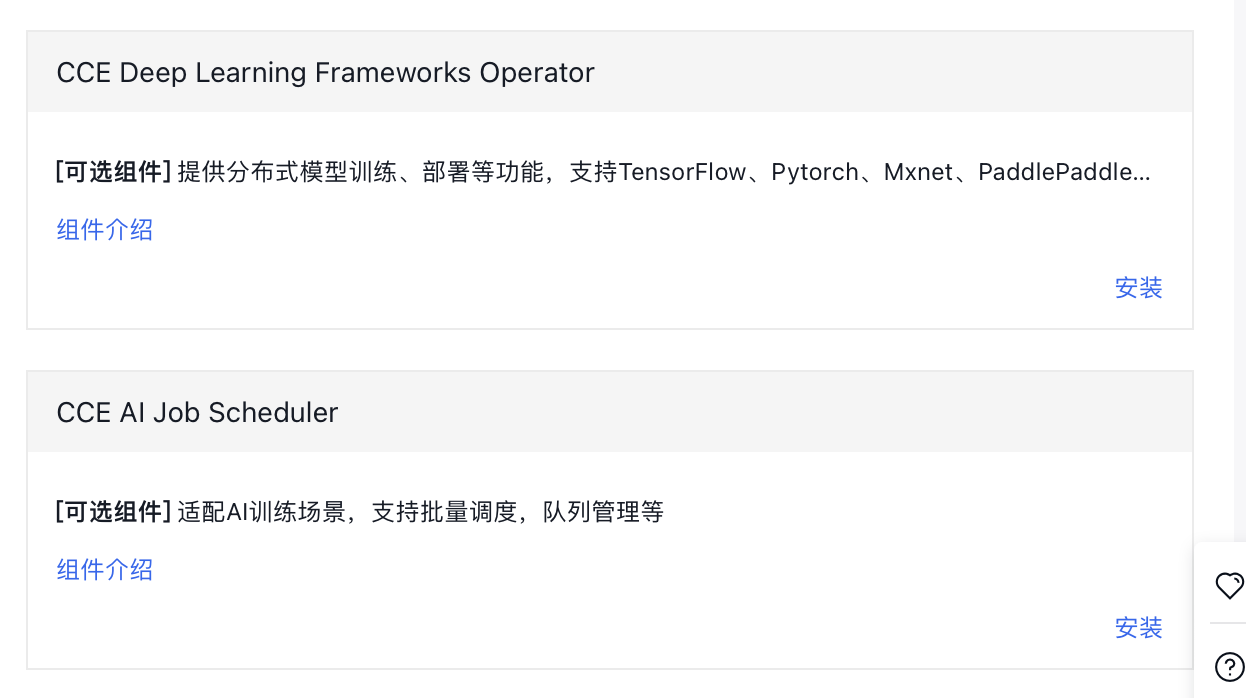
3.2.2 CCE Deep Learning Frameworks Operator and CCE AI Job Scheduler components
Install these components directly in the Component Management section
3.3 Steps to enable memory sharing on nodes:
- Sign in to the Baidu AI Cloud official website and enter the management console.
- Select Product Services - Cloud Native - Cloud Container Engine (CCE) to enter Cluster Management - Cluster List.
- Click on the target cluster name in the Cluster List page to navigate to the cluster management page.
- On the left sidebar, select Node Management - Worker to enter the node list page.
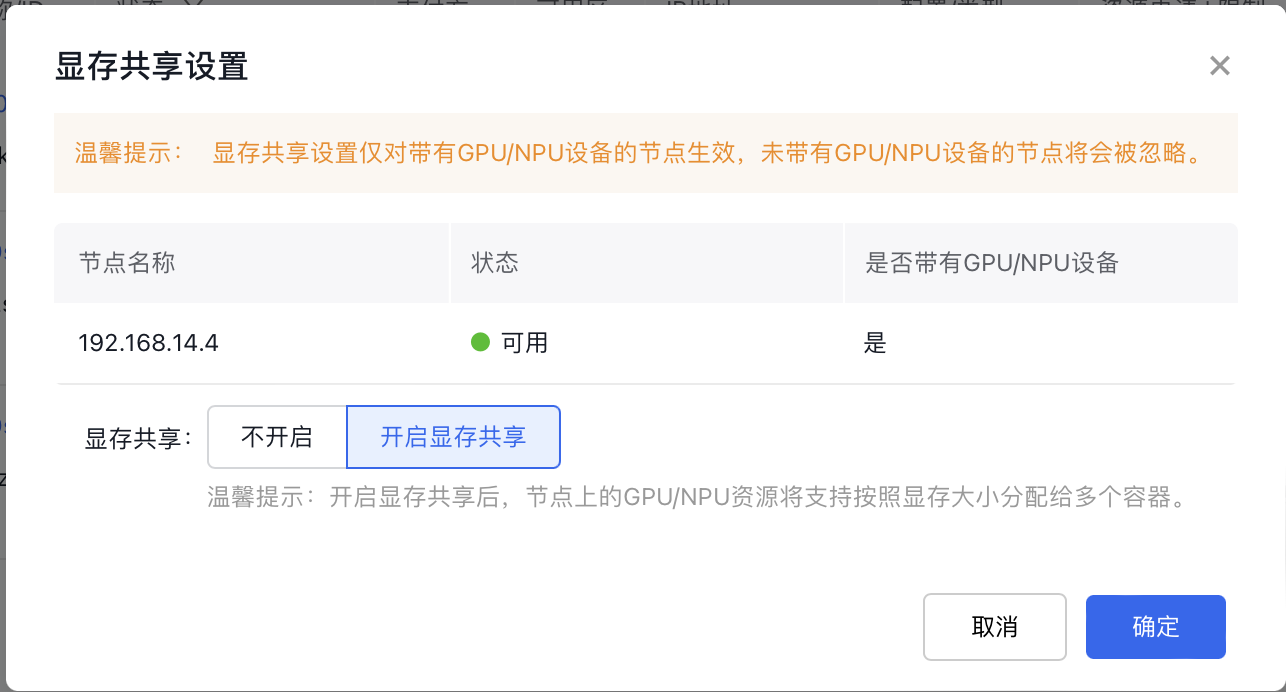
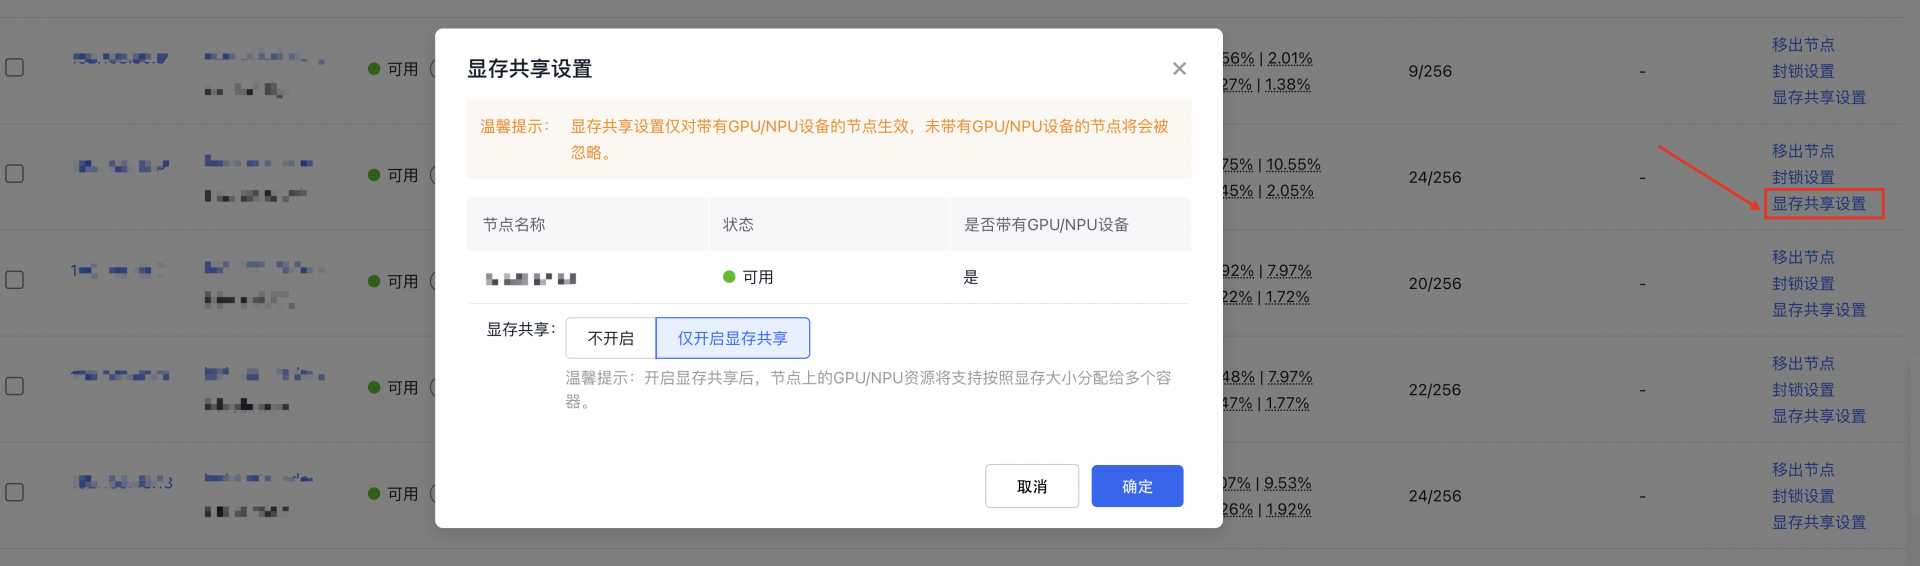
- In the node list, select the GPU node for which you want to enable memory sharing, and click Enable Memory Sharing.
- Turn on the memory sharing switch, then click OK to complete the memory sharing setup.
3.4 Batch enable GPU virtualization on nodes
Method 1:Batch add virtualization node labels to existing nodes
- Sign in to the Baidu AI Cloud official website and enter the management console.
- Select Product Services - Cloud Native - Cloud Container Engine (CCE) to enter Cluster Management - Cluster List.
- Click on the target cluster name in the Cluster List page to navigate to the cluster management page.
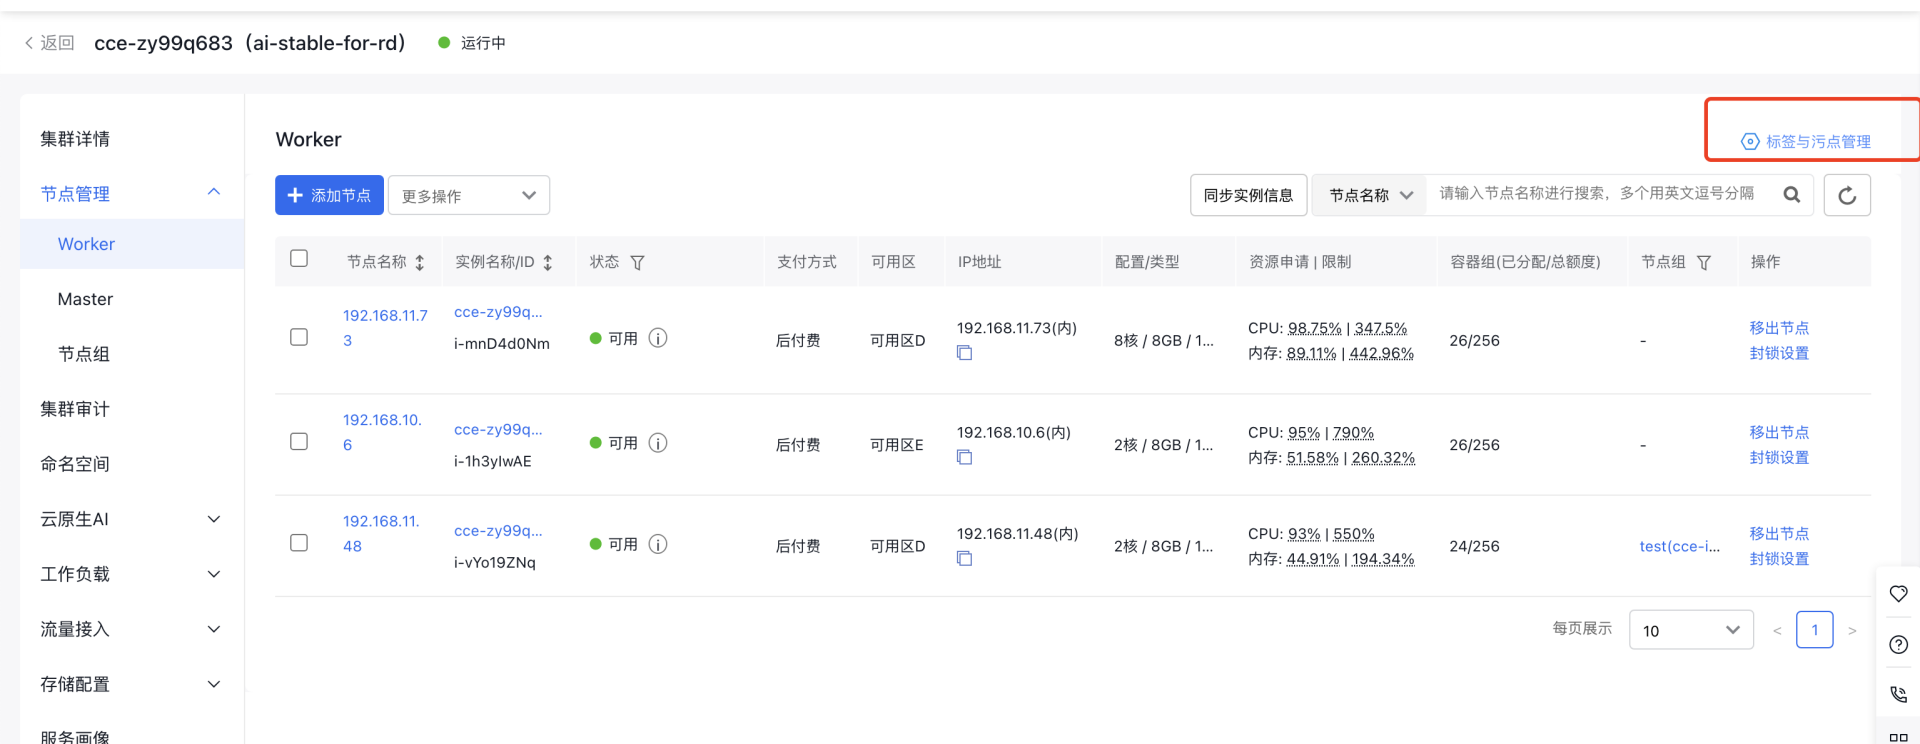
- On the left sidebar, select Node Management - Worker to enter the node list page.
- Click Label and Taint Management to enter the configuration page
- Click Edit Labels, enter the tag key and value, then click OK
1Tag key: cce.baidubce.com/gpu-share-device-plugin
2 Value: enable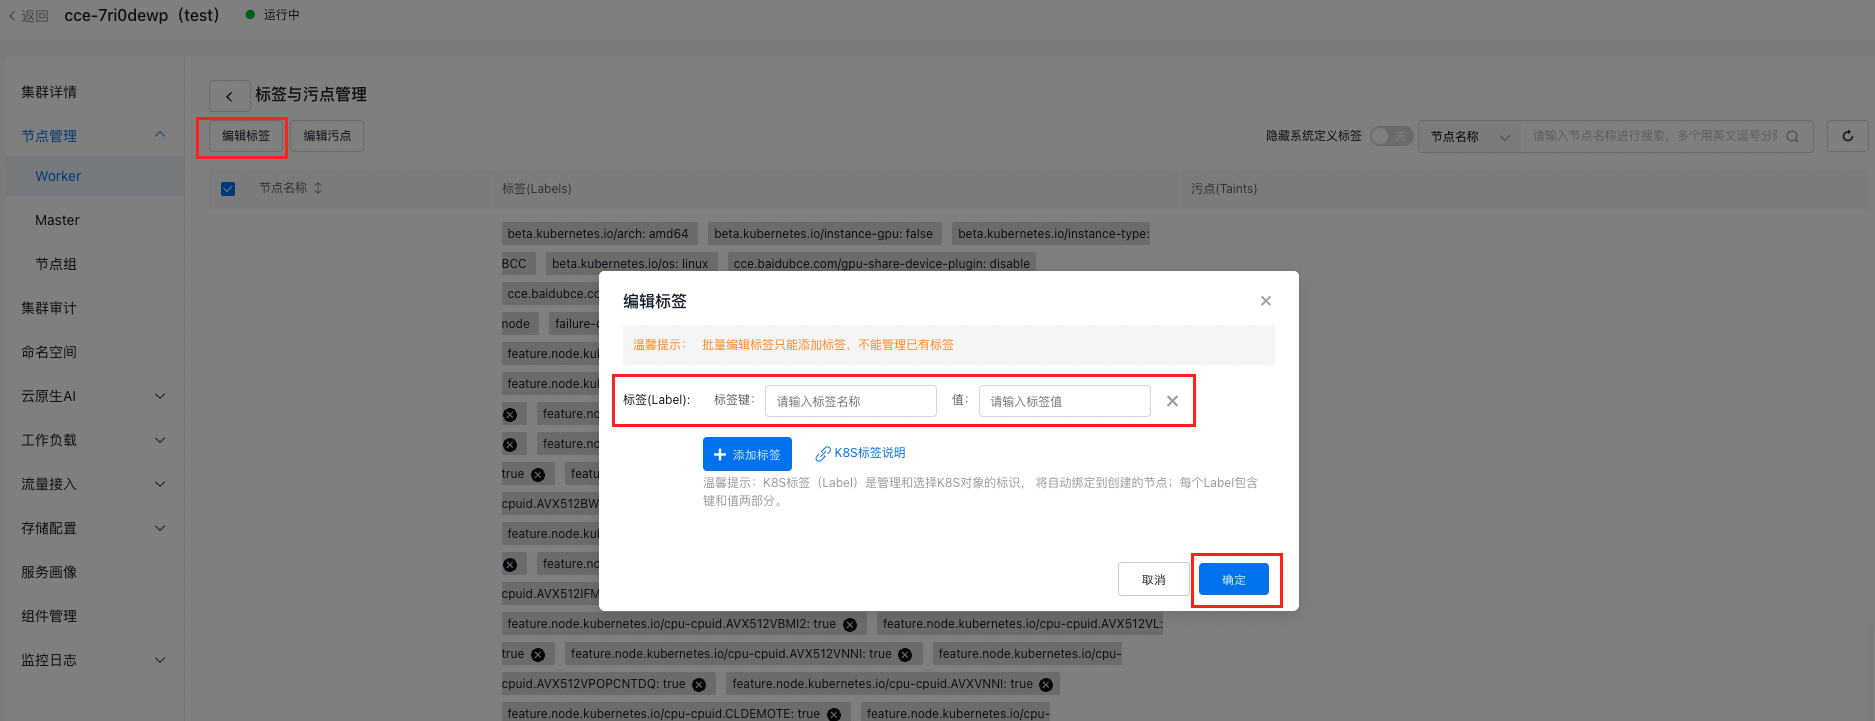
Method 2: Add node labels by default using node groups
- Sign in to the Baidu AI Cloud official website and enter the management console.
- Go to Product Services - Cloud Native - Cloud Container Engine (CCE) to access Cluster Management - Cluster List.
- Click on the target cluster name in the Cluster List page to navigate to the cluster management page.
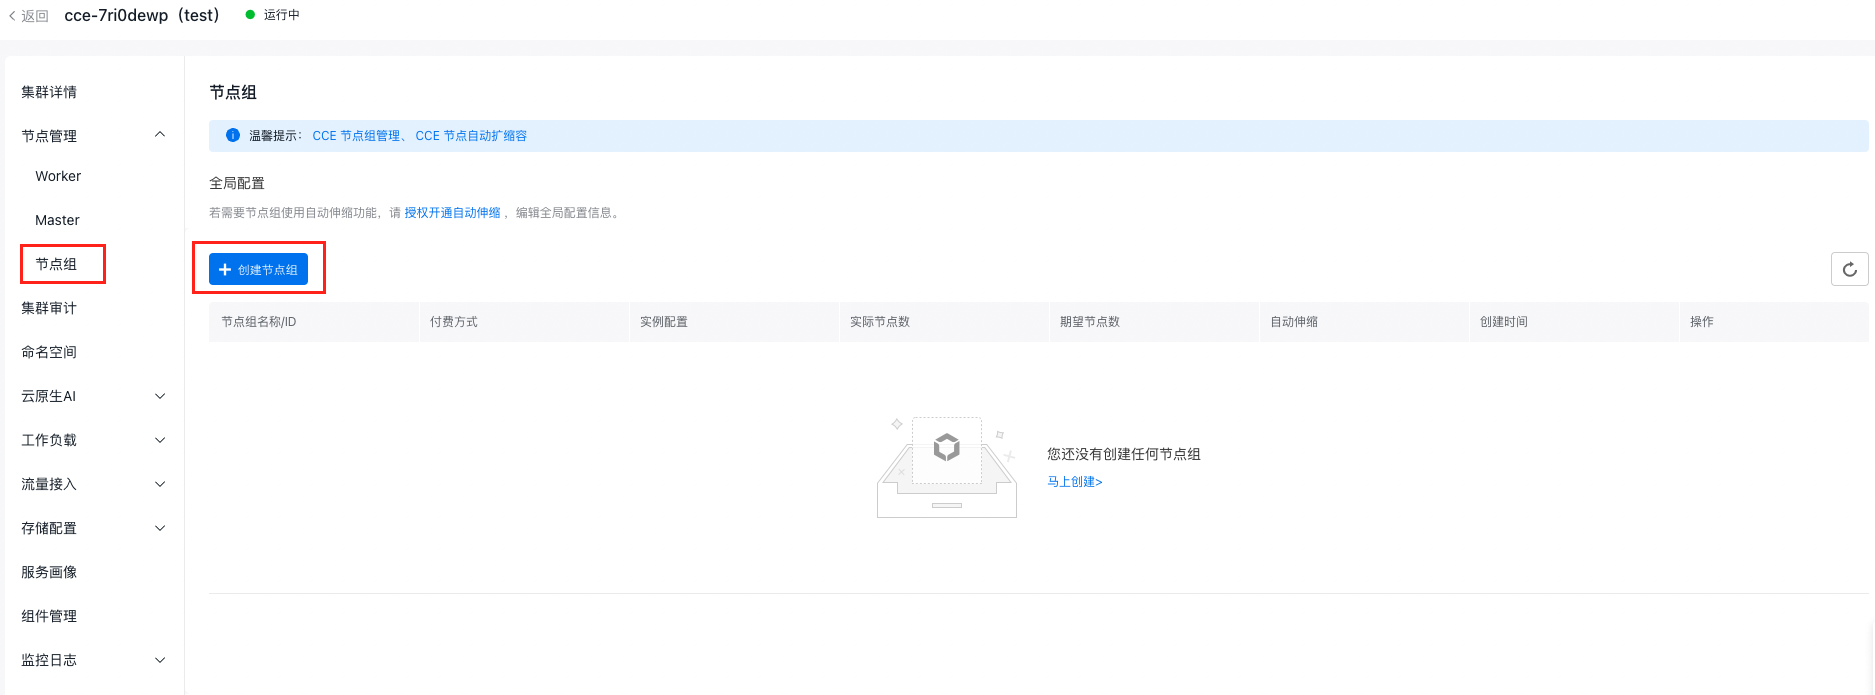
- On the left sidebar, select Node Management - Node Groups to enter the Node Group page.
- Click Create Node Group to enter the configuration page
- Fill in the basic node group configurations:
- Node group name: custom, which supports uppercase and lowercase letters, numbers, Chinese characters, and -_ /. special characters, starting with a letter and a length of 1-65
- VPC network: The VPC network of the cluster
- Node configuration: This includes the settings for nodes in the group, such as the availability zone, node subnet, and instance specifications. This configuration will act as the template for future node group scaling. The number of nodes specified during creation represents the initial target node count.
- Auto scaling: Enable auto-scaling, allowing the system to automatically expand when conditions are met, based on specified node configurations and auto-scaling rules. The system will also calculate node costs and create orders automatically. After scaling, you can manually review the node and order details.
- Advanced settings: Support configuring parameters such as scaling policies, kubelet data directory, container data directory, pre-deployment scripts, post-deployment scripts, custom kubelet parameters, node cordoning, resource labels, K8s labels, taints, and annotations. Configure K8s labels
1Tag key: cce.baidubce.com/gpu-share-device-plugin
2 Value: enable
3.5 Obtain RBAC authorization
Note: If you are a IAM user, you need RBAC authorization from the root account or a IAM user with administrator privileges to create new tasks. Skip this step if you are not a IAM user.
- Obtain IAM authorization. The IAM user must first be granted at least CCE read-only permissions in IAM. For detailed authorization steps, see Configure IAM Preset Permission Policies
- Obtain RBAC authorization. For detailed authorization procedures, see Configure Preset RBAC Permission Policies
4. GPU resource description
4.1 GPU model and resource name
Specifying the correct resource name for the GPU model is essential when using the GPU virtualization isolation-optimized service. Familiarize yourself with GPU resource configurations and compatibility before task creation to ensure successful execution. To designate GPU computing power or memory resources, append _core or _memory to the resource name.
The following are common GPU models and their corresponding resource names:
| GPU model | Resource name |
|---|---|
| NVIDIA V100 16GB | baidu.com/v100_16g_cgpu |
| NVIDIA V100 32GB | baidu.com/v100_32g_cgpu |
| NVIDIA T4 | baidu.com/t4_16g_cgpu |
| NVIDIA A100 80GB | baidu.com/a100_80g_cgpu |
| NVIDIA A100 40GB | baidu.com/a100_40g_cgpu |
| NVIDIA A800 80GB | baidu.com/a800_80g_cgpu |
| NVIDIA A30 | baidu.com/a30_24g_cgpu |
| NVIDIA A10 | baidu.com/a10_24g_cgpu |
| NVIDIA RTX3090 | baidu.com/rtx_3090_cgpu |
| NVIDIA RTX4090 | baidu.com/rtx_4090_cgpu |
| NVIDIA H800 | baidu.com/h800_80g_cgpu |
| NVIDIA L20 | baidu.com/l20_cgpu |
| NVIDIA H20 96GB | baidu.com/h20_96g_cgpu |
| NVIDIA H20 141GB | baidu.com/h20_141g_cgpu |
| NVIDIA H20z | baidu.com/h20z_141g_cgpu |
4.2 Resource description
| Resource name | Types | Unit | Description |
|---|---|---|---|
| baidu.com/xxx_xxx_cgpu | int64 | 1 | Number of GPU cards: Enter 1 for the shared scenario. The number of shared GPU cards requested for multi-GPU single-container scenarios |
| baidu.com/xxx_xxx_cgpu_core | int64 | 5% | GPU computing power (minimum unit: 5%) |
| baidu.com/xxx_xxx_cgpu_memory | int64 | GiB | GPU memory |
| baidu.com/xxx_xxx_cgpu_memory_percent | int64 | 1% | GPU memory requested by percentage (minimum unit: 1%) |
5. Create task
Users can create tasks/workloads via CCE console or YAML. Choose the method based on your needs. Detailed creation steps are provided below.
Note: See Section VII for precautions for image building in shared GPU scenarios.
5.1 Create tasks via the console
Operation steps (For reference, see Cloud Native AI Task Management)
- Sign in to the Baidu AI Cloud official website and enter the management console.
- Go to Product Services - Cloud Native - Cloud Container Engine (CCE) to access the CCE management console.
- Click Cluster Management - Cluster List in the left navigation pane.
- Click on the target cluster name in the Cluster List page to navigate to the cluster management page.
- On the Cluster Management page, click Cloud-Native AI - Task Management.
- Click Create Task on the Task Management page.
- On the Create Task page, configure basic task information:
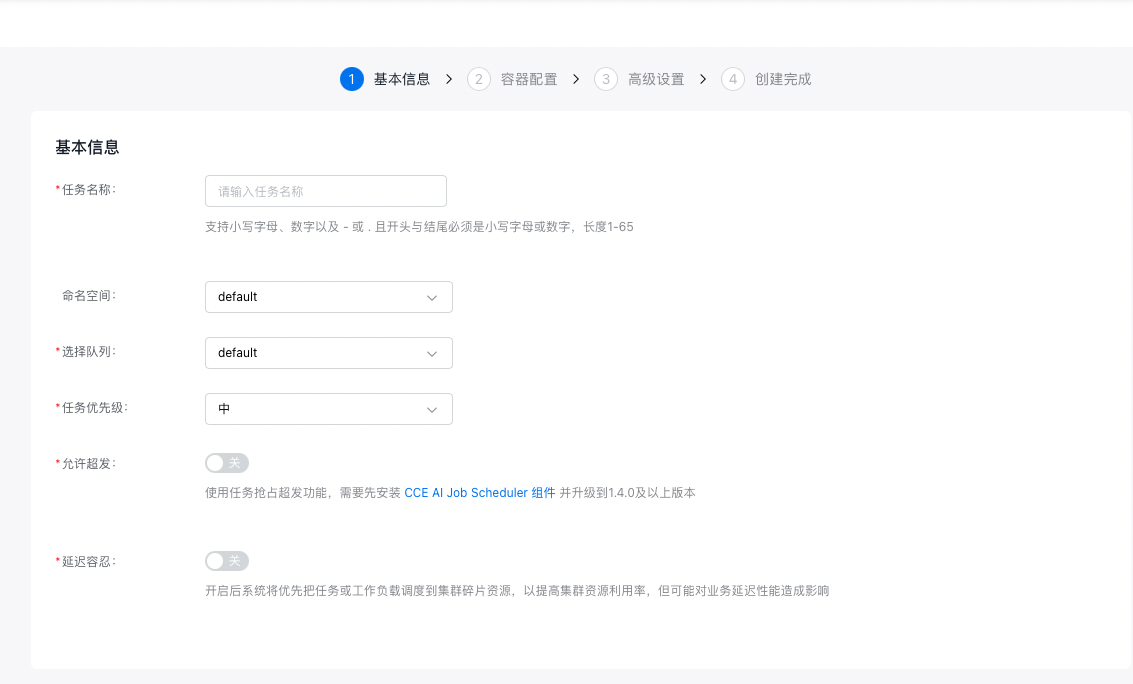
- The task name supports uppercase and lowercase letters, numbers, and special characters (-_/), must start with a letter or Chinese character, and should be 1 to 65 characters long.
- Namespace: Choose the namespace for the new task.
- Select queue: Choose the queue associated with the new task.
- Task priority: Set the priority level for the task.
- Allow overcommitment: Enable this option to use task preemption for overcommitment. The CCE AI Job Scheduler component must be installed and updated to version 1.4.0 or higher.
- Delay tolerance: When activated, the system prioritizes scheduling tasks or workloads to fragmented cluster resources.
- Configure basic code information:
- Code configuration type: Specify the code configuration method. Current options include “BOS File,” “Local File Upload,” and “Not Configured Temporarily.”
- Execution command: Define the command to execute the code.
- Configure data-related information:
- Set Data Source: Supports both datasets and persistent volume claims (PVCs). For datasets: All available datasets are listed, and selecting a dataset will automatically select a PVC with the same name. For PVCs: Directly select the desired PVC.
- Click "Next" to proceed to container-related configurations.
- Configure task type information:
- Select a framework: Choose TensorFlow.
- Training method: Select either Single-Machine or Distributed training.
- Select role: When the training method is “Single-machine”, only “Worker” can be selected. When the training method is “Distributed”, “PS”, “Chief” and “Evaluator” can be additionally selected.
- Configure pod information (advanced settings are optional).
- Specify the number of pods desired in the pod.
- Define the restart policy for the pod. Options: “Restart on Failure” or “Never Restart”.
- Image address: Enter the address for fetching the container image. You can also click Select Image to choose the required image. Refer to Section VI for guidelines on building images in shared GPU scenarios.
- Enter the image version. If left unspecified, the latest version will be used by default.
- Container quota: Specify information related to the container’s CPU, memory, and GPU resources. You can specify the GPU type (exclusive or shared) in the pod configuration of the task. Details for each type are as follows.
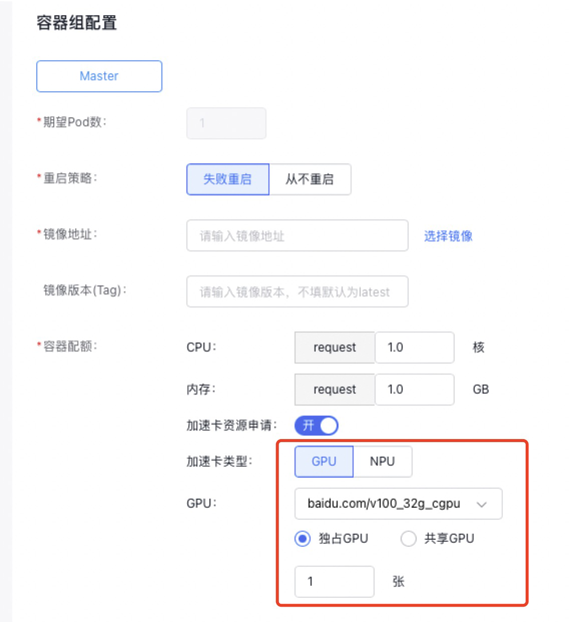
5.1.1 Single-GPU/Multi-GPU exclusive
- When specifying the GPU type as exclusive GPU, to use the full resources of a GPU card for the task:
- Choose the GPU model.
- Enter the number of GPU cards (range: [1 to the maximum number of GPU cards per node in the current cluster]).
- To use only CPU and memory resources (no GPU resources):
Leave the GPU Model field blank and only input the required CPU and memory resources.
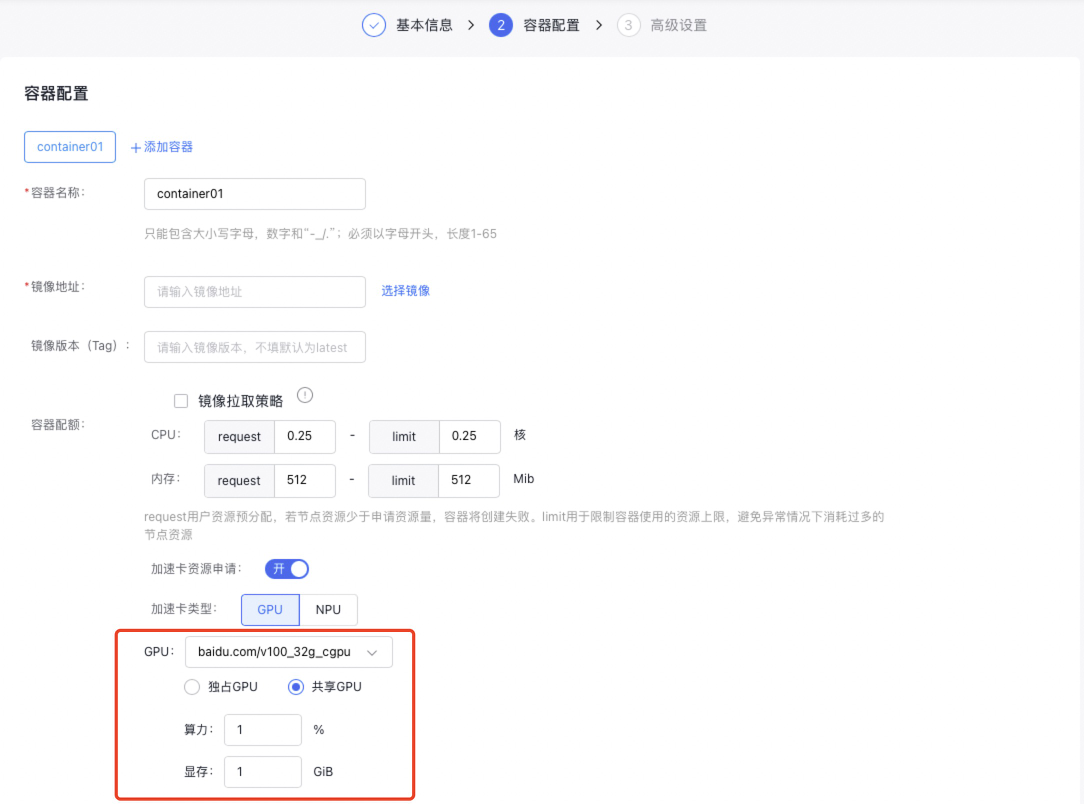
5.1.2 Single-GPU sharing (isolation for memory only, no isolation for computing power)
When specifying the GPU type as shared GPU, to isolate only memory (no computing power isolation), follow steps below:
- Choose the GPU model.
- Disable the computing power switch.
- Enter the required GPU memory, ranging from [1 to the memory size of the selected GPU card].

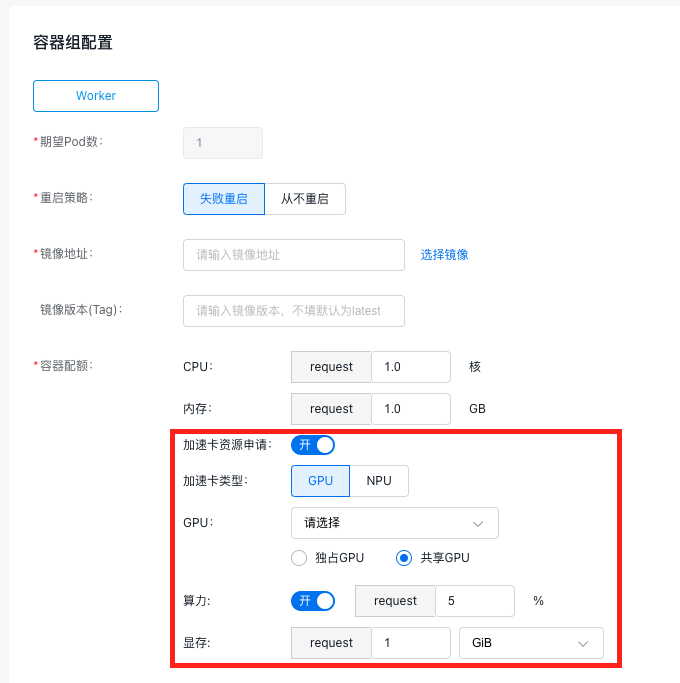
5.1.3 Single-GPU sharing
When specifying the GPU type as shared GPU, to isolate memory and computing power, follow steps below:
- Choose the GPU model.
- Turn on the computing power switch, and enter the required computing power percentage. The percentage must be a positive integer between [5 and 100].
- Enter the required GPU memory. The memory size must be a positive integer, ranging from [1 to the memory size of the selected GPU card].
- Configure the advanced task settings.
- Set the maximum allowable training duration (leave blank for unlimited duration).
- Add credentials to access the private image registry if using a private image.
- Tensorboard: If task visualization is needed, enable the Tensorboard function. After activation, specify the “Service Type” and “Training Log Reading Path.”
- Assign K8s labels to the task.
- Provide annotations for the task.
- Click the Finish button to complete the creation of the task.
5.2 Create workloads via the console
If you create a workload through the CCE console (refer to Workloads for steps), you can set the GPU type as either "Exclusive" or "Shared" in the workload’s container settings. The resource input rules for exclusive and shared modes are consistent with those for AI task creation.
5.3 Create tasks/workloads using YAML
If you create a task or workload via YAML (for detailed configurations, refer to Cloud-Native AI Task Management and Workloads), you can specify the required GPU card resources as “Exclusive” or “Shared” in the YAML configuration. Specific examples are as follows:
Remarks:
- When creating a task via YAML, the scheduler must be specified as: schedulerName: volcano
- GPU memory resources must be applied for. Additionally, only one of baidu.com/v100_32g_cgpu_memory and baidu.com/v100_32g_cgpu_memory_percent can be filled in; they cannot be filled in simultaneously
- The GPU card's resource name should be provided based on the resource description outlined in Section IV, with different GPU models corresponding to distinct resource names.
5.3.1 Single-GPU exclusive
1resources:
2  requests:
3 baidu.com/v100_32g_cgpu: 1 // 1 GPU card
4    cpu: "4"
5    memory: 60Gi
6  limits:
7 baidu.com/v100_32g_cgpu: 1 // Limit and request must be the same
8    cpu: "4"
9    memory: 60Gi
5.3.2 Multi-GPU exclusive
1resources:
2  requests:
3 baidu.com/v100_32g_cgpu: 2 // 2 GPU card
4    cpu: "4"
5    memory: 60Gi
6  limits:
7 baidu.com/v100_32g_cgpu: 2 // Limit and request must be the same
8    cpu: "4"
9    memory: 60Gi
5.3.3 Single-GPU sharing (isolation for memory only, no isolation for computing power)
1resources:
2  requests:
3 baidu.com/v100_32g_cgpu_memory: 10 // 10 GB, fill in as needed
4    cpu: "4"
5    memory: 60Gi
6  limits:
7    baidu.com/v100_32g_cgpu_memory: 10
8    cpu: "4"
9    memory: 60Gi
5.3.4 Single-GPU sharing
1resources:
2  requests:
3 baidu.com/v100_32g_cgpu_core: 50 // 50%, 0.5 of a card’s computing power, fill in as needed
4 baidu.com/v100_32g_cgpu_memory: 10 // 10 GB, fill in as needed
5    cpu: "4"
6    memory: 60Gi
7  limits:
8    baidu.com/v100_32g_cgpu_core: 50 //
9    baidu.com/v100_32g_cgpu_memory: 10
10    cpu: "4"
11    memory: 60Gi
5.3.6 Multi-GPU single-container capability (GPU memory/computing power isolation & memory-only isolation)
Explain how to use the single-container multi-GPU capability of sGPU by detailing resource descriptors, covering two situations: one where GPU memory and computing power are simultaneously isolated, and another with memory-only isolation.
- Simultaneous isolation of GPU memory and computing power
Resources for a single shared GPU card:
- Computing power resource per GPU card: baidu.com/xxx_xxx_cgpu_core / baidu.com/xxx_xxx_cgpu
- Memory resource per GPU card: baidu.com/xxx_xxx_cgpu_memory/baidu.com/xxx_xxx_cgpu
Example: In this case, the pod requests 50% computing power, 10 GiB memory, and 2 shared GPU cards. Each shared GPU card therefore provides 25% computing power and 5 GiB memory.
1resources:
2limits:
3baidu.com/a10_24g_cgpu: "2"
4baidu.com/a10_24g_cgpu_core: "50"
5baidu.com/a10_24g_cgpu_memory: "10"- GPU memory isolation with shared computing power
Resources for a single shared GPU card:
- Computing power resources per GPU card: Shares 100% computing power with other containers.
- Memory resource per GPU card: baidu.com/xxx_xxx_cgpu_memory/baidu.com/xxx_xxx_cgpu
Example: In this example, the pod requests 10 GiB memory and 2 shared GPU cards. Consequently, each shared GPU card provides 100% shared computing power and 5 GiB memory.
1resources:
2          limits:
3            baidu.com/a10_24g_cgpu: "2"
4 baidu.com/a10_24g_cgpu_memory: "10"- Usage restrictions
- The memory/computing power allocation for a single GPU must be a positive integer (e.g., computing power: baidu.com/xxx_xxx_cgpu_core/baidu.com/xxx_xxx_cgpu; memory: baidu.com/xxx_xxx_cgpu_memory/baidu.com/xxx_xxx_cgpu).
- The memory/computing power allocation for a single GPU must meet or exceed the minimum unit requirement for memory/computing power.
- You cannot request _cgpu_core if you do not request _cgpu_memory or _cgpu_memory_percent
- The minimum unit for memory isolation is 1 GiB.
6. Precautions for image building in shared GPU scenarios.
- When choosing an image for a shared GPU task, pay attention to the image’s environment variables.
The following environment variables will be injected by the GPU Manager. Do not add them to the image’s environment variables:
| Environment variables | Description |
|---|---|
| NVIDIA_VISIBLE_DEVICES | Visible GPU device list: Assigned by the scheduler |
| NVIDIA_VISIBLE_GPUS_SLOT | Visible GPU device slots: Assigned by the scheduler |
| NVIDIA_VISIBLE_GPUS_UUID | A list of visible GPU devices in UUID format: Assigned by the scheduler |
| LD_LIBRARY_PATH | It is not recommended to set the LD_LIBRARY_PATH environment variable. If necessary, add the /usr/lib64 directory in the format of LD_LIBRARY_PATH=/usr/lib64:$LD_LIBRARY_PATH. |
| CUDA_MPS_ACTIVE_THREAD_PERCENTAGE | MPS computing power isolation settings (assigned by the scheduler) |
| CUDA_MPS_LOG_DIRECTORY | MPS log path |
| CUDA_MPS_PIPE_DIRECTORY | Communication address for MPS SERVER |
| CGPUX_XXX | Environment variables starting with CGPU: Used to run memory & computing power isolation functions (e.g., CGPU0_PRIORITY, CGPU0_SHAREMODE) |
| CGPU_COUNT | Number of devices |
| SGPU_DISABLE | Flag indicating whether to use GPU virtualization (for isolation-optimized type) |
- When creating an image, avoid directly saving a GPU container running in the cluster as an image. Doing so will include environment variables injected by the GPU Manager component, which could lead to unexpected behavior or the inability to use virtualization features properly.
7. (Optional) Verify GPU virtualization isolation effect
Once the above steps are completed, to confirm whether the shared GPU operates according to the configured isolation parameters, follow these instructions.
- Sign in to the Baidu AI Cloud official website and enter the management console.
- Go to Product Services - Cloud Native - Cloud Container Engine (CCE) to access the CCE management console.
- Click Cluster Management - Cluster List in the left navigation pane.
- Click on the target cluster name in the Cluster List page to navigate to the cluster management page.
- On the cluster management page, click Workloads - Pods.
- Click the Pod Name you want to check
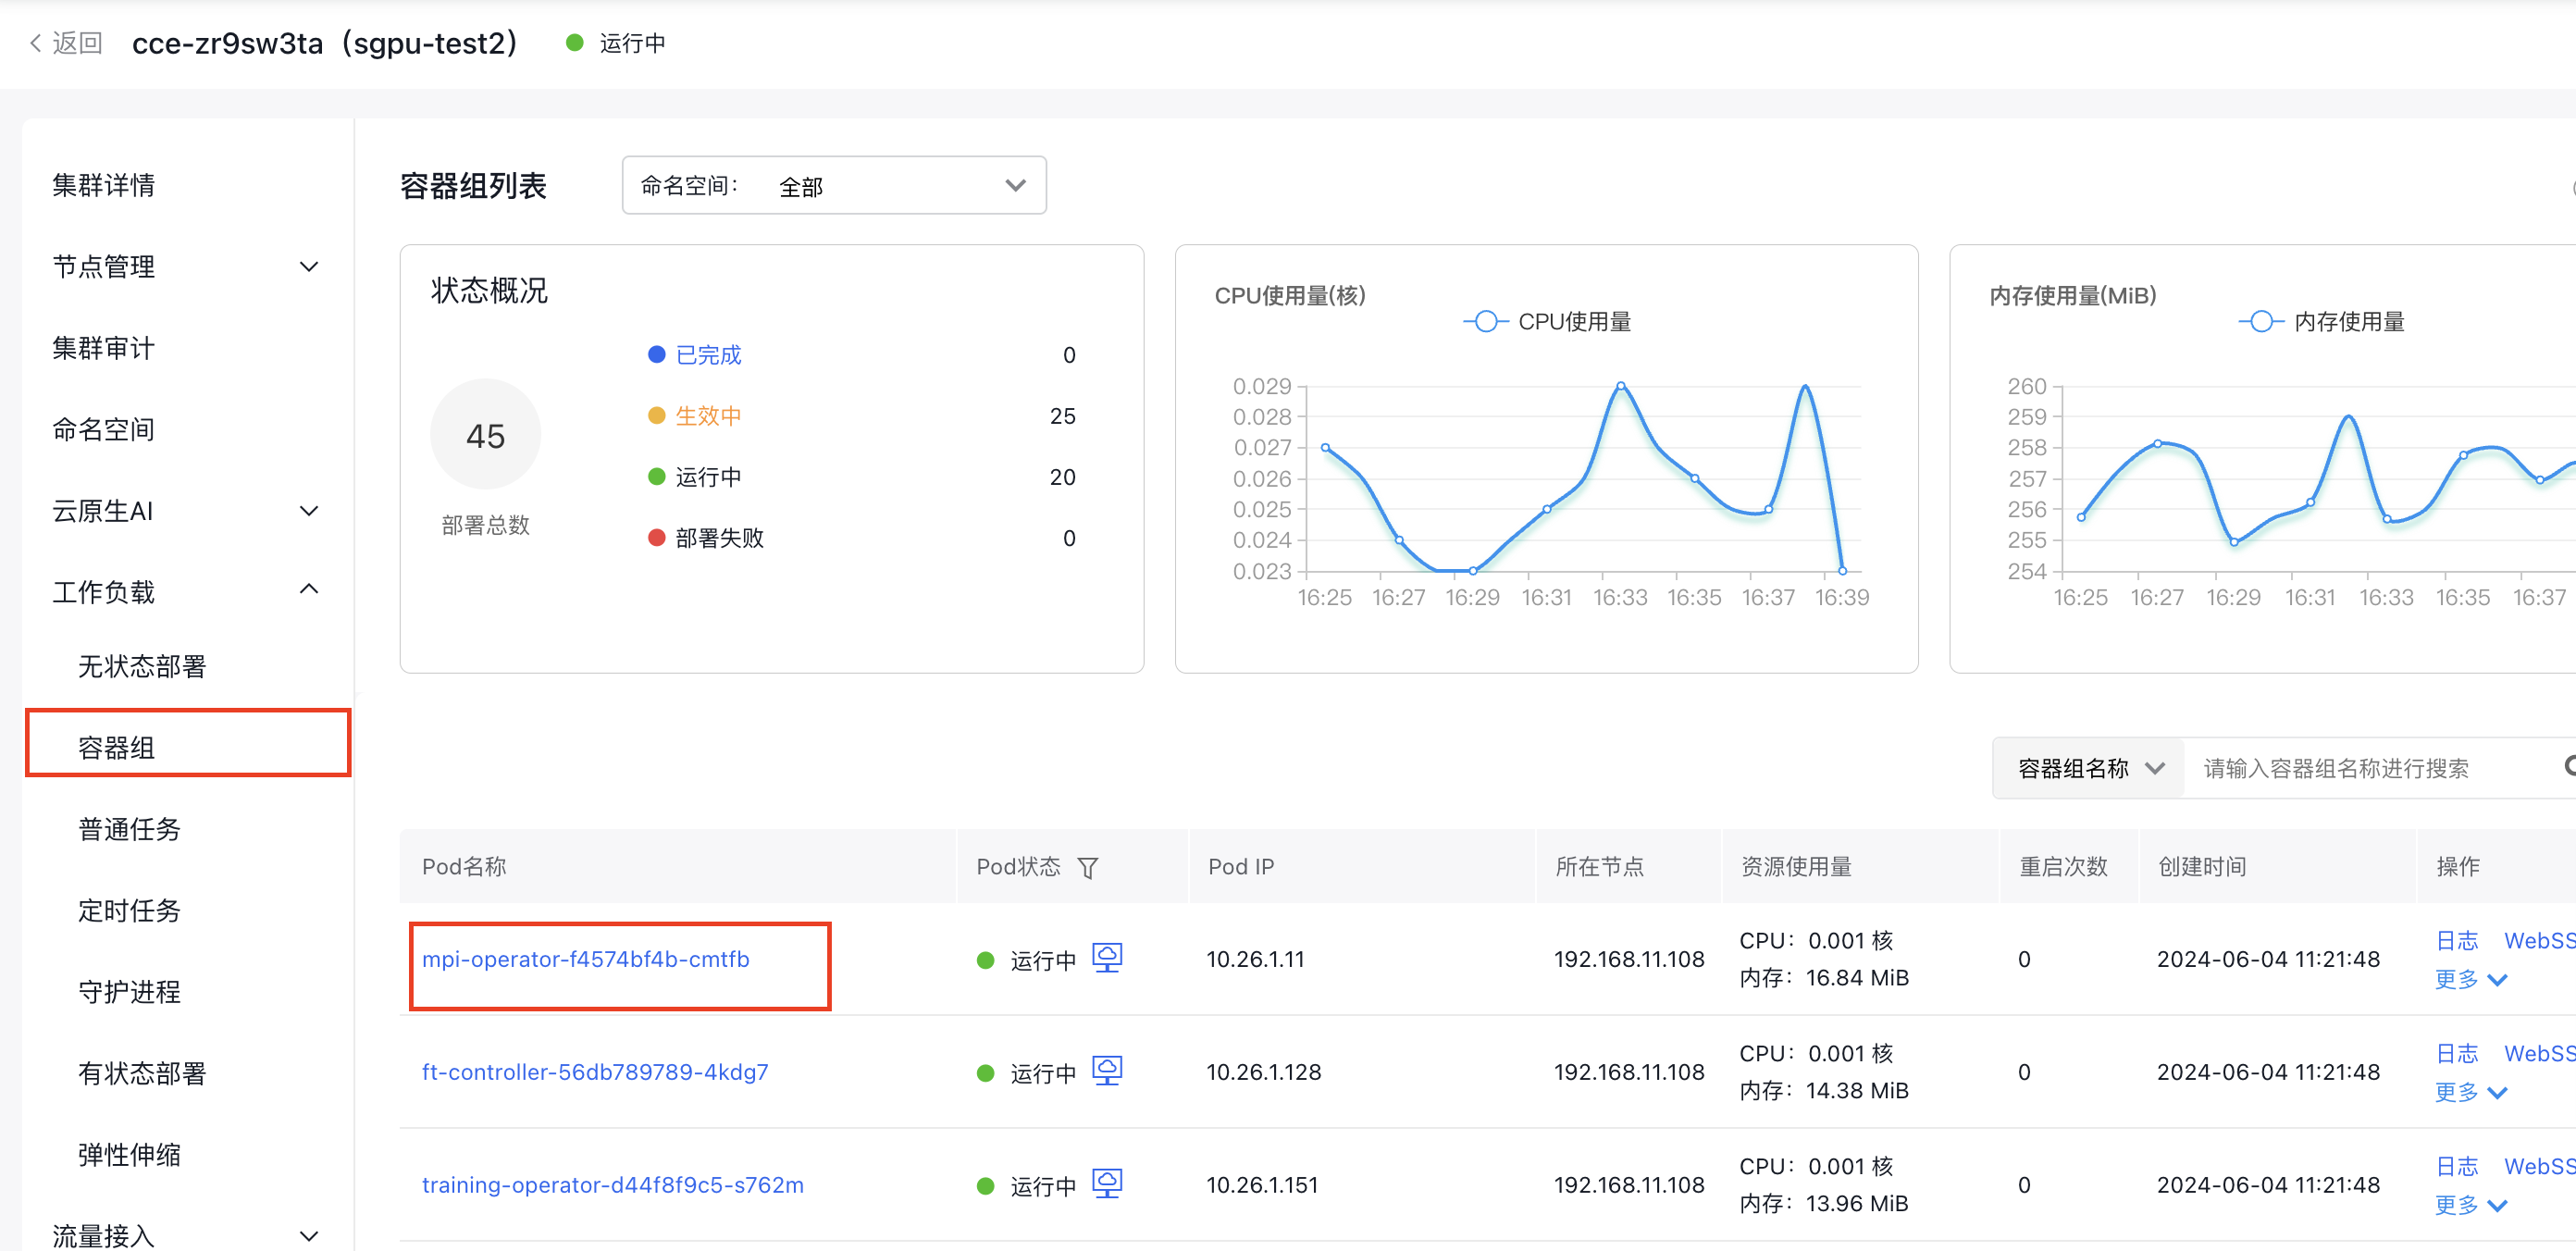
- Click WebSSH, select /bin/sh as the command type, then click Connect
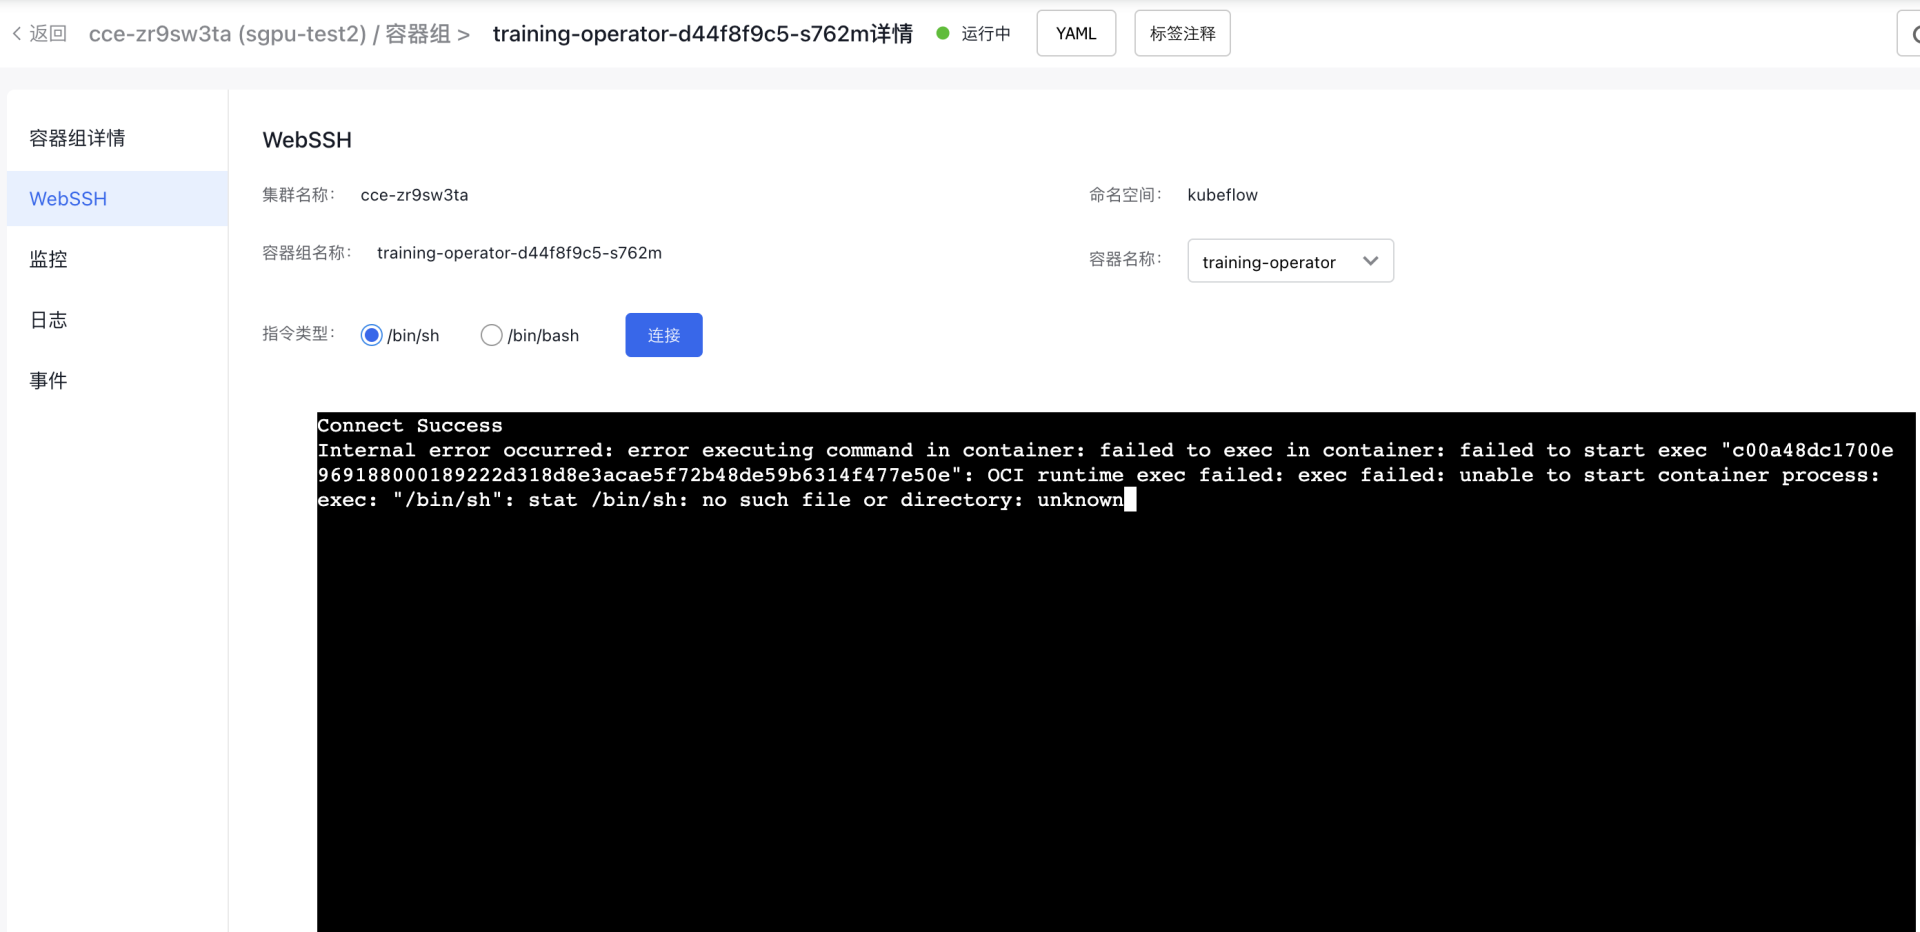
- Enter the command: nvidia-smi and press Enter
| Parameters | Description |
|---|---|
| GPU Name | The command output will display all GPUs available on the server. |
| Memory-Usage | The memory usage for each GPU. |
| GPU-Util | The utilization rate of each GPU. |
| Processes | The processes utilizing the GPUs. |
8. Disable memory sharing
- Restrictions for disabling memory sharing
If you need to turn off the memory-sharing function on a node, the system will first check for any active memory-sharing tasks on that node. The function can only be disabled after all such tasks have been completed. Otherwise, it may disrupt current tasks or prevent proper resource reclamation after task completion, affecting future tasks on the node.
Use the commands in Steps 2 and 3 to locate nodes with memory sharing enabled and verify the status of memory-sharing tasks on each node.
- Query nodes with memory sharing enabled
1kubectl get nodes -l cce.baidubce.com/gpu-share-device-plugin=enableThis command will display all nodes where the memory-sharing function is enabled. These nodes are labeled with cce.baidubce.com/gpu-share-device-plugin:enable.
- Query pods running memory-sharing tasks
1kubectl get pods --all-namespaces -o json | jq -r '.items[] | select(.status.phase=="Running") | select(.spec.containers[].resources.limits // empty | keys[] // empty | test("baidu.com/.*(_core|_memory|_memory_percent)$")) | "\(.metadata.name) \(.spec.nodeName)"' | sort | uniqThis command will show all active pods using memory sharing and their corresponding host nodes. The memory-sharing function can only be disabled after these pods are finished.
- Risks of modifying node labels via commands
In addition to the console method, you can use the kubectl label nodes command to modify the node label to cce.baidubce.com/gpu-share-device-plugin:disable to disable the node’s memory sharing function. Please pay attention to the following risks before modification:
- Service interruption: Modifying node labels triggers the installation of a non-shared environment, which interrupts running memory-sharing tasks or prevents resources from being reclaimed properly when tasks end. This impacts subsequent tasks on the node.
- Scheduling failure: After modifying labels, the scheduler might assign non-shared tasks to the node. Running both task types on the same machine could lead to issues like incorrect GPU detection or abnormal shared memory behavior.
To mitigate these risks, ensure the node labels in the cluster correctly represent the node's capabilities, and only disable memory sharing on a node after confirming there are no active memory-sharing tasks running on it.
- The minimum value for computing power isolation is 5%.