
How to Solve Browser Cross-Origin CORS Issues
Introduction
Browser same-origin policy
The same-origin policy is a widely recognized security measure introduced to browsers by Netscape in 1995. It serves as the fundamental security mechanism for browsers. In essence, it ensures that scripts on a given domain can only access resources within the same domain and are restricted from accessing resources in other domains to prevent data breaches. For instance, if Websites A and B belong to different domains (e.g., www.a.com and www.b.com), JavaScript scripts from Website A can only interact with resources on Website A and not those on Website B. As a result of the same-origin policy's restrictions, any cross-domain access attempts are blocked by the browser.
The term "same origin" refers to situations where the domain name, protocol, and port are identical. Examples are as follows:
- Different domain names:
http://www.baidu.comandhttp://www.baidu.cnare not of the same origin; - Different protocols:
http://www.baidu.com与https://www.baidu.comare not of the same origin; - Different ports:
http://www.baidu.com:80andhttp://www.baidu.com:81are not of the same origin; - Others:
http://www.baidu.com/aandhttp://www.baidu.com/bare of the same origin because their domain names, protocols, and ports are all the same.
What is Cross-Origin Resource Sharing (CORS)
In real-world scenarios, cross-domain access frequently occurs. For example, the backend of Website A (www.a.com) may utilize BOS storage, and the user may wish to reference resources stored in BOS from Website A's web application. However, the web page can only request resources within its own domain, and sending requests to BOS would be blocked by the browser, creating inconvenience due to being unable to access them directly. To address such cross-domain access difficulties, HTML5 offers a standardized solution called CORS.
Cross-Origin Resource Sharing (CORS) is a set of policies that browsers adhere to, facilitated through HTTP headers. When a browser detects a cross-domain request being made, it appends the "Origin" header to the HTTP request and sends it to the server. Using the example above, the "Origin" header would be www.a.com. Upon receiving the request, the server evaluates it based on specific criteria to decide whether to approve the request from the originating domain. If approved, the server includes the "Access-Control-Allow-Origin" header in its response, specifying www.a.com to indicate permission for cross-domain access. For servers that accept requests from all origins, the "Access-Control-Allow-Origin" header is set to *. The browser determines whether the cross-domain request succeeds based on the presence of the appropriate header in the response. If the corresponding header is missing, the browser blocks the request.
CORS requires support from both the browser and the server. The entire CORS communication workflow is automatic and requires no user intervention. When a browser detects an AJAX request as cross-domain, it automatically adds additional header information, and in some cases, an additional preflight request is sent. As long as the server is equipped with a proper CORS implementation, cross-domain communication can proceed.
Browsers categorize CORS requests into two types: simple requests and preflight requests (not-so-simple requests).
A simple request refers to a request whose method is one of HEAD/GET/POST, and the HTTP header information does not exceed the following fields:
- Accept
- Accept-Language
- Content-Language
- Last-Event-ID
- Content-Type: only limited to three values: application/x-www-form-urlencoded, multipart/form-data, text/plain
Requests that do not meet the criteria for simple requests are classified as preflight or not-so-simple requests. For a preflight request, the browser sends an HTTP OPTIONS request prior to the main request. This OPTIONS request includes three key headers: Origin, Access-Control-Request-Method, and Access-Control-Request-Headers. The server reviews these fields and confirms whether cross-origin requests are allowed before responding. The server's response includes the "Access-Control-Allow-Origin" header field.
BOS configures CORS
BOS allows developers to configure cross-domain access permissions for bucket resources in two ways. One way is by directly setting CORS rules within the BOS console, and the other is by calling CORS-related APIs to manage bucket resource access permissions.
Note:
- CORS configuration in BOS is at the bucket level;
- The outcome of a CORS request is entirely independent of BOS identity authentication, as CORS rules solely determine whether CORS-related headers should be included in the response. Ultimately, it is the browser that decides whether or not to block the request.
-
Console setting method:
- Go to the "Basic Configuration" tab, select "Cross-Domain Access CORS Settings," and click "Modify Configuration.\
- Click OK to save the rules
-
API control method:
- PutBucketCors API: Used to set a Cross-Origin Resource Sharing (CORS) rule on the specified bucket, overwriting the original rule if it exists.
- GetBucketCors API: Used to obtain the current CORS rules of the specified bucket.
- DeleteBucketCors API: Designed to disable the specified Bucket CORS function and clear all rules.
- OPTIONS object API: Before sending a cross-domain request, the browser will send a preflight request (OPTIONS) with specific origin domains, HTTP methods and Header information to BOS, thus determining whether to send the actual request. This API responds to such requests.
Practical cases
Next, we'll detail how simple and preflight requests behave when accessing BOS resources across domains. We'll use GET requests as an example of simple requests and POST requests as an example of preflight requests.
Preparation conditions
- Log in to the BOS console to create a new bucket, set the read and write permission to “Public Read and Write”, and then upload an object. In this example, we create a new bucket named bos-demo, then upload a bos.txt file with the content “This is a bos demo for CORS test!”. Click Copy Link to see the access address of the bos.txt object: http://bos-demo.bj.bcebos.com/bos.txt。
-
Disable the browser's cache function to avoid scenarios where cached header information from a previous server response conflicts with current CORS requirements, which could affect the request outcome. Here’s how to do it in the Chrome browser: open the Developer Tools and enable the "Disable Cache" option.

Cross-domain request example
-
Start by using curl to access the bos.txt file, where you’ll observe that the file can be accessed normally.
curl http://bos-demo.bj.bcebos.com/bos.txt
This is a bos demo for CORS test ! - Then we try to use the Fetch API to access this object. You can copy the following code to the local, save it as an html file, and open it with a browser. The code provides functions for sending GET and POST requests.
1    <!DOCTYPE html>
2    <html>
3    <body>
4      <p align="center" style="font-size: 30px;">
5        <button onclick="sendGetCorsRequest()">Send Get Request</button>
6        <button onclick="sendPostCorsRequest()">Send Post Request</button>
7      </p>
8
9      <script type="text/javascript">
10        var url = "http://bos-demo.bj.bcebos.com/bos.txt";
11
12        function sendGetCorsRequest() {
13          fetch(url).then(function(res) {
14            if (res.ok) {
15              alert("The response is ok, get request success!");
16            } else {
17              alert("The response wasn't ok, got status ", res.status);
18            }
19          }, function(e) {
20            alert("Get request failed!", e);
21          });
22        }
23
24      function sendPostCorsRequest() {
25        fetch(url, { method: "POST" }).then(function(res) {
26            if (res.ok) {
27              alert("The response is ok, post request success!");
28            } else {
29              alert("The response wasn't ok, got status ", res.status);
30            }
31          }, function(e) {
32            alert("Post request failed!", e);
33          });
34        }
35      </script>
36    </body>
37    </html>
When opening the HTML file (using Chrome as an example) and clicking the "Send Get Request" or "Send Post Request" buttons, you'll notice that both requests fail to be sent.
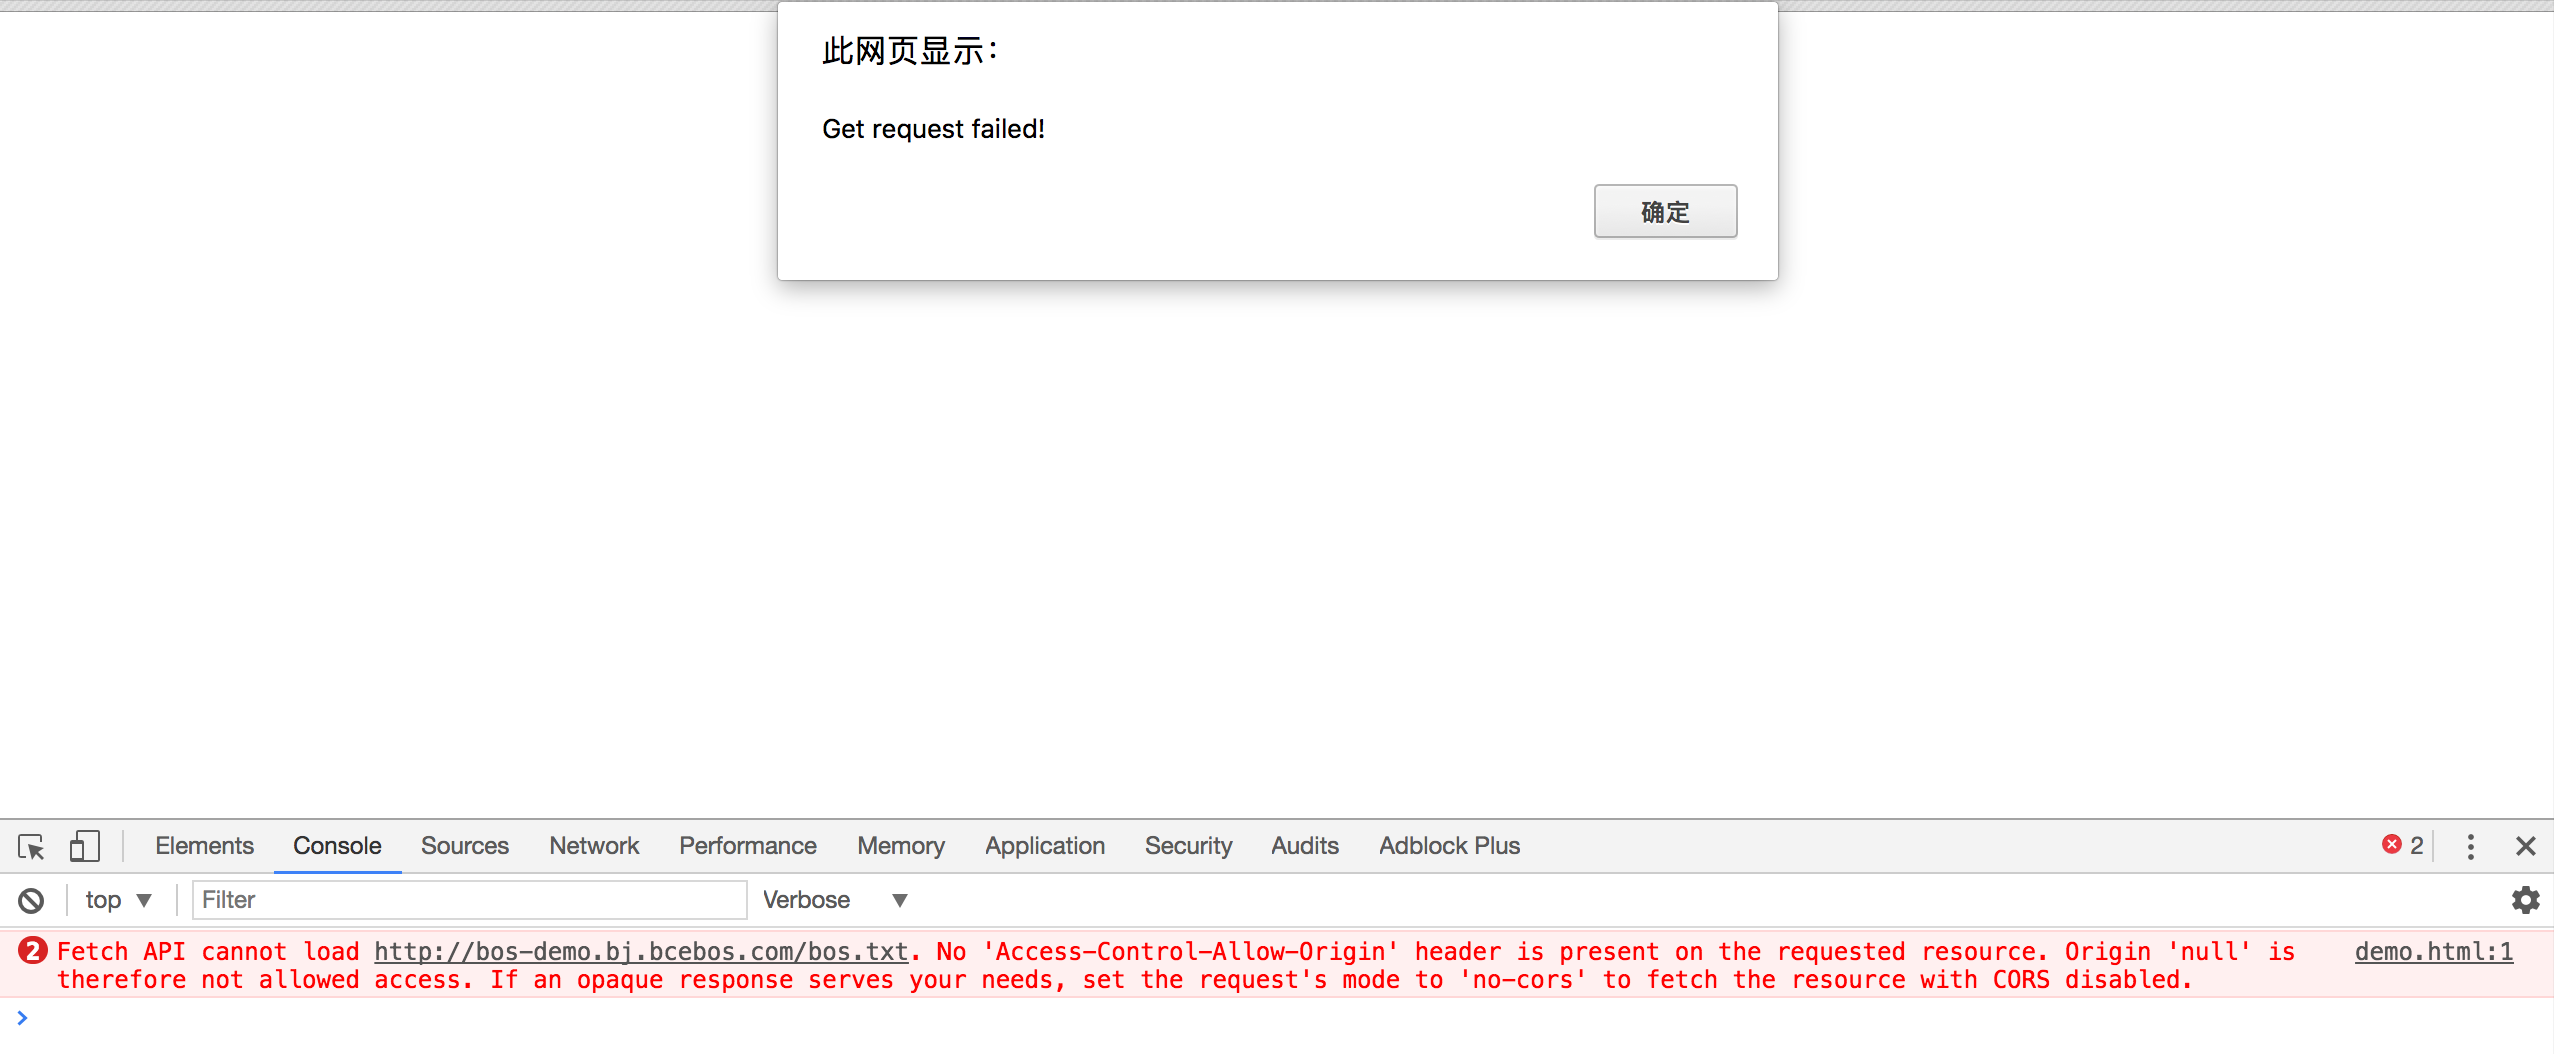
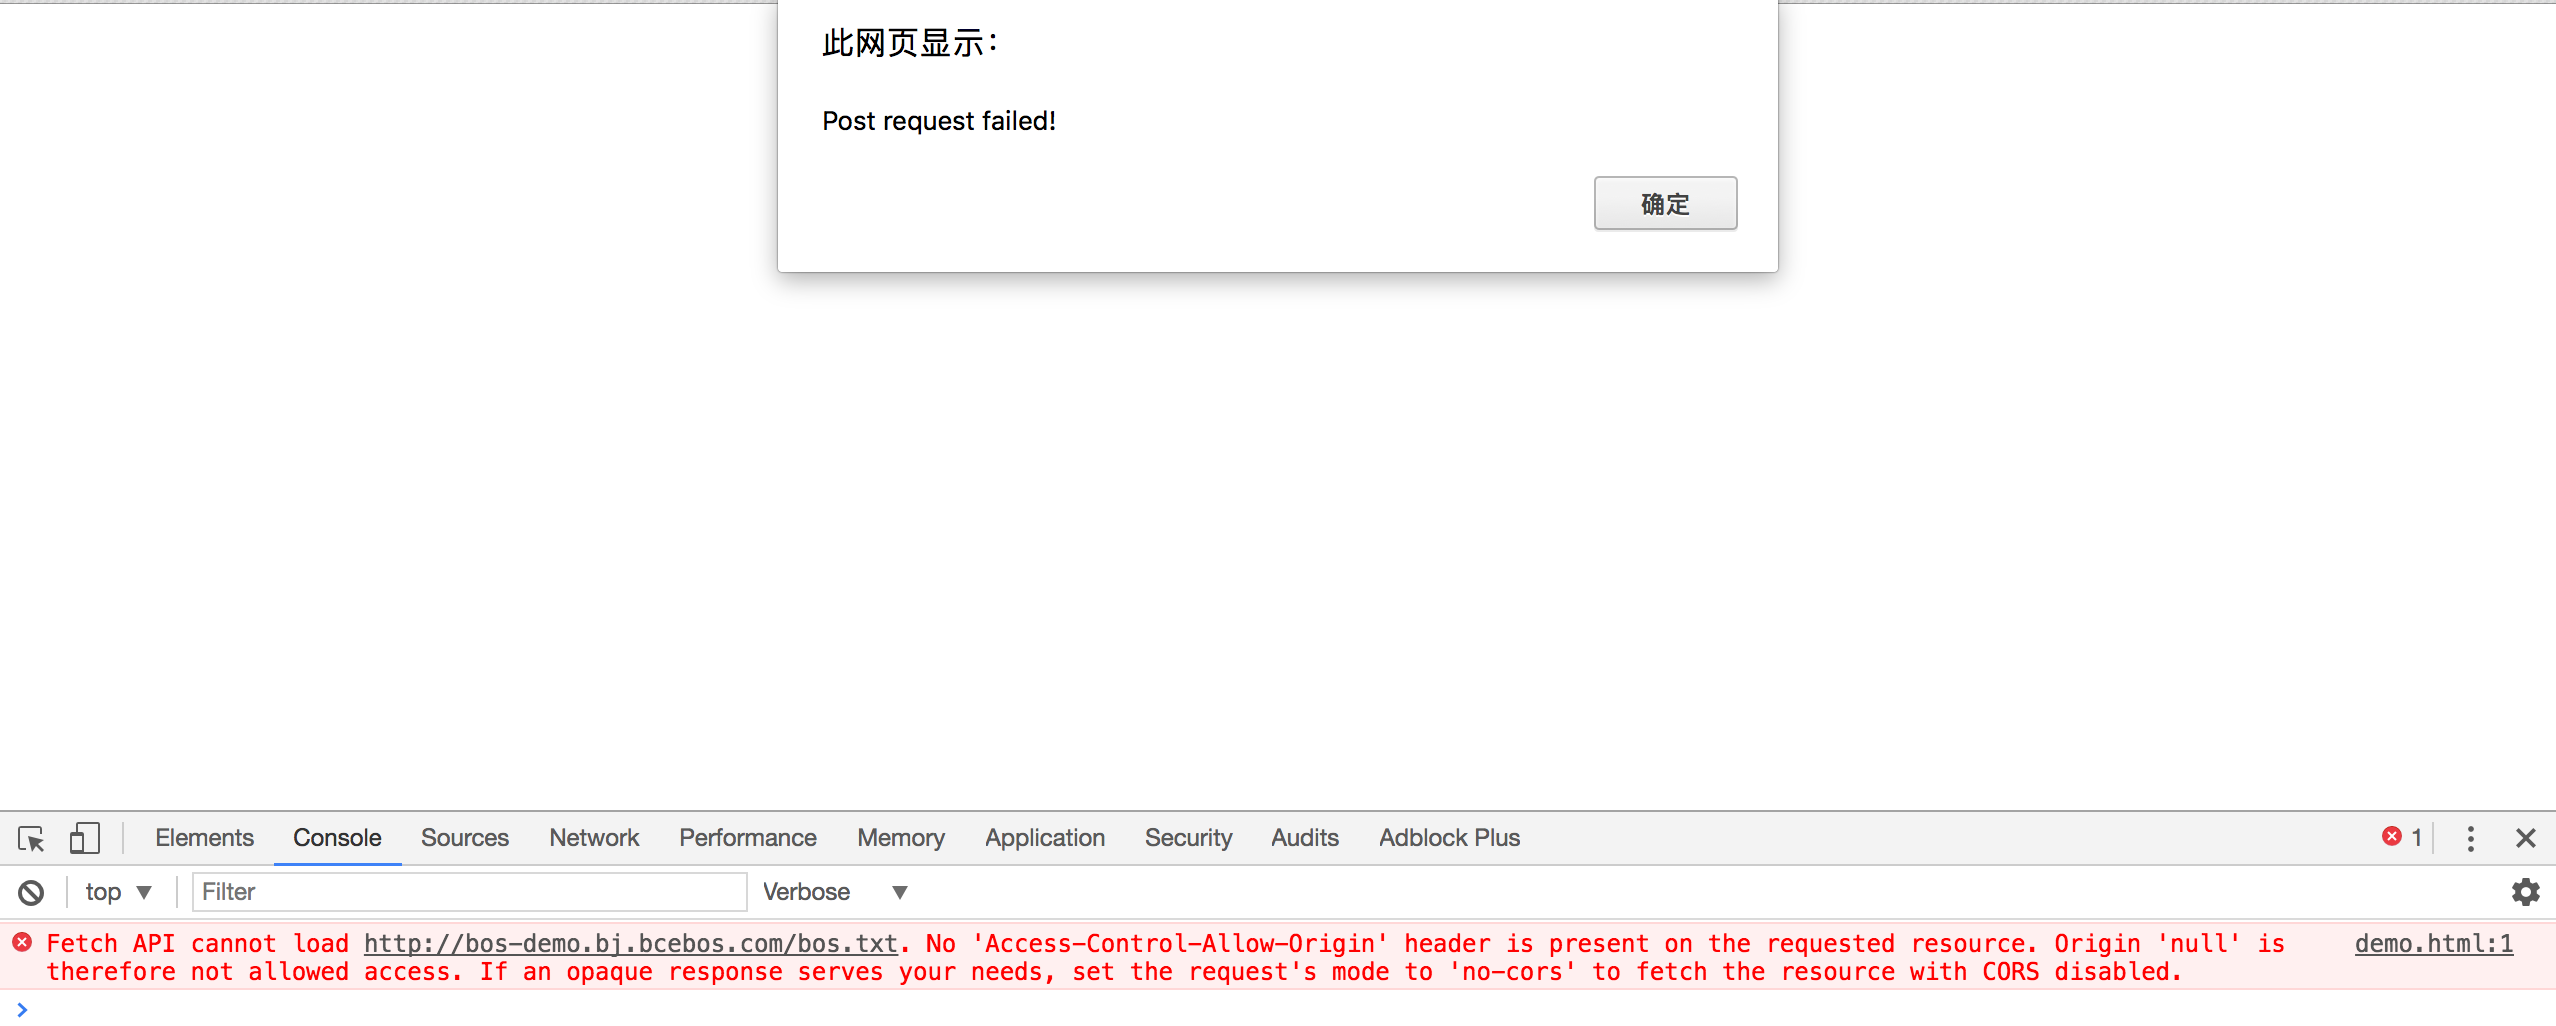
Upon checking the error message in the Chrome Console, you’ll see that the failure is due to the absence of the "Access-Control-Allow-Origin" header. Clearly, this indicates that the server is not configured with CORS.
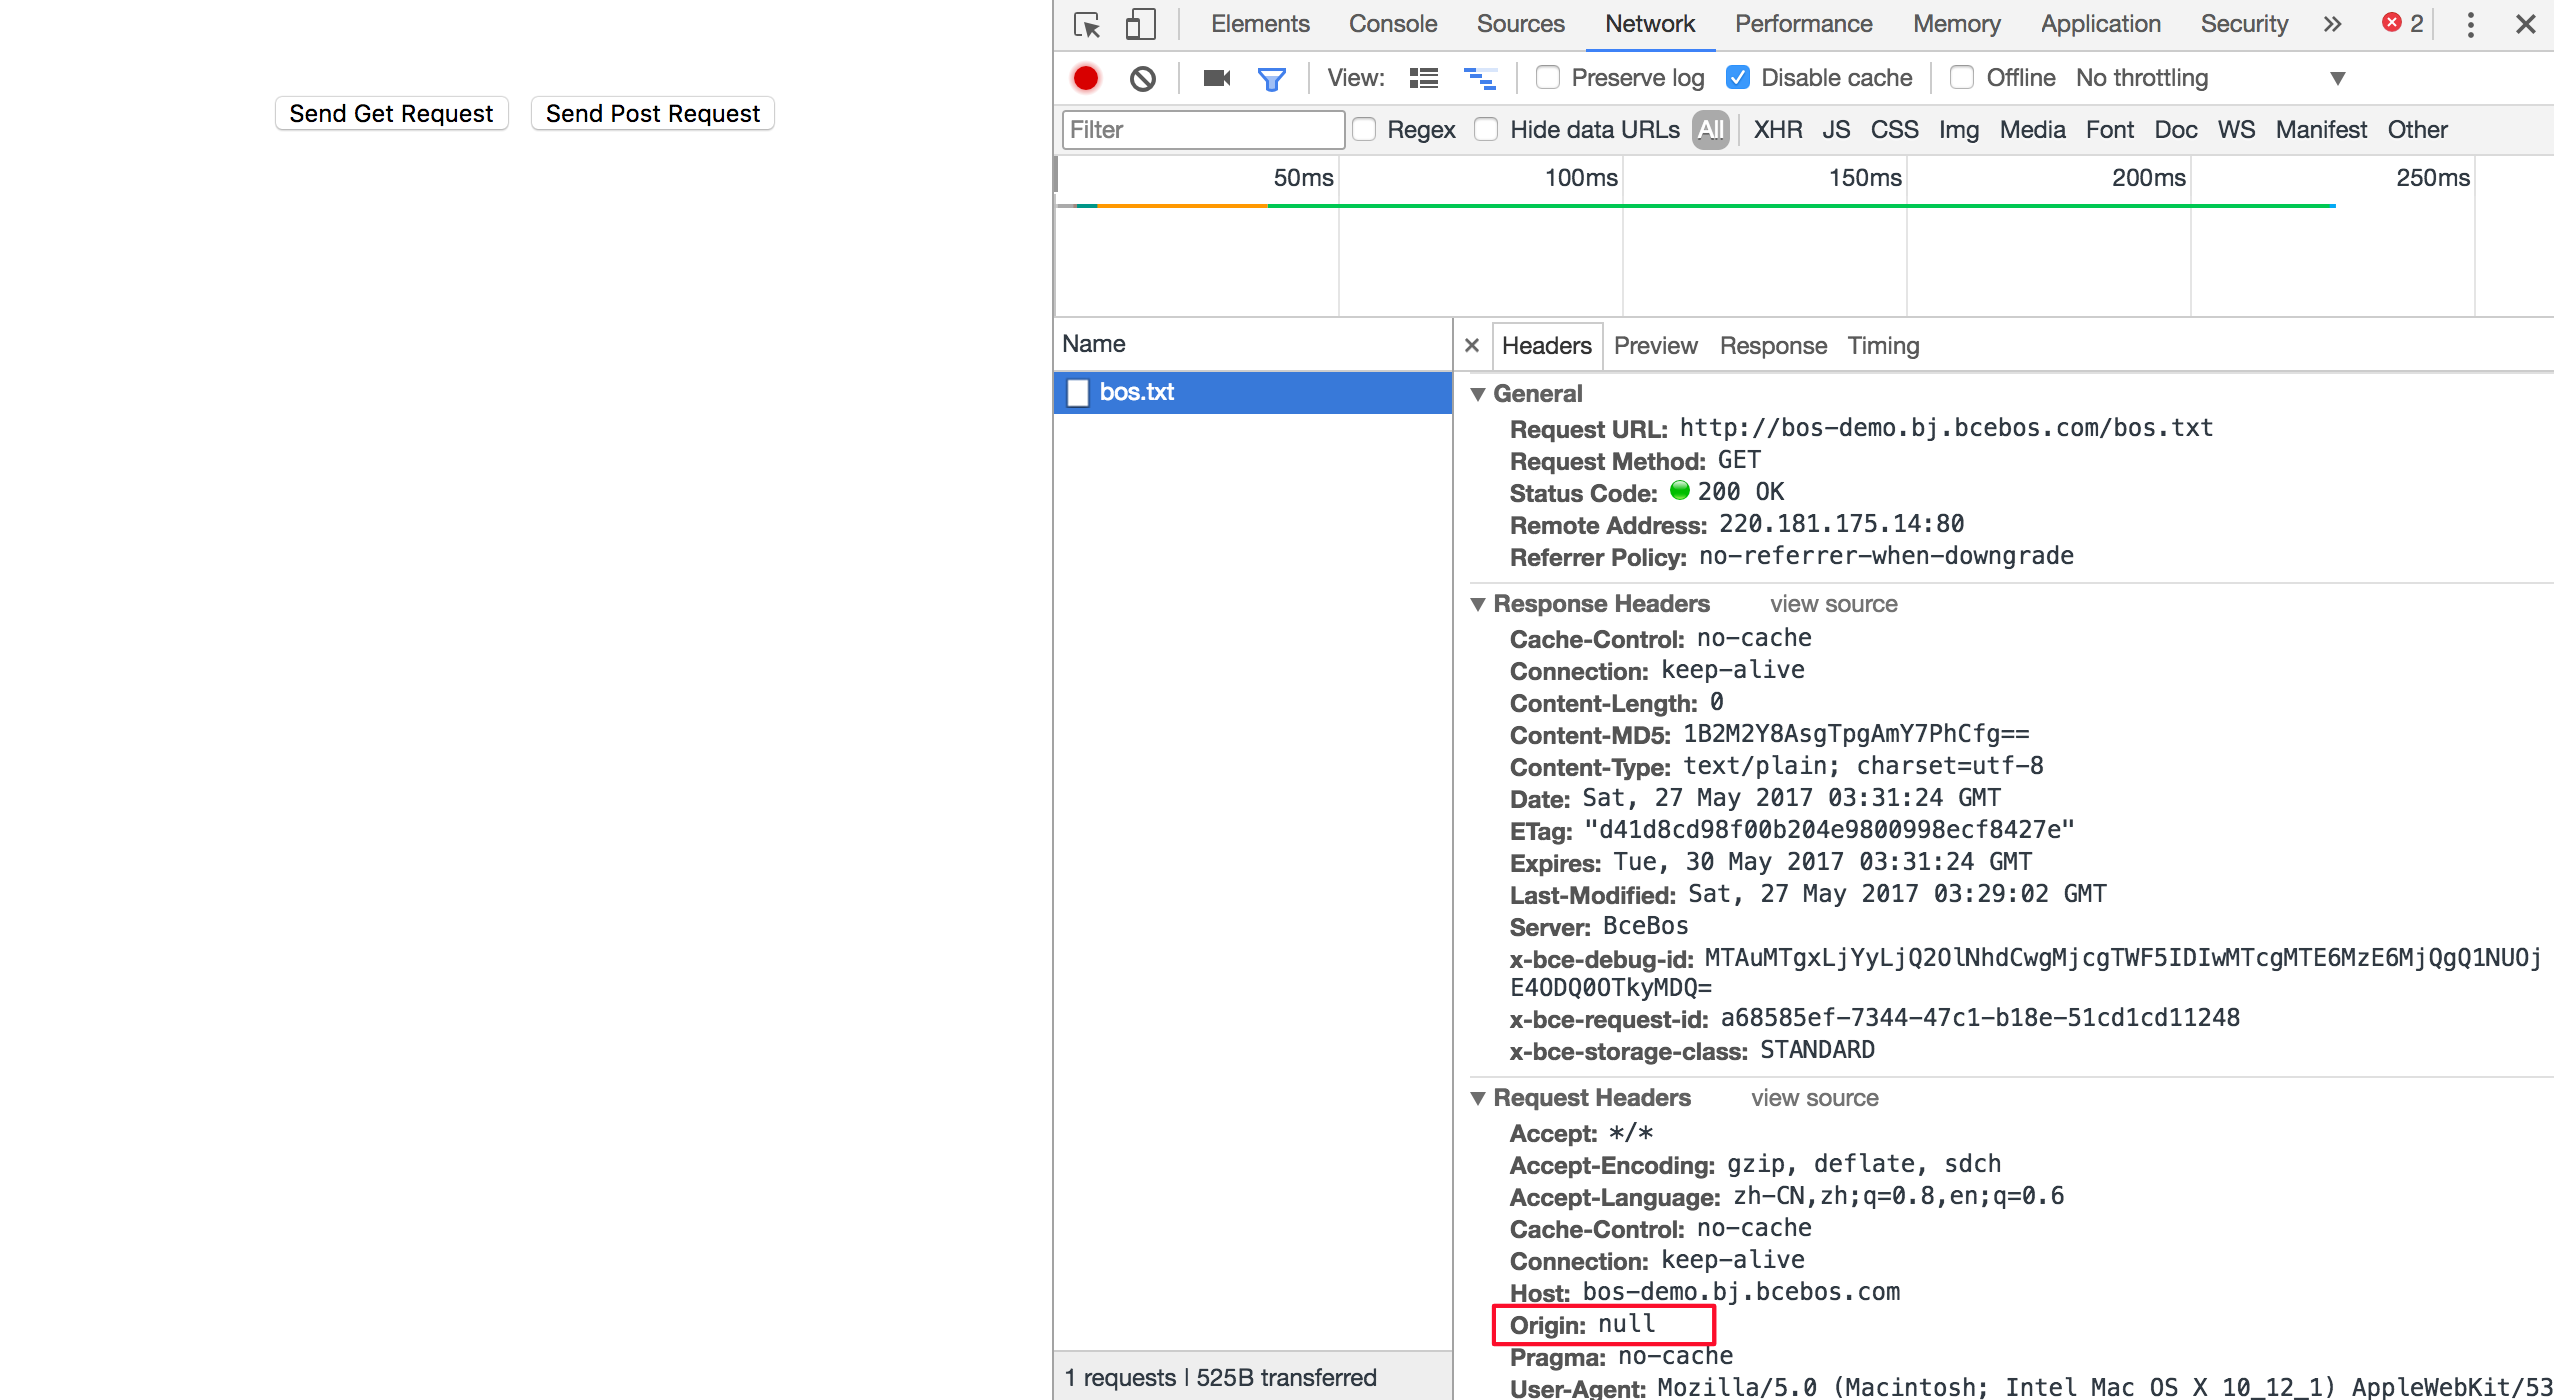
Next, check the Header API, where you'll see that the browser included an Origin header, confirming it as a cross-domain request. On Chrome, when accessing a local file, the Origin will appear as null.
Configure bucket CORS rules
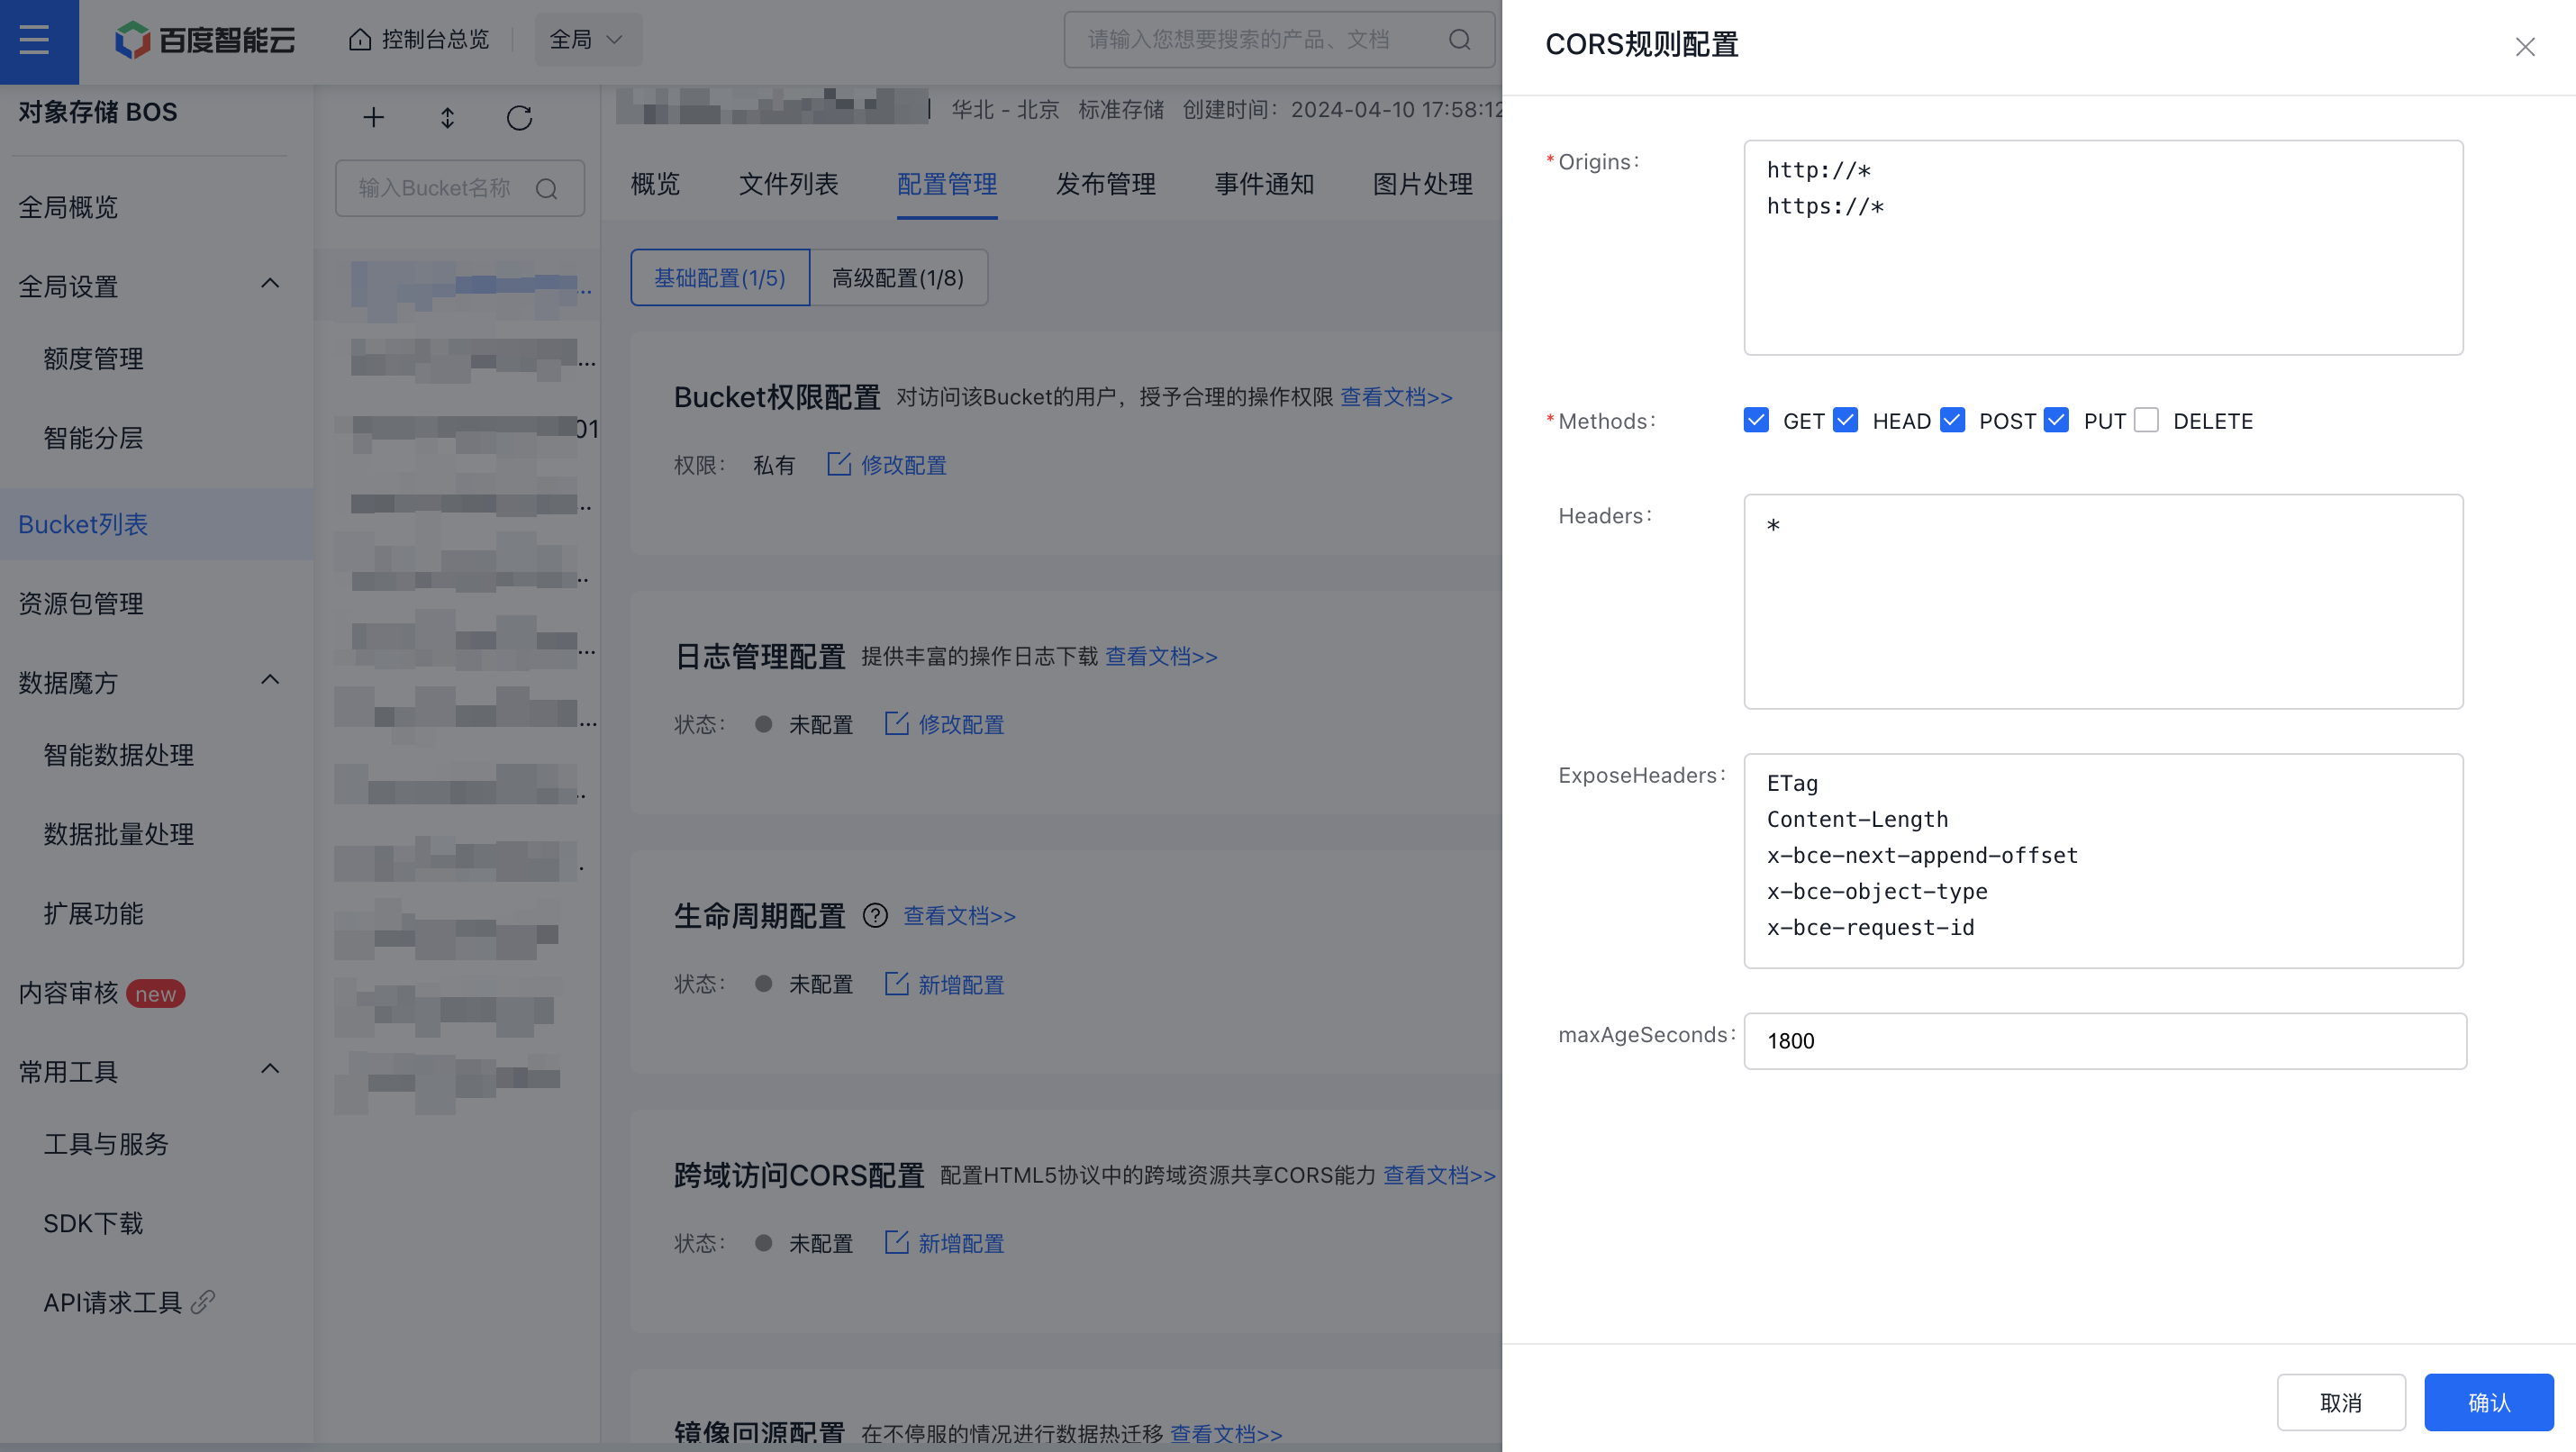
CORS settings are defined through individual rules. When matching a request, the evaluation starts from the first rule and proceeds one by one, with the earliest match taking precedence. Now, configure the first rule with the most permissive settings:
This configuration allows all origins, all request methods, all headers, and sets the maximum cache duration to 10 seconds. For detailed parameter descriptions, refer to the BOS product configuration documentation. After completing the configuration, perform a retest. The results are as follows:
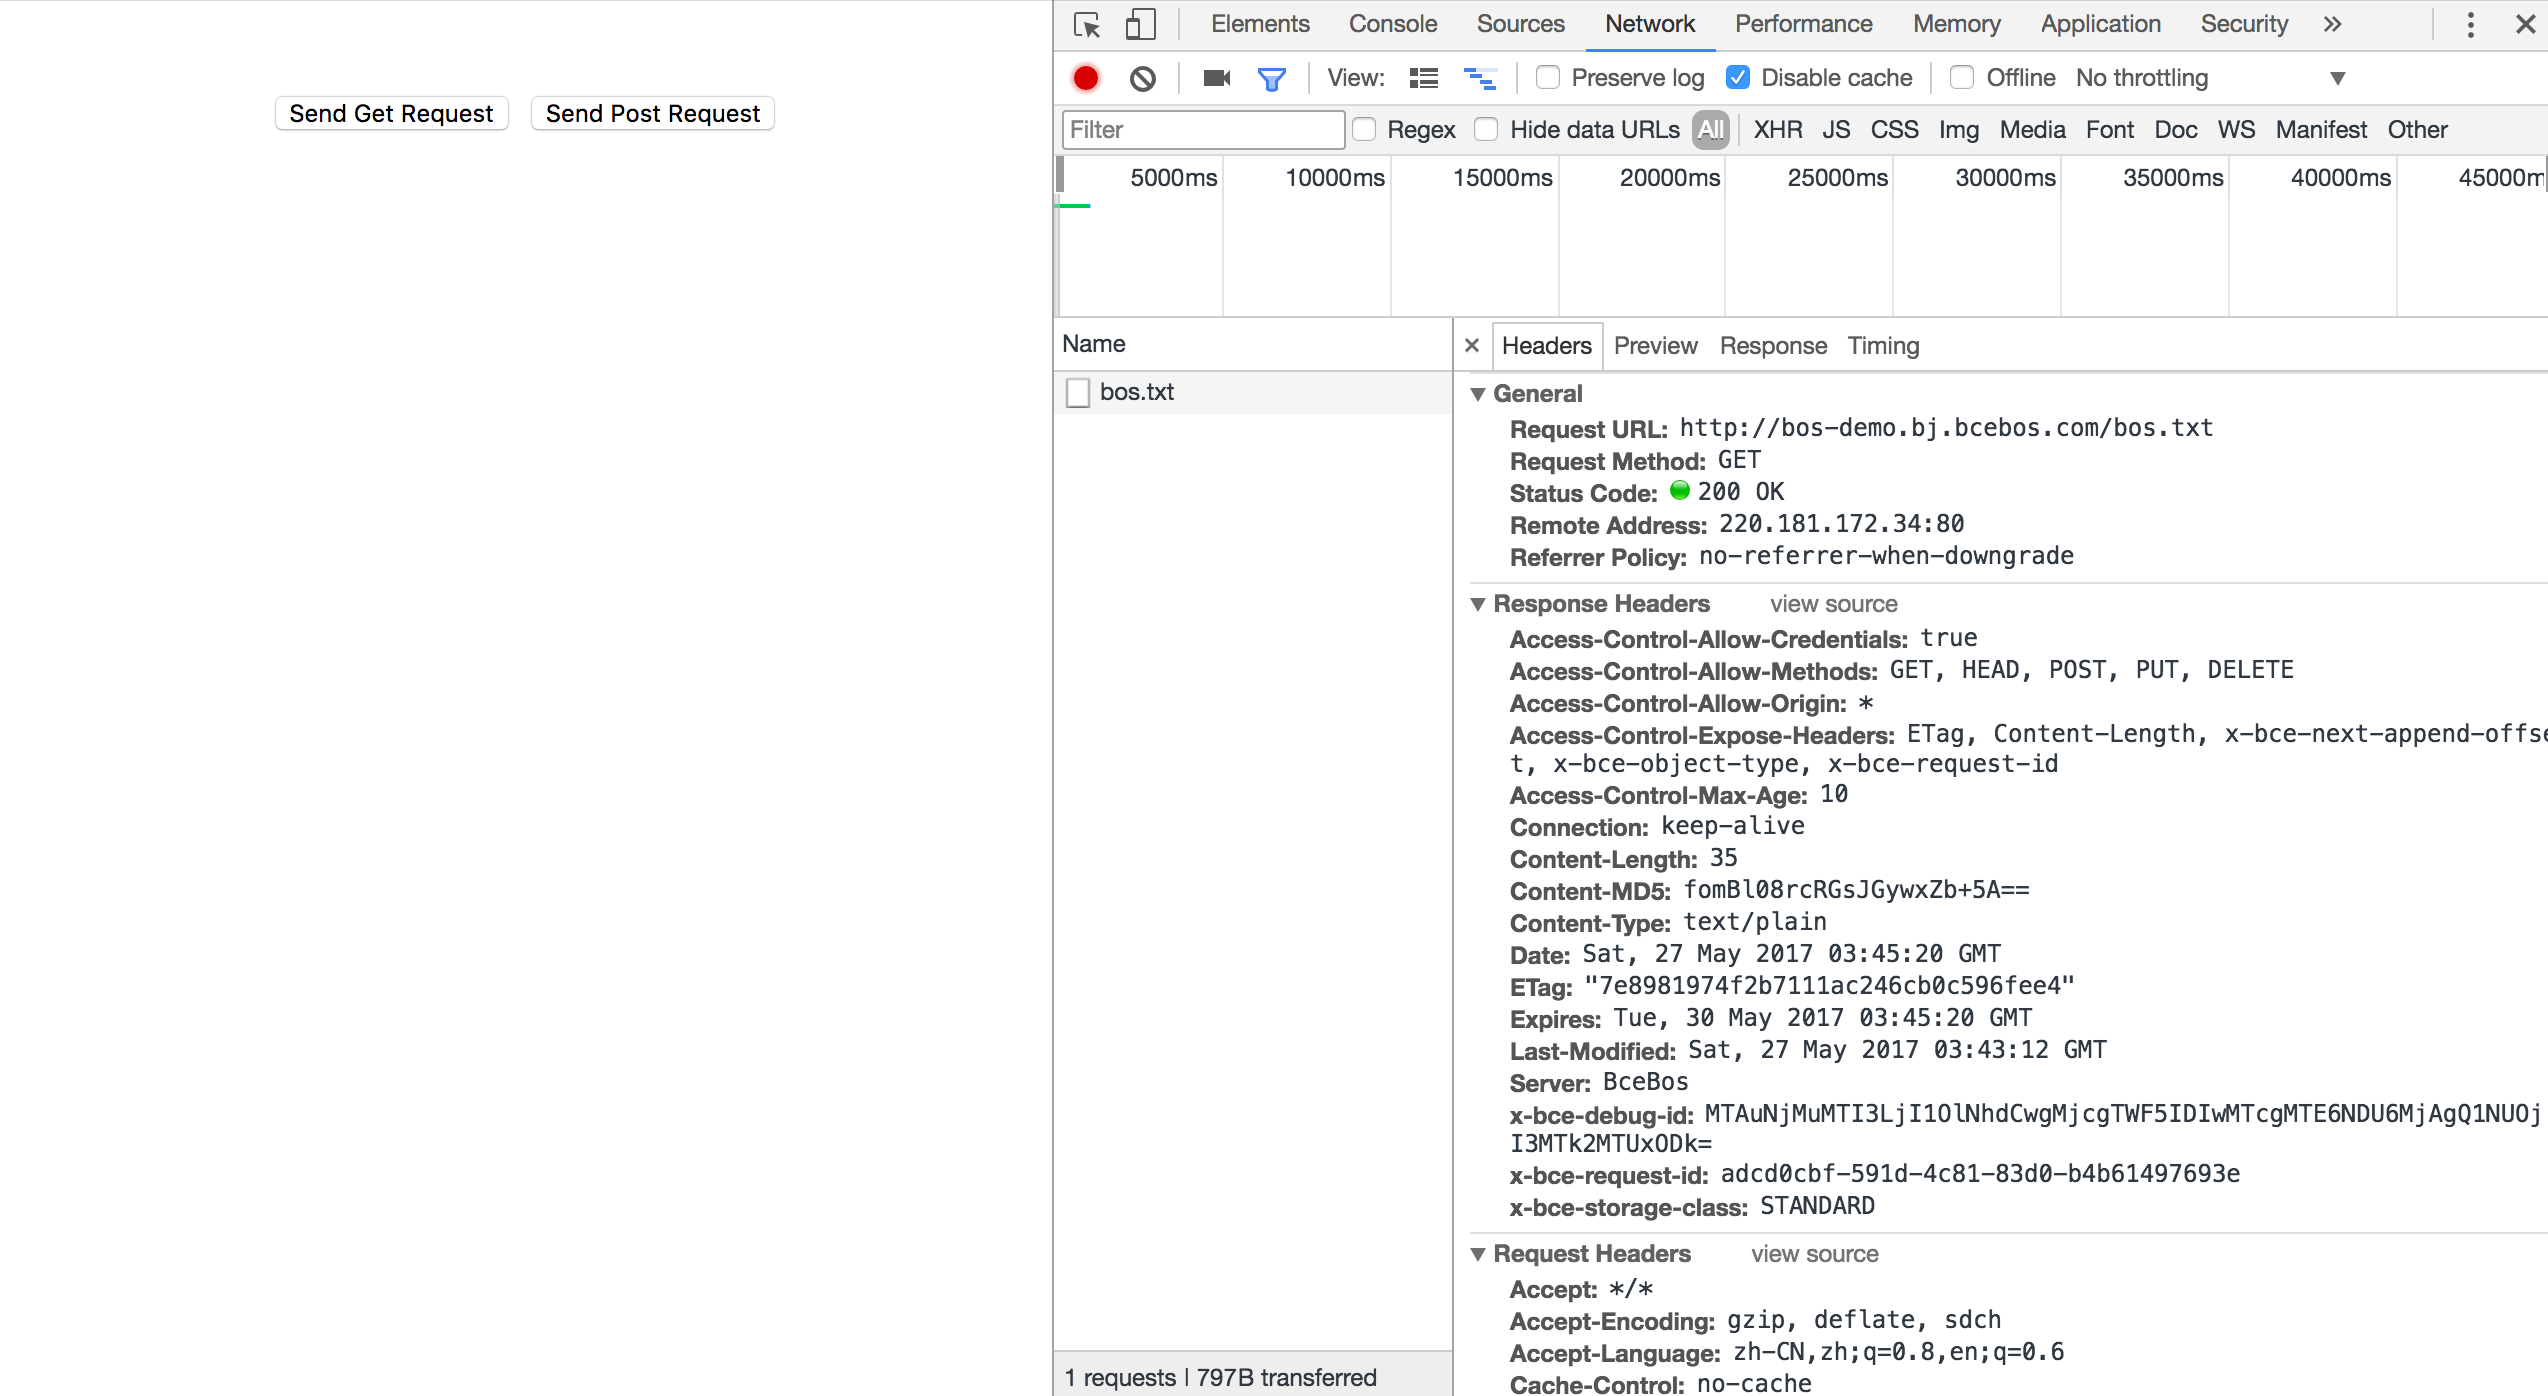
Get request result:

Post request result:

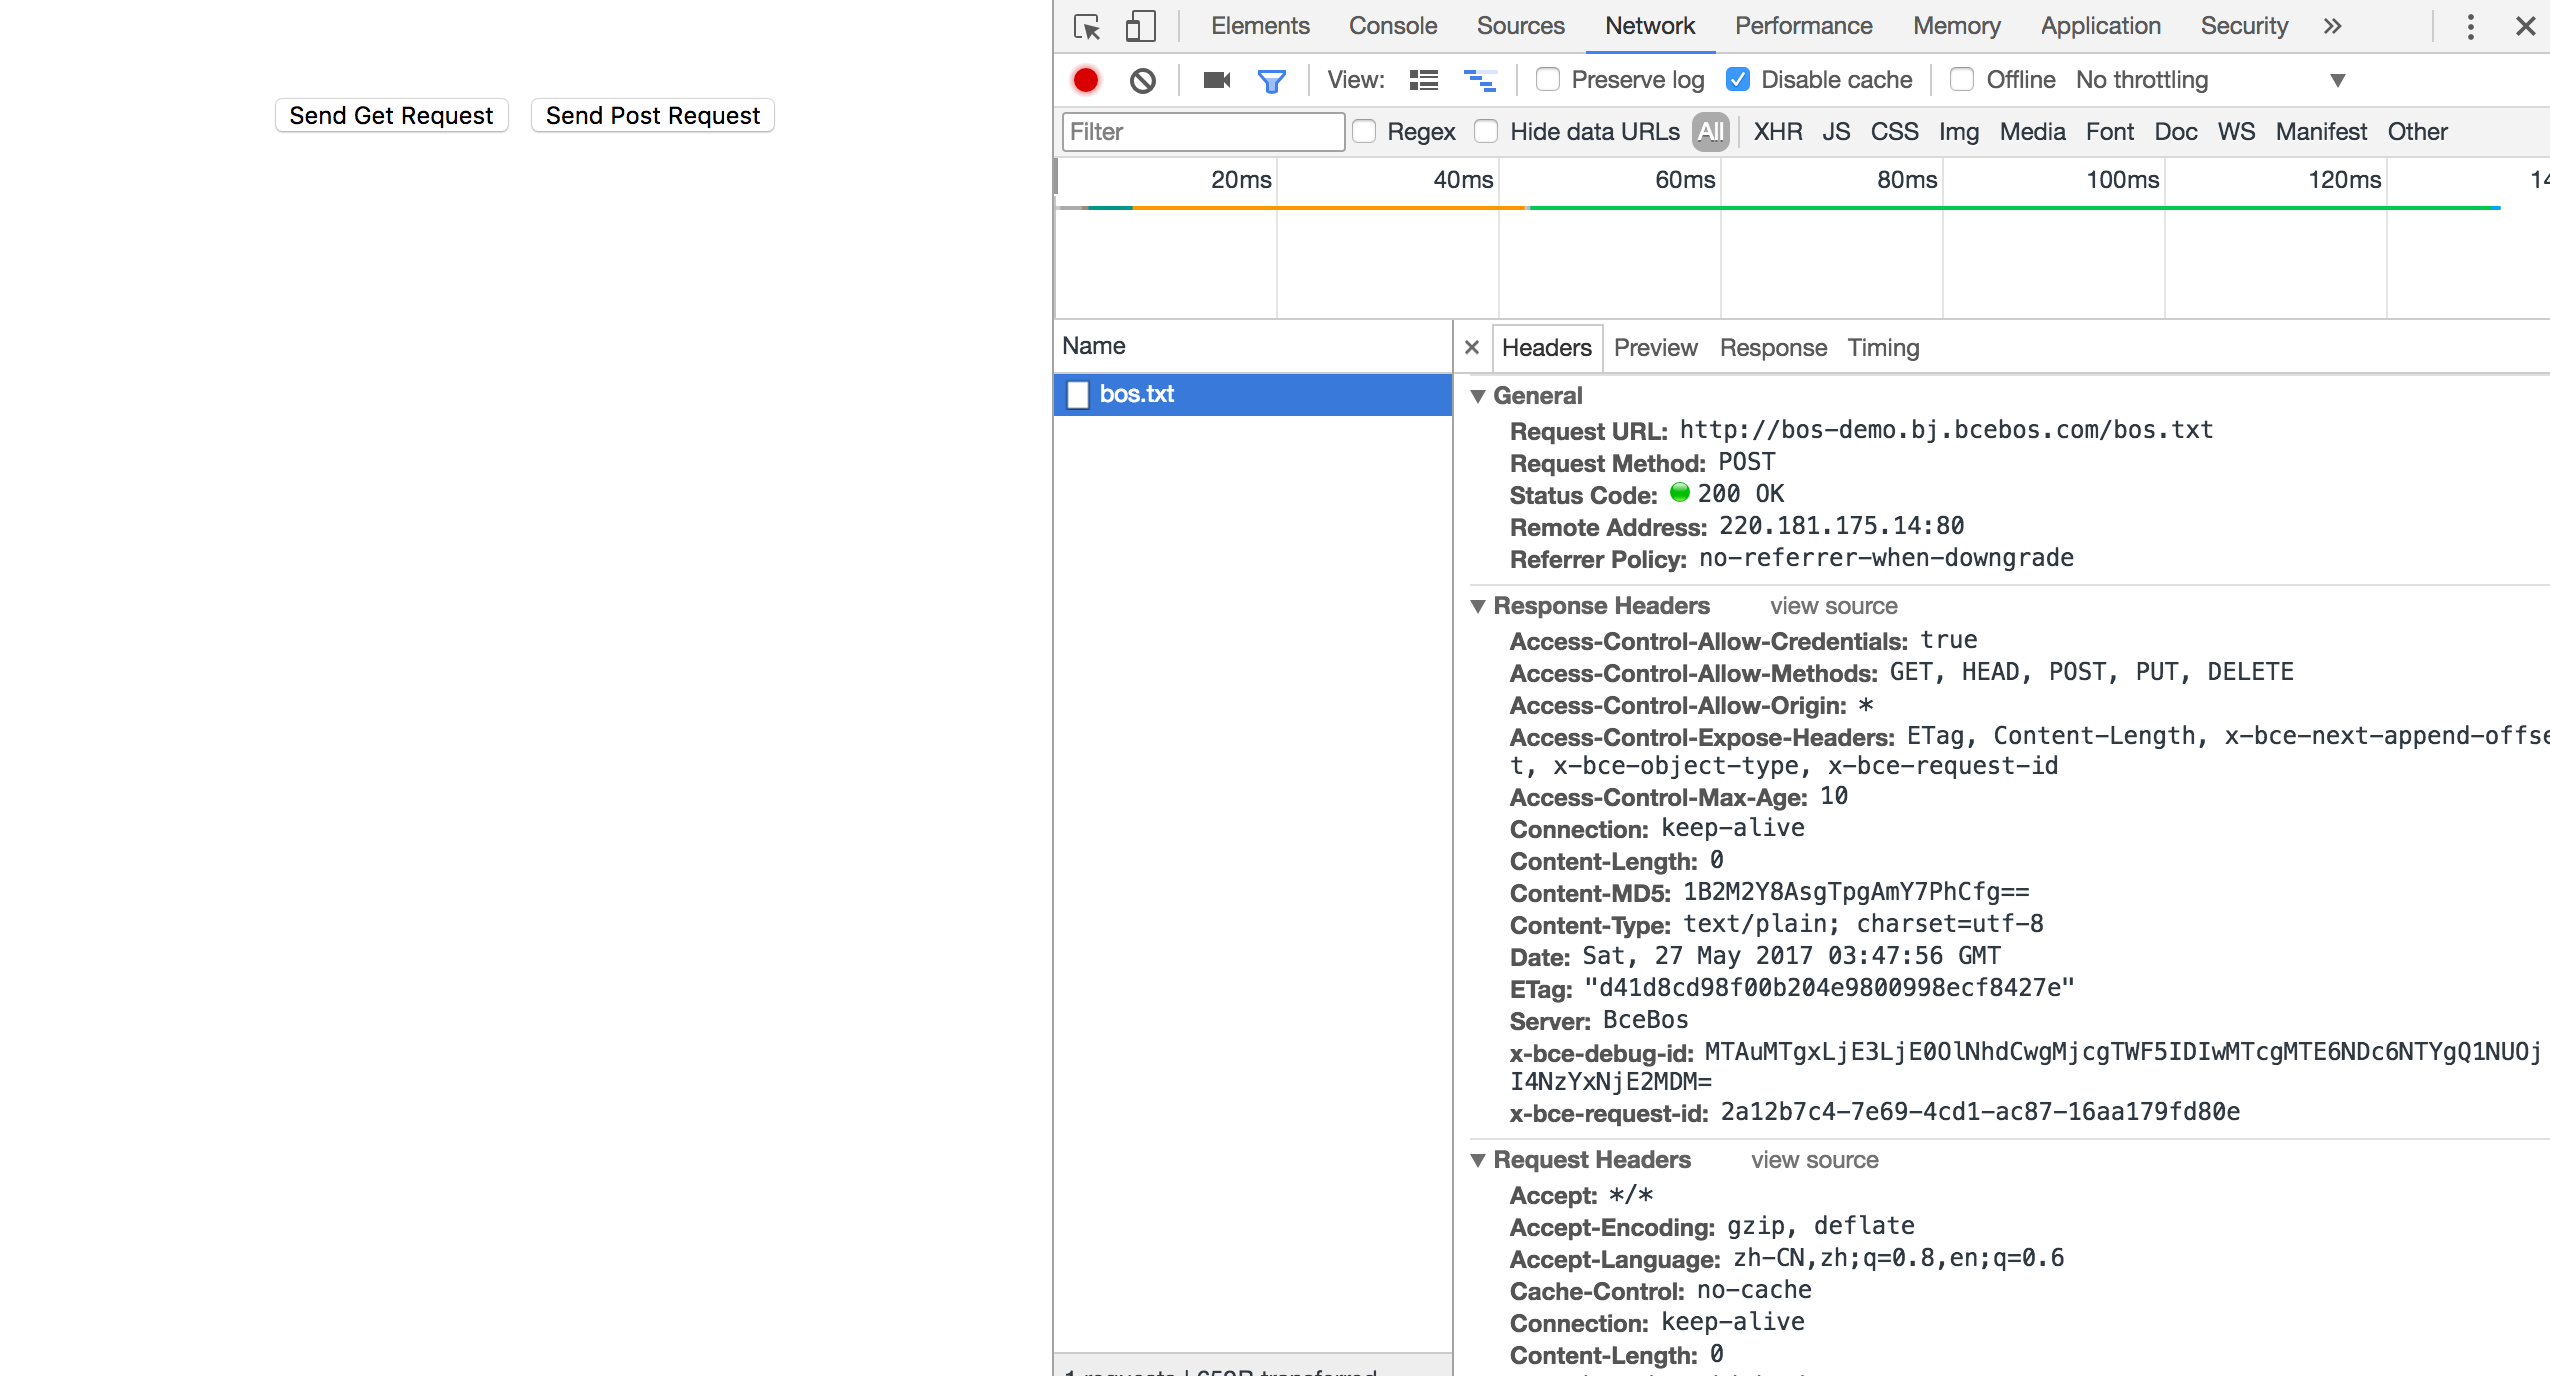
It can be found that after we configure the CORS rules, both POST and GET requests can be sent successfully. In addition to the most lenient configuration, more refined control mechanisms can also be configured to achieve targeted control. For example, only allow get requests for a certain bucket, not other requests, or only allow a certain domain name to access the bucket, etc. These can be configured in the console. For most scenarios, users are advised to use the minimum configuration according to their own usage scenarios to ensure security.
Notes
CORS configuration items notes:
- Origins: When configuring, make sure to include the full domain information, including the protocol (e.g., http). If a non-default port number is used, include the port number as well. If unsure, enable the browser's debugging tools to inspect the Origin header. Wildcards (*) are supported but limited to single use, allowing for flexible configurations based on specific needs.
- Methods: Enable the appropriate request methods according to your requirements.
- Headers: This refers to the list of allowable headers. If there are no specific requirements, it is recommended to set it to *, as it is case-insensitive.
- ExposeHeader: This is the list of headers exposed to the browser. Wildcards are not allowed. Configure it based on the application's needs. Only expose the necessary headers, such as ETag. If you don’t need to expose anything, you can leave it blank. If there are special requirements, specify them separately, as it is case-insensitive.