
Basic Chapter - Directly Uploading Files to BOS in the Browser
Usage process
When using bce-bos-uploader, follow these steps to directly upload files to BOS via a browser:
Special note: bce-bos-uploader is no longer updated and maintained. It is recommended to use JS SDK for direct upload to BOS
- Enable cross-origin access settings for bucket
- Query ak/sk
- Initialize bce-bos-uploader parameters
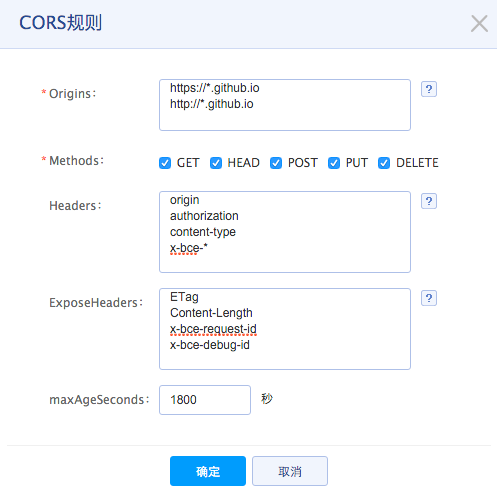
Enable cross-origin access for bucket
Due to browser security constraints, to directly access the BOS service through a browser, you must properly configure the cross-origin function for the relevant bucket. The setup process is as follows:
- Log in to the Baidu AI Cloud console.
- Choose the bucket and navigate to the Bucket Management page.
- Click on Bucket Properties from the left menu to access the Bucket Configuration page.
- Select CORS Settings on the right to open the CORS configuration page.
- Click Add Rule to add one or more CORS rules.
Query AK/SK
You can query the information of AK and SK in Security Authentication under the account in the upper right corner of the Baidu AI Cloud console homepage, or you can view it in Bucket management. For detailed operations, please refer to [Manage ACCESSKEY](Reference/Retrieve AK and SK/How to Obtain AKSK.md).
Obtain bce-bos-uploader
There are two ways to obtain the code of bce-bos-uploader:
-
First: Install via npm
Plain Text1npm install @baiducloud/bos-uploader -
Second: Directly reference resources on CDN (for testing only, not recommended for production environment)
Plain Text1<script src=" https://bj.bcebos.com/v1/bce-cdn/lib/@baiducloud/bos-uploader/<version>/bce-bos-uploader.bundle.min.js"></script>
Initialize bce-bos-uploader
1<!doctype html>
2<html>
3  <head>
4    <meta charset="utf-8" />
5    <title>bce-bos-uploader simple demo</title>
6    <!--[if lt IE 8]><script src="https://unpkg.com/json3@3.3.2/lib/json3.min.js"></script><![endif]-->
7    <!--[if lt IE 9]><script src="https://unpkg.com/js-polyfills@0.1.42/es5.js"></script><![endif]-->
8    <!--[if lt IE 10]><script src="https://unpkg.com/mOxie@1.5.7/bin/js/moxie.min.js"></script><![endif]-->
9    <script src="https://unpkg.com/jquery@3.3.1/dist/jquery.min.js"></script>
10    <script src="https://bce.bdstatic.com/lib/@baiducloud/bos-uploader/1.4.0-rc.0/bce-bos-uploader.bundle.min.js"></script>
11  </head>
12  <body>
13    <input type="file" id="file" >
14 <button type="submit">Start Upload</button>
15    <script>
16      var uploader = new baidubce.bos.Uploader({
17      browse_button: '#file',
18      bos_bucket: '<your bucket>',
19      bos_endpoint: '<your host>',
20      bos_ak: '<your ak>',
21      bos_sk: '<your sk>',
22      max_file_size: '1Gb',
23      init: {
24        FileUploaded: function (_, file, info) {
25          var bucket = info.body.bucket;
26          var object = info.body.object;
27          var url = '<your host>' + bucket + '/' + object;
28          $(document.body).append($('<div><a href="' + url + '">' + url + '</a></div>'));
29        },
30        UploadComplete: function() {
31 $(document.body).append('<div>Upload completed! </div>');
32        }
33      }
34    });
35     $('button[type=submit]').click(function () {
36      uploader.start();
37      return false;
38    });
39
40    </script>
41  </body>
42</html>
Save the above code as index.html, and then start the webserver to access this page.
Start webserver
-
Start via PHP
Plain Text1php -S 0.0.0.0:9999 -
Start via Python
Plain Text1python -m SimpleHTTPServer 9999 - For other methods, please refer to the relevant documents
After starting the webserver, access http://localhost:9999/index.html in the browser to open the above page and start testing whether the upload can be performed normally.