
Security group
Security group overview
A security group acts as a network firewall within a VPC network for BCC instances, DCC dedicated instances, load balancer instances, and cloud database instances. It defines ingress and egress access rules based on IP and port, thereby enhancing the security of cloud server instances, load balancers, cloud database instances, and related resources.
Security groups are divided into regular security groups and enterprise security groups with the following functions:
| Function | Regular security group | Enterprise security group |
|---|---|---|
| No rules specified for security group | Ingress: Deny all access requests Egress: Deny all access requests |
Ingress: Deny all access requests Egress: Deny all access requests |
| Default rules for new security groups | Ingress: Deny all access requests Egress: Allow all access requests |
Ingress: Deny all access requests Egress: Allow all access requests |
| Security group rule strategy | Only support the Allow policies | Support the Allow and Deny policies |
| Set rule priority | Complete Allow List mechanism without priority | Value range: 1-1000. The smaller the value, the higher the priority. If Allow and Deny rules share the same priority, Deny takes precedence. Rules are evaluated in order, from the highest to the lowest priority. |
| Select security group for source or target | Support | Not supported |
| Count of associated instances | Unlimited | Unlimited |
| Instance associating with multiple security groups | All rules are matched one by one. If any rule allows, the request is allowed. | All rules in the associated enterprise security groups are reordered by priority, and rules are matched by priority. If Allow and Deny policies have the same priority, Deny takes precedence. |
| Application scenarios | For scenarios with low operation and maintenance costs | For scenarios requiring more refined network control |
Before Configuration, users should know:
- Up to 100 security groups can be created in each default VPC;
- Up to 20 security groups can be created in each regular VPC;
- Each BCC instance can associate with up to 10 security groups. When associated with multiple groups, the effective rules for the instance will be the combined rules from all associated groups.
- When the security group quota is exhausted, the button will be grayed out and cannot be clicked;
- When creating a security group, users can configure detailed rules using the Ingress and Egress tabs under Port Settings.
- Each regular security group allows a maximum of 100 rules per direction by default. To create additional rules, apply via the Quota Center.
- Each enterprise security group allows a maximum of 150 ingress rules and 150 egress rules by default. To create additional rules, apply at the Quota Center.
- Each VPC comes with a default security group that cannot be deleted. However, you can add, remove, or modify its rules. The "One-click Restoration to Initial Setting" button is available exclusively for the default security group.
- To delete a security group, ensure it is first disassociated from all instances.
- If a BCC instance has only one associated security group, that group cannot be disassociated.
- An instance cannot be simultaneously associated with both regular security groups and enterprise security groups.
Create a security group
- Navigate to Product Services - Virtual Private Cloud (VPC), and choose Security Group from the left-hand menu.

- Click on Create Security Group to open the security group creation interface.

- Select the target network and provide the desired security group name and description.
- Select the port setting method. Ingress and egress access rule settings are divided into two separate tabs, with the following methods for rule setting:
- When "Allow Access to All Ports" is turned OFF, click Add Rule to set up ingress and egress rules.

- If "Allow Access to All Ports" is OFF and no rules are defined, it will result in the BCC being unable to communicate with the external network. In this scenario, the BCC can only be accessed via remote VNC login. Therefore, use this option cautiously.
- If "Allow Access to All Ports" is ON, all service ports of the BCC will be completely exposed to the network, potentially leading to security risks. Proceed with caution when enabling this option.
Description:
When adding a rule, if the source or target is a security group, it indicates that the source or destination IP refers to the internal IP of an instance linked to that security group, excluding other security group rules.
- Click OK to access the Security Group Details page and finalize the creation of the security group.
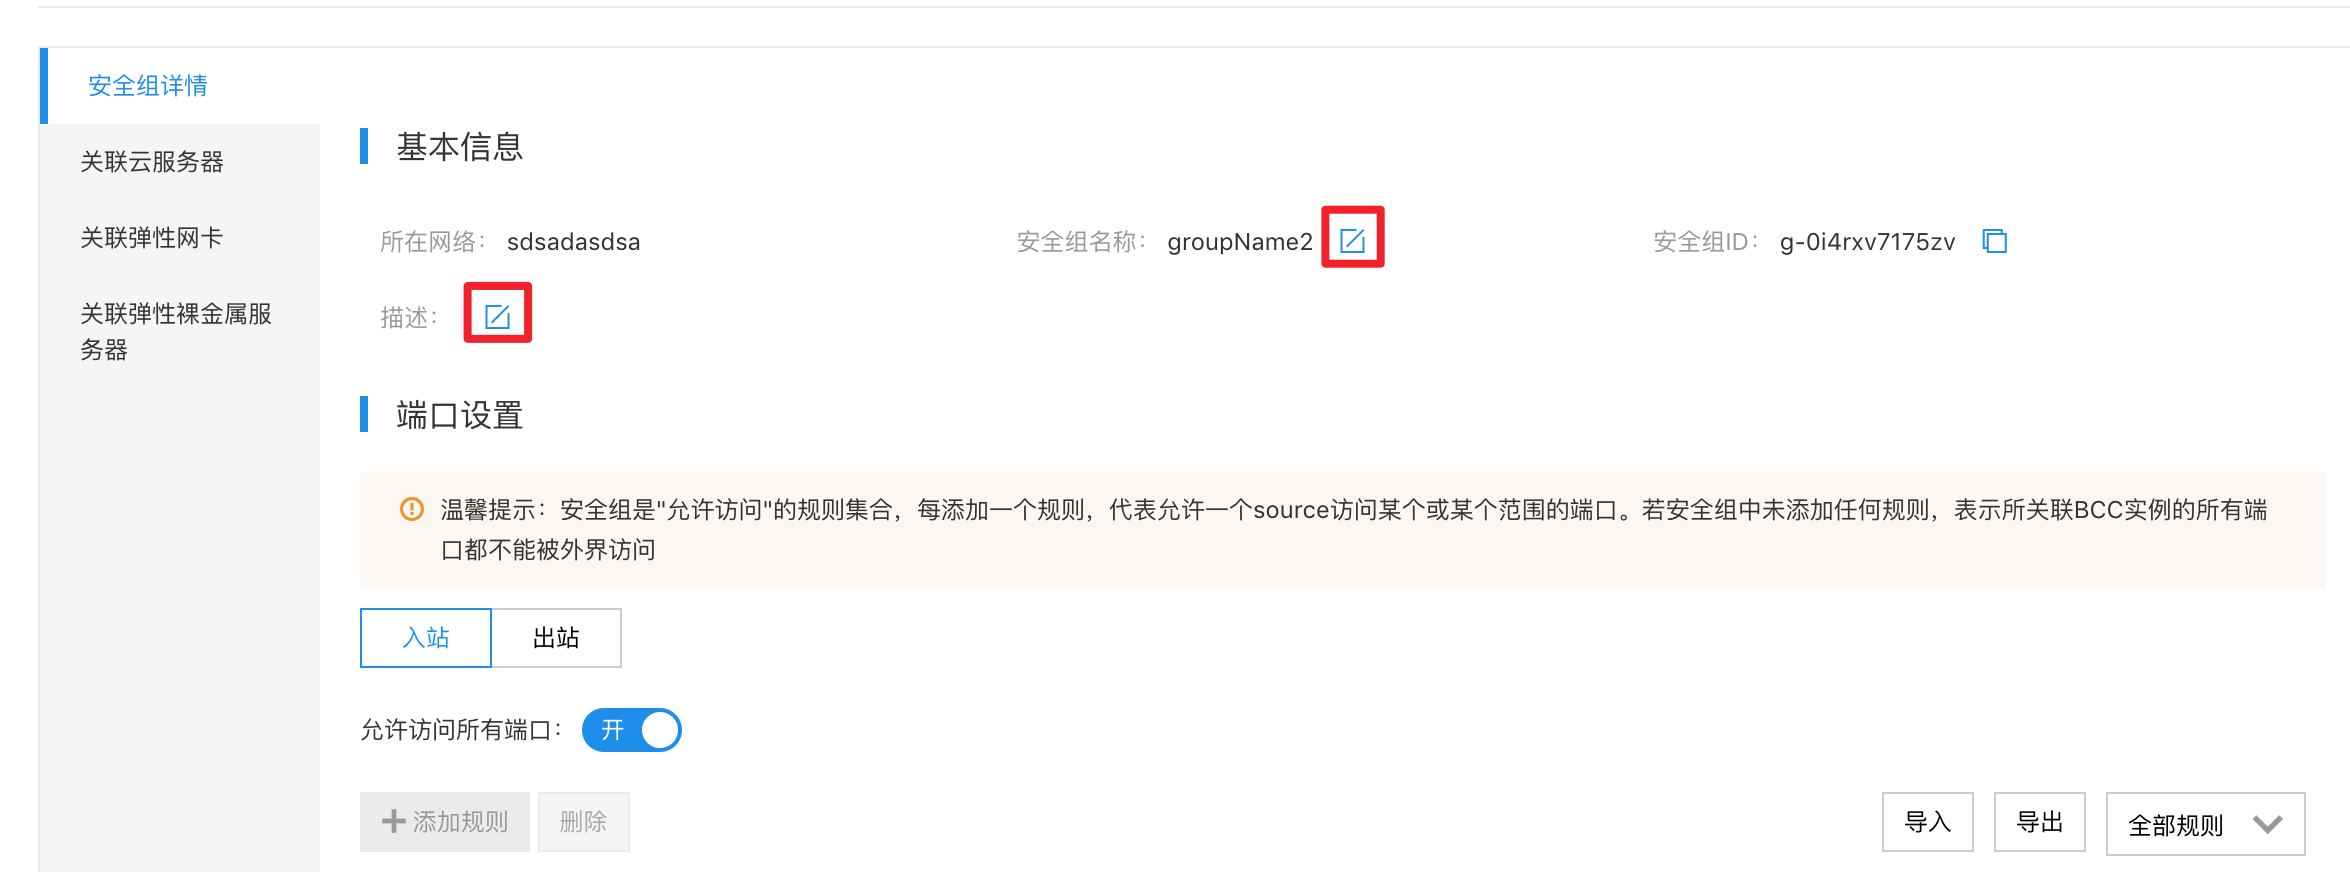
Edit security group
You can edit the names, descriptions, port settings, and associated instances of existing security groups.
Description:
To maintain system security, it is recommended not to alter the settings of the "Default security group." If additional permission mechanisms are needed, create a new security group and bind it to cloud service instances.
- Go to Product Services - Virtual Private Cloud (VPC) and select Security Group from the left-hand menu.
- Click on a security group name to access the Security Group Details page.
- For rules under the "Protocol" field that need changes, click Edit next to the corresponding action to modify them.
Export security group rules
You can export security group rules for local backup purposes.
- Go to Product Services - Virtual Private Cloud (VPC) and select Security Group from the left-hand menu.
- Click on a security group name to access the Security Group Details page.
- Click Export to download the rule file to your device.

Import security group rules
You can import previously exported security group rule files into a new security group for quick setup and recovery.
- Go to Product Services - Virtual Private Cloud (VPC) and select Security Group from the left-hand menu.
- Click on a security group name to access the Security Group Details page.
- Click Import and choose a security group rule file in .csv format.
- Click OK to import the security group rules.

Description:
To customize security group rules, start by exporting the current rules and editing them following the provided format.
Copy security group
Users can effortlessly create a security group with the same rules by using the Replicate Security Group feature.
- Navigate to Product Services - Virtual Private Cloud (VPC), then choose Security Group from the left navigation bar to access the Security Group List page.
- After selecting the desired security group to replicate, click the Copy button in the Actions column to open the Copy Security Group interface.
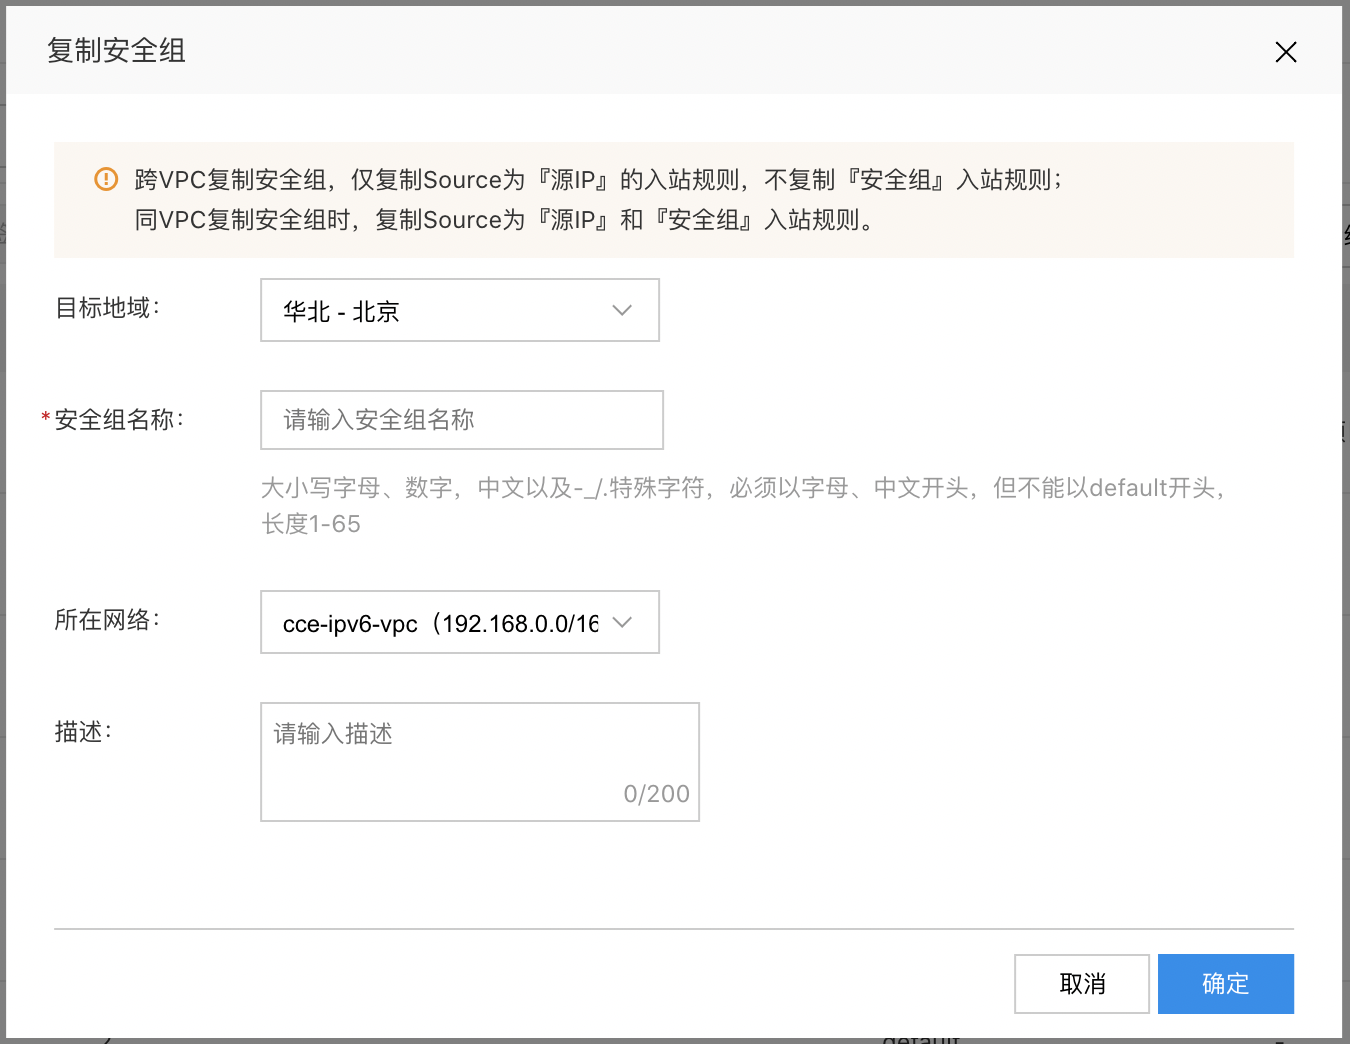
- Click OK to finalize the replication of the security group information.
Delete a security group
If a security group is no longer required, users can delete it. For unassociated custom security groups, direct deletion is allowed. For associated security groups, disassociation must occur before deletion.
- Navigate to Product Services - Virtual Private Cloud (VPC), then choose Security Group from the left navigation bar to access the Security Group List page.
- Select the security group to delete and click the Delete button.
- (Optional) To dis-associate from cloud server instances, refer to [Disassociate security group](#Disassociate security group).
- For unassociated security groups, simply click OK to remove the security group information immediately.
Description:
Users can also delete multiple security groups at once. In the Security Group List, select the target groups and click Delete.
Associate with security group
After creating a security group, associate and bind it to the relevant cloud server so that the security group rules can govern the cloud server’s network access control. Users can either associate an instance from the security group interface or associate a security group from the instance interface.
Description:
To modify the type of security group associated with an instance (e.g., switching from a standard security group to an enterprise security group), visit the Instance List page to manage security group associations.
Instance association on the security group side
- Go to Product Services - Virtual Private Cloud (VPC) and select Security Group from the left-hand menu.
- Click on a security group name to access the Security Group Details page.
- Click the Associate Cloud Server button located above the list of associated instances to proceed with the association.

Associate security group from instance side
Using BCC association as an example, detailed steps are available for guidance.
- Go to Product Services - Baidu Cloud Compute (BCC) to view the user’s list of created cloud servers.
- Select the instances you want to associate with the security group. When multiple instances are chosen, batch association will be performed.
- Click the Associate Security Group button to bring up the Associate Security Group dialog box.
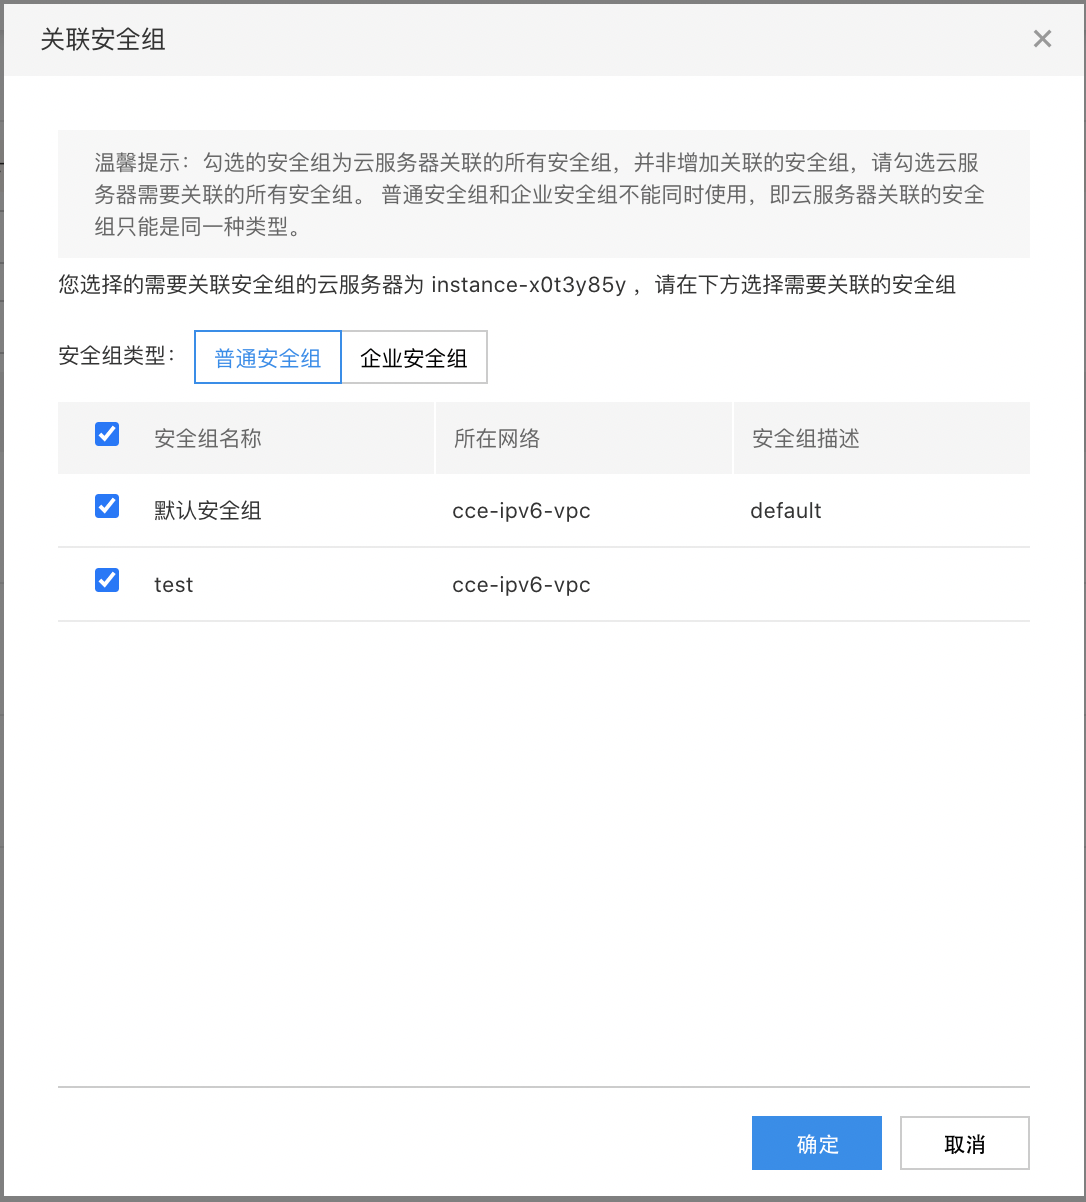
- Choose the name of the security group you wish to associate.
- Click OK to complete the association of the cloud server instance with the security group.
Disassociate security group
To switch a BCC instance to a different security group, the current security group association must be canceled since a BCC instance must always be linked to at least one security group. Users can disassociate the instance via the security group or the instance interface.
Disassociate instance from security group side
- Go to Product Services - Virtual Private Cloud (VPC) and select Security Group from the left-hand menu.
- Click on a security group name to access the Security Group Details page.
- In the operations column of the associated instances list, click Disassociate to unlink the security group.

Disassociate security group from instance side
- Choose Product Services - Baidu Cloud Compute (BCC) to navigate to the Instance List interface.
- Click on the corresponding link under Instance Name to open the Instance Details tab.
- Go to the Security Group tab and scroll down to the Associated Security Groups List section.
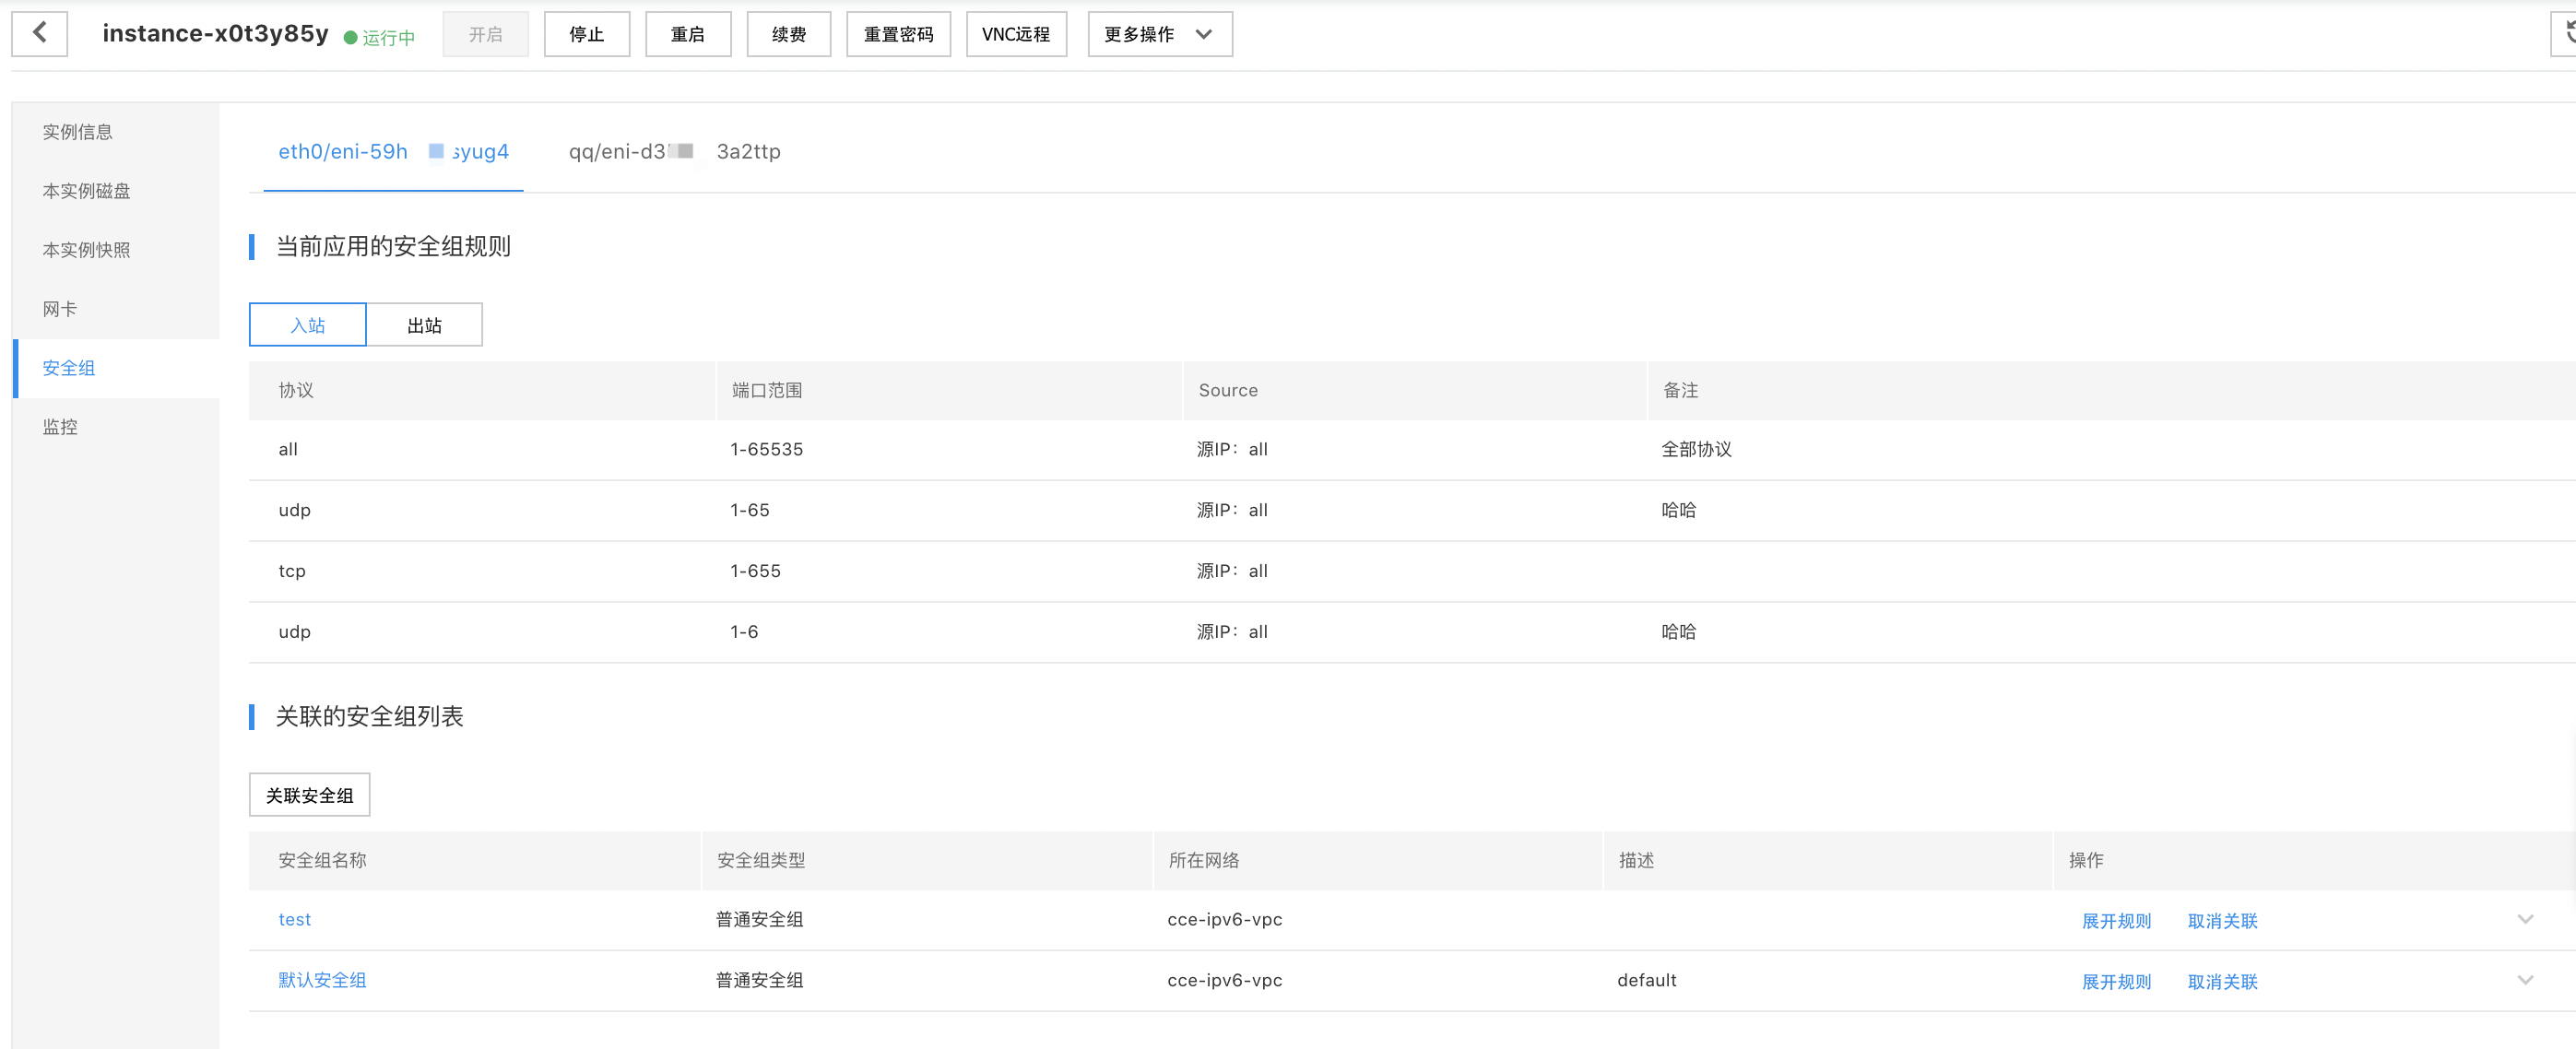
- Click Disassociate to unlink the instance from its associated security group.