
Private Network NAT (Network Address Translation) Gateway
Overview
Private NAT resolves issues such as address conflicts, network communication between different environments, and the need for specific address access by converting cloud service addresses.
Application scenario:
- The access addresses for IDC and cloud VPC instances are conflicting.
- Address conflicts occur across VPCs within the same or different regions in the cloud.
- There are requirements for accessing resources with specific IP addresses.
The virtual private cloud NAT gateway allows Baidu Cloud Compute instances within a VPC to access external private networks and also offers private network access services externally.
Description:
- Before setting up SNAT rules, ensure that private NAT routing is configured in the VPC hosting the private NAT gateway.
- To enable access to external virtual private clouds through a private NAT gateway, SNAT rules must be configured.
Private NAT gateways support both SNAT and DNAT functions:
- Source Network Address Translation (SNAT) provides proxy services, allowing Baidu Cloud Compute instances in a VPC to access external virtual private clouds.
- Destination Network Address Translation (DNAT) maps private NAT IPs to cloud service instances, enabling these instances to provide private access services externally through IP or port mapping.
Quota and limits
The performance of an enhanced private NAT gateway is measured in Capacity Unit (CU). The performance parameters for one CU are:
- New connections (cps): 1,000 per second
- Concurrent connections (conns): 10,000
- Forwarding capacity (bps): 1Gbps
Before Configuration, you should know:
- A single NAT IP can serve simultaneously for both SNAT and DNAT purposes.
-
Note when creating new SNAT and DNAT rules:
- When creating a new SNAT rule, ensure that the source network segment does not conflict with NAT IPs or the source segments of existing SNAT rules.
- For a new DNAT rule, the intranet IP can only be a single IP (not a network segment); the private IP must differ from the NAT IP and must not conflict with existing DNAT private IPs.
- In DNAT's full-port mode, the same NAT IP cannot be shared with the specific port mode.
| ConfigMap | Default quota |
|---|---|
| Maximum count of private NAT instances a user can create | 50 counts |
| A VPC can create a private NAT | 3 |
| The count of NAT IP segment entries supported per private NAT gateway | 50 (adjustable) |
| The count of NAT IP addresses supported per NAT IP segment | 50 (adjustable) |
| Number of DNAT rules a private NAT instance can create | 50 counts |
| Number of SNAT rules a private NAT instance can create | 50 counts |
| The count of NAT IP addresses supported per SNAT entry | 50 (adjustable) |
Operation process

Step 1: Create a private NAT gateway
Step 2: Configure private NAT gateway (Create NAT IP segment, create NAT IP address, create SNAT rule, create DNAT rule)
Step 3: Configure the VPC route
Step 4: View monitor
Create private NAT gateway
- On the VPC Instance List page, select the created VPC instance and click to enter the Details page. To create a NAT gateway in a non-default VPC, you must first create a subnet within that VPC.
- In the navigation bar, navigate to Network Connection > NAT Gateway > Private NAT, and then click the Create NAT Gateway button.
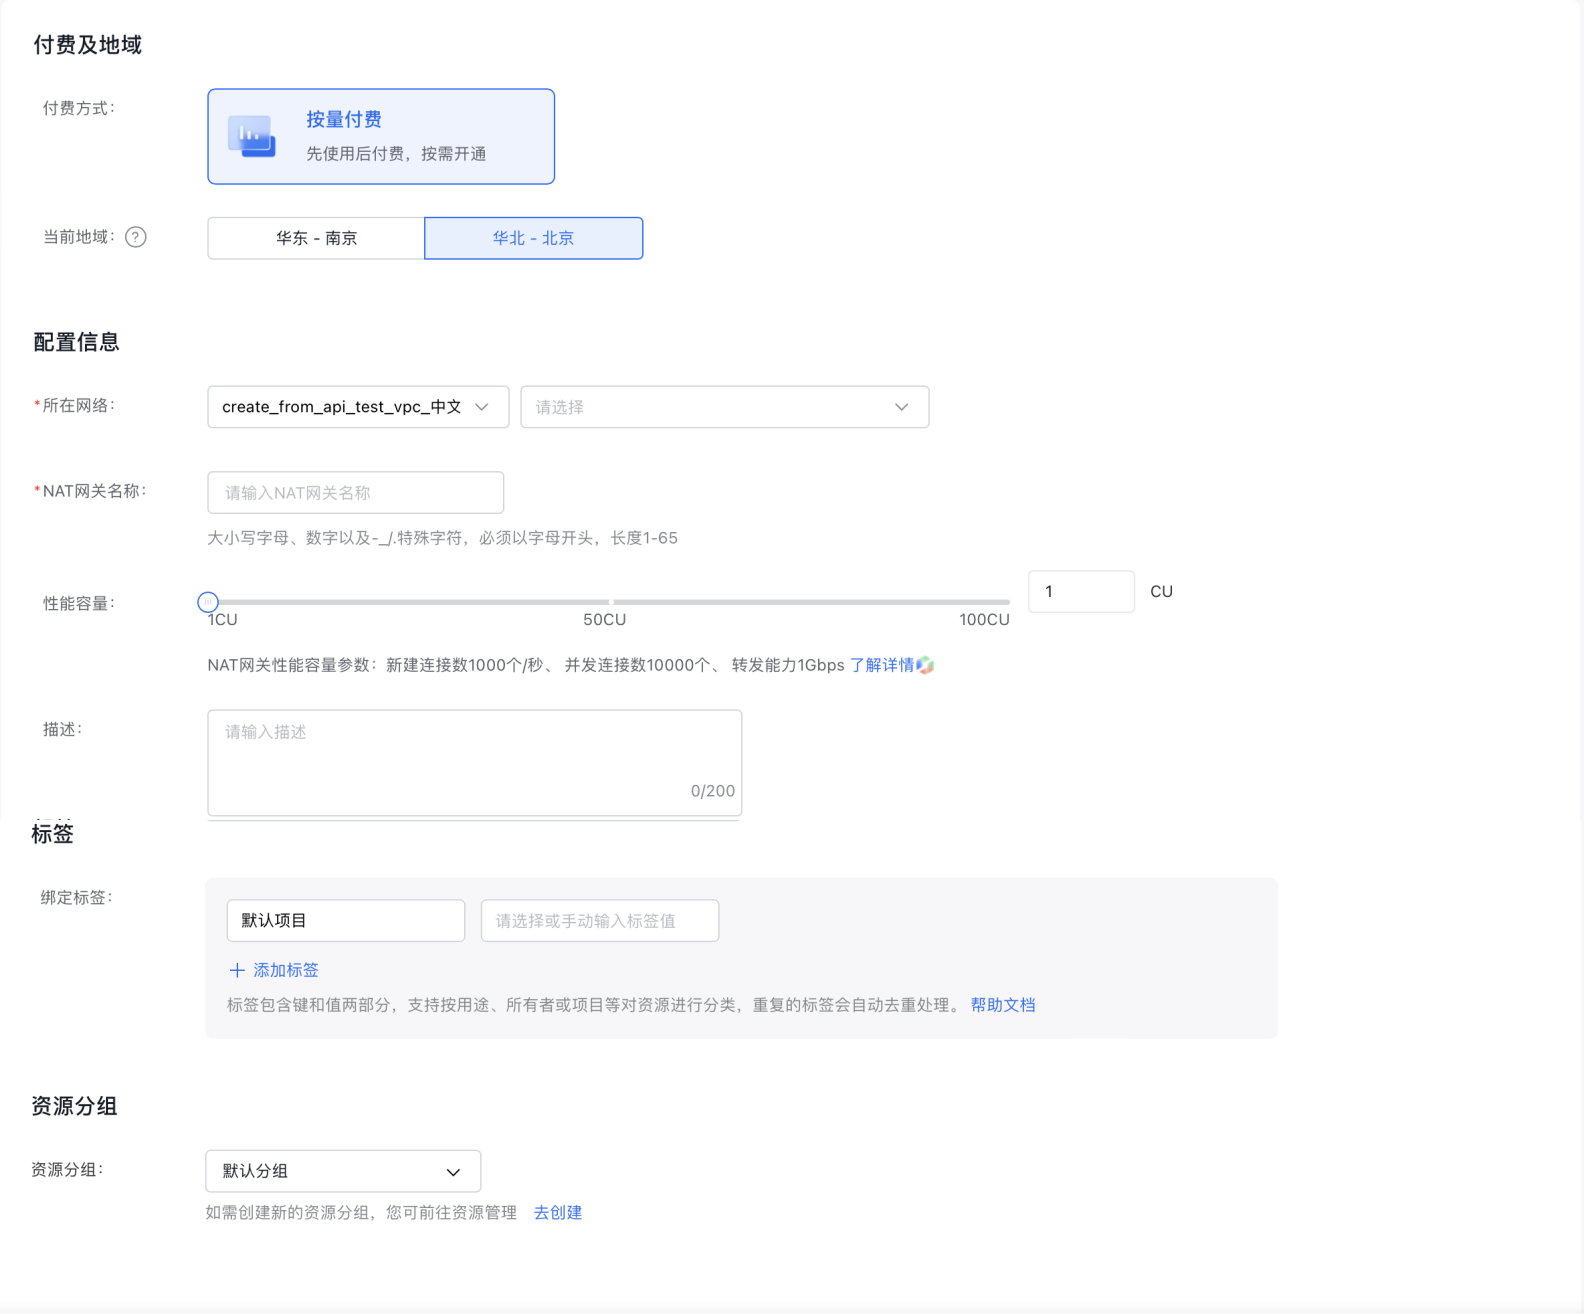
- Fill in the following configuration information:
| ConfigMap | Description |
|---|---|
| Bill type | Choose prepay or postpay |
| Current region | Support Beijing, Nanjing, Suzhou – switch via the top-left Region selector |
| Network | Select the network and subnet |
| NAT (Network Address Translation) name | User-defined NAT gateway name |
| Performance capacity | Select the NAT gateway performance capacity |
| Description | Edit NAT gateway description |
| Resource group | Select resource group |
| Purchase period | Select purchase period |
| Auto-renewal | Select whether to enable auto-renewal |
Create NAT IP address range
- Click NAT instance name to access its details page, then select NAT IP from the left navigation bar to enter the NAT IP segment creation page.
- The NAT IP address range list indicates that a default NAT IP range is automatically bound during the creation of a private NAT instance, with the option to also create new NAT IP ranges.
- Click Add next to the Address Range List and complete the following Configuration.
| ConfigMap | Description |
|---|---|
| Name | User-defined entry name (1-65 characters) |
| Address range | Choose a subnet that is part of the private NAT-associated VPC or its secondary network segment. |

Create NAT IP address
- Click the NAT instance name to view its details page, then select NAT IP from the left-hand menu to access the NAT IP creation page.
- A default NAT IP is automatically created within the default address range, but you can also create new NAT IPs.
- Click Create NAT IP to allocate NAT IPs either randomly by quantity or manually.
- Fill in the following configuration information:
| ConfigMap | Description |
|---|---|
| Address range | Choose the default address range or create a new one. |
| Allocation method | For random allocation or manual assignment, manual entry requires users to input NAT IPs themselves. Up to 10 IPs can be entered, with one IP per line. To input multiple IPs, use separate lines. |
| NAT IP | Specify the number of NAT IPs to allocate randomly. |
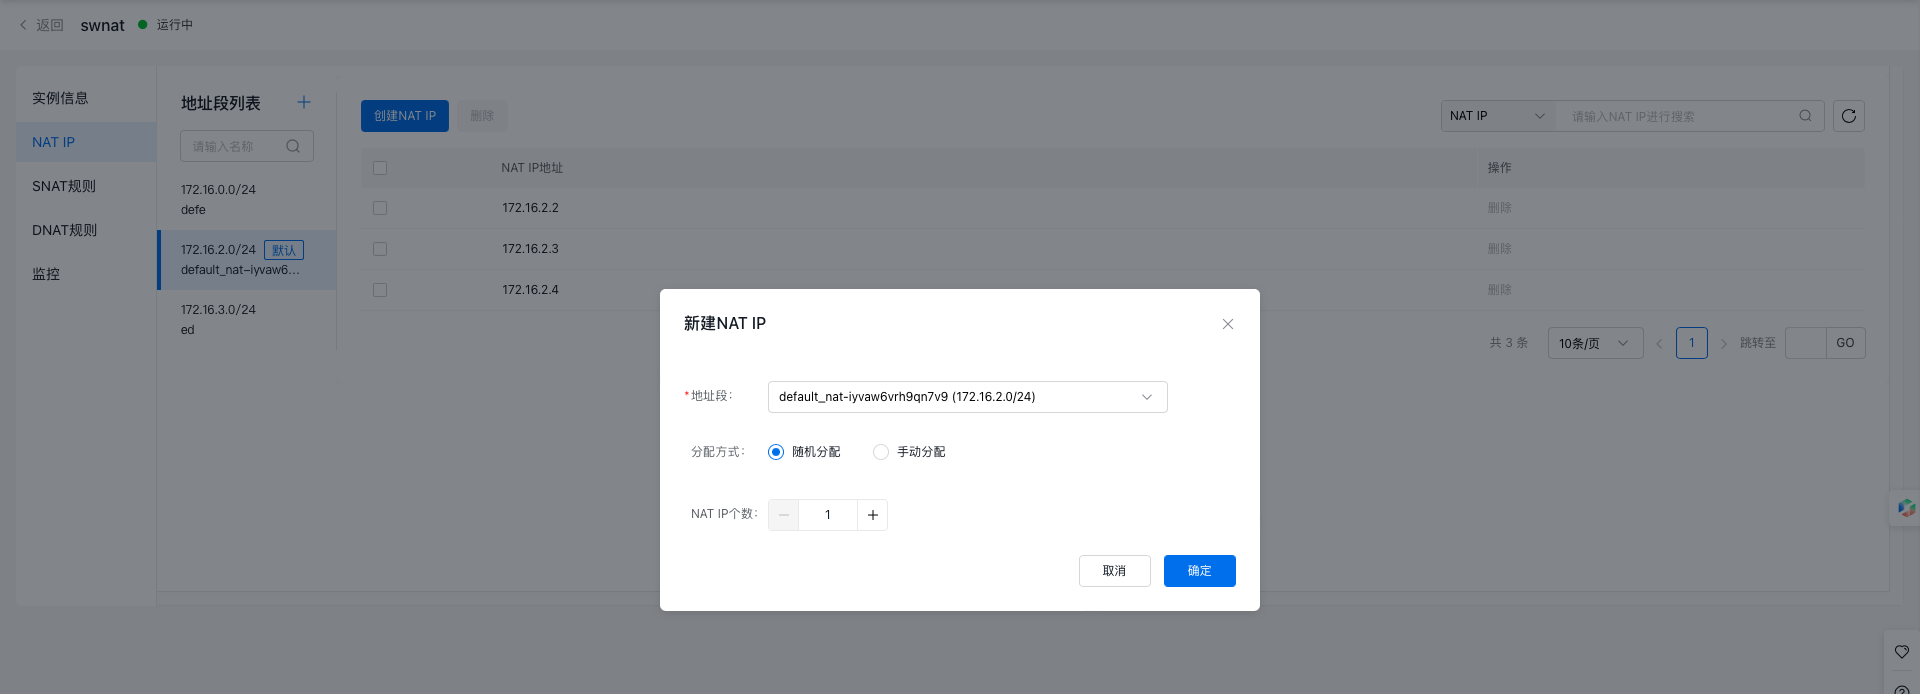
- Default NAT IPs cannot be removed. Customized NAT IPs associated with SNAT or DNAT rules must first have those rules disassociated before deletion.
Configure SNAT table
- Click the NAT instance name or choose Configure SNAT from the operations menu to go to the SNAT Table page.
- Click on Add SNAT Entry above the SNAT list to open the Add SNAT Entry dialog box.
- Fill in the following configuration information:
| ConfigMap | Description |
|---|---|
| Rule name | User-defined entry name (1-65 characters) |
| Source network segment | Cloud Service resource instances within this network segment will use the SNAT function to access target segments. Note: Avoid overlap with NAT IP segments. In case of conflicts, use secondary segments instead. |
| NAT IP | Specify the number of NAT IPs to allocate randomly. |
- Click OK to finalize adding the SNAT entry.
Configure DNAT table
- Click the NAT instance name or choose Configure DNAT from the operations menu to access the DNAT Table page.
- Click on Add DNAT Entry above the DNAT list to open the Add DNAT Entry dialog box.
- Fill in the following configuration information:
| ConfigMap | Description |
|---|---|
| Name | User-defined entry name (0-32 characters) |
| Private IP address | Custom IP input is supported, but ensure that this segment does not overlap with the NAT IP segment. |
| NAT IP | Select an existing NAT IP from the dropdown menu (single choice). |
| Protocol | Supported protocols: All protocols, TCP, UDP. |
| Private IP port | Options: All protocols (shown as ALL on the frontend), TCP or UDP (input field with range 1-65535, supporting port ranges). |
| NAT IP Port | Options: All protocols (shown as ALL on the frontend), TCP or UDP (input field with range 1-65535, supporting port ranges). |
Configure the NAT route
- In the navigation bar, go to the Route Table section, click the route table name, and proceed to the details page.
- Click on Add Route.
- Source segment: The address or segment before NAT rule translation
- Input the target network segment: specify the segment for the destination IDC or VPC. Note: 0.0.0.0/0 is not supported.
- Select NAT gateway for the route type
- Next hop instance: Choose the ID of the created NAT gateway. Traffic from the source subnet to the destination segment will use this NAT gateway as the next hop.
- Click OK to finalize the router configuration.
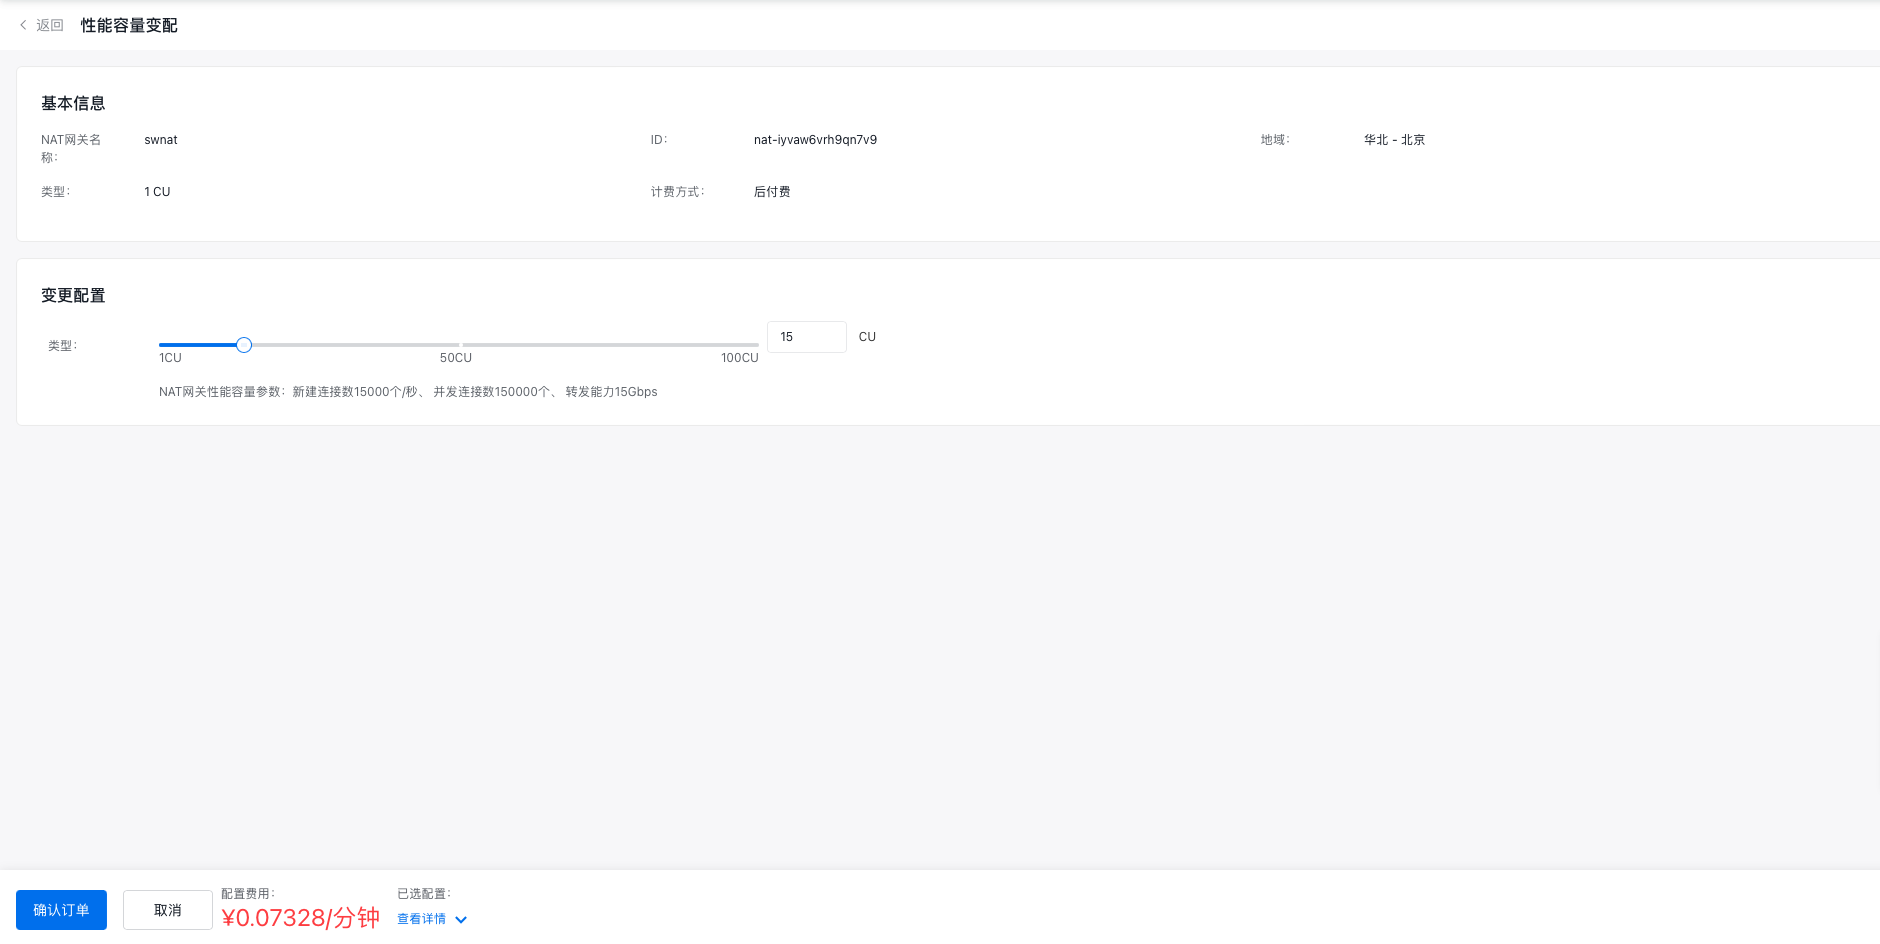
Performance capacity resize
- Go to the private NAT instance list page, click More in the operation menu of the target instance, then select Performance Capacity Resize.
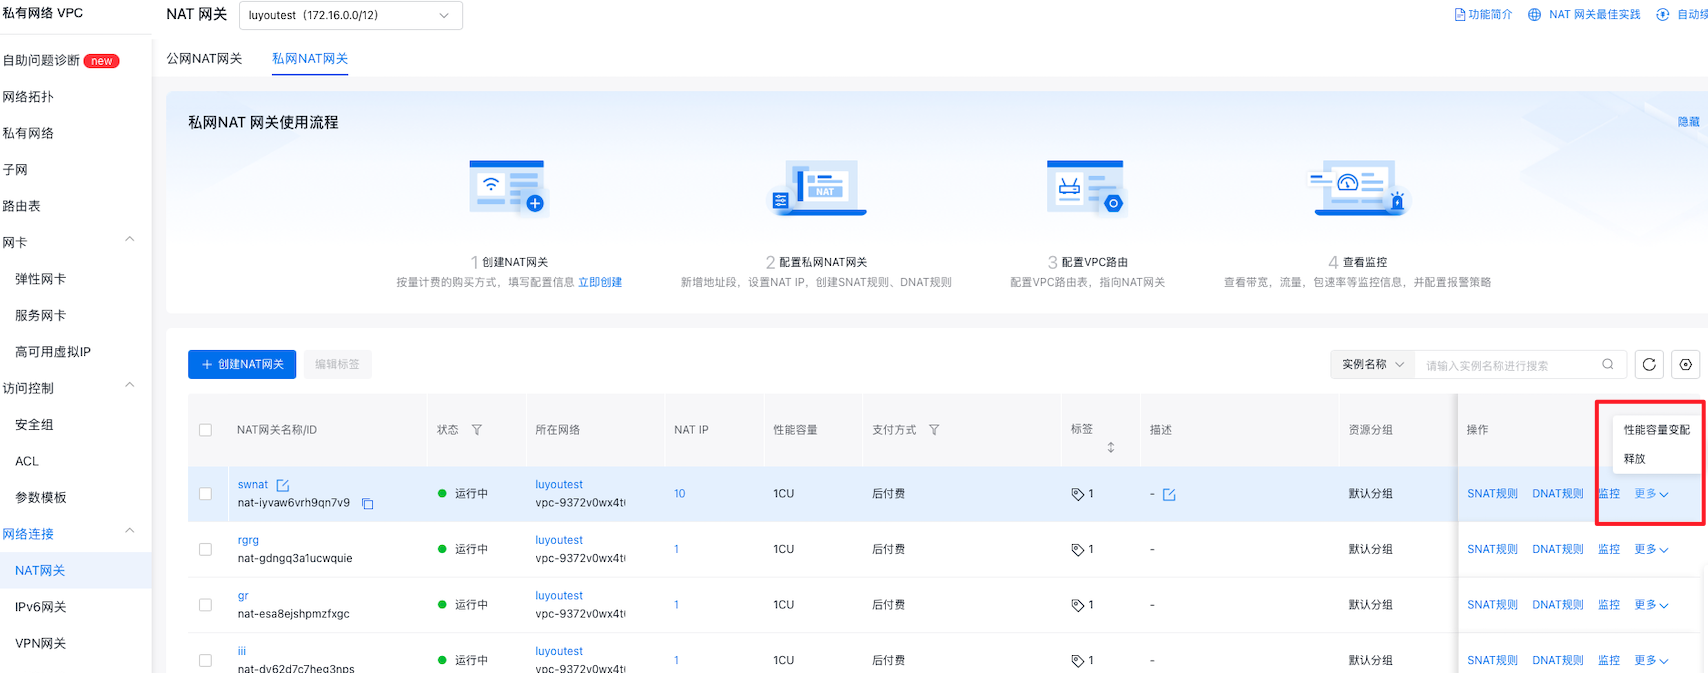
- In the Resize Configuration section, enter the desired CU increase.
- Click "Confirm Order" to finalize the resizing of performance capacity.
View monitor
- Log in to the Management Console, navigate to "Products & Services" > "Virtual Private Cloud," and select "NAT Gateway" from the left-hand menu to access the list of NAT gateway instances.
- Select Monitor after the instance, and a floating monitor window will appear on the right side of the page.
- Click View More to access the Monitor Of Instance Details page.
- Users can view monitoring information for both the NAT gateway and real servers.
-
On the "Monitor" page, click "Alarm Details" to access the alarm policy configuration section, where you can manage the NAT gateway's alarm strategies. For detailed instructions, please refer to the BCM Alarm Management guide.
Description:
- If there are fewer than 10 real servers, all their monitoring information is displayed by default. Users can customize which server monitoring information to display, with a limit of 10 options.
NAT gateway supports TOPN statistics
TOPN: After selecting the time range, statistical method, and metric, enable the TOP display function by clicking the "Refresh" button on the far left. The system will automatically display the IDs of the top 10 real server instances ranked by traffic share based on your selection. Statistical methods include: Average, Maximum, Minimum, Sum. Monitoring metrics include: Inbound traffic, outbound traffic, inbound bandwidth, outbound bandwidth, inbound packet rate, outbound packet rate, and connections. Log in to the Baidu AI Cloud Management Console, go to "Product Service" > "Network" > "Virtual Private Cloud (VPC)," select "NAT Gateway" from the left-hand menu, click on the NAT Gateway Instance Name, navigate to the "Monitor" section on the left, and view the real server monitoring information.
Description:
- The NAT gateway status is "Running", and the SNAT or DNAT status is "available".
- There must be network traffic passing through the NAT gateway for conversion;
- After clicking the Refresh button, there may be a delay before the Traffic Graph appears. Please wait approximately three minutes for it to load.
- Data should be available within the past three days, and the maximum query time span is 30 days.
- The system supports the following three methods for selecting query time: - For a range less than 1 hour (1-59 minutes), the data queried will be up to 1 hour prior. For example, a query started at 20:00 can retrieve data from 18:56 to 19:55. - For a range exceeding 1 hour, queries must be in whole-hour intervals, and the range is limited to 1-12 hours. For example, if a query starts at 20:00 for a 1-12 hour range, the data available will only be before 19:00. - If the range exceeds 1 hour but is not a whole multiple, data within the first hour can be queried along with ranges less than an hour (1-59 minutes).