
IPsec VPN Gateway
The IPsec VPN gateway connects the user IDC to a virtual private cloud through an encrypted public network tunnel.

Operation process

IPsec VPN gateway instances can be fully self-configured in the console. Users need to complete the following steps to make the VPN connection effective:
Create IPsec VPN gateway
- In the left navigation bar of the virtual private cloud console, select Network Connection - VPN Gateway, navigate to the IPsec VPN Gateway Page, and click + Create IPsec VPN Gateway.
Description:
- To create an IPsec VPN gateway in a non-default VPC, first create a subnet in that VPC. For details, refer to [Create subnet](VPC/Operation guide/Subnet.md#Create subnet).
- Each VPC supports creating up to 3 IPsec VPN gateways. To create more gateways, submit a ticket for application.
- Fill in the following configuration information:
| ConfigMap | Description |
|---|---|
| Bill type | Select bill type |
| Current region | Supports regions such as North China-Beijing, North China-Baoding, South China-Guangzhou, East China-Shanghai, East China-Suzhou, Central China-Wuhan, Southwest China-Chengdu, and Hong Kong. Switch regions using the Region dropdown menu in the top-left corner. |
| Network | Virtual private cloud (VPC) to which the VPN belongs |
| Subnet belonged | Subnet located in the availability zone under the VPC associated with the VPN. |
| VPN gateway name | Custom name for the VPN gateway. |
| VPN gateway specifications | Users can choose the maximum forwarding capacity supported by the VPN gateway. Standard VPN gateways allow up to 200Mbps, while enhanced VPN gateways allow up to 1,000Mbps. |
| VPN description | Description of the VPN gateway. |
| Gateway type | Supports public and private networks. Public networks use the Internet to establish encrypted tunnels and require binding with Baidu AI Cloud EIP products. Private networks use an encrypted tunnel over a private connection via an express tunnel (ET). It is important to ensure network connectivity between the local VPN gateway and the peer VPN gateway's IP addresses, such as through the ET's dedicated channel. |
| VPN public network bandwidth | (Optional, displayed only for public gateway types) The public EIP bound to the user. |
| Resource group | Select resource group |
| Purchase period | Select purchase period |
| Auto-renewal | Select whether to enable auto-renewal |
- After confirming the order and completing payment, the IPsec VPN gateway will be successfully created.
Create VPN tunnel
-
On the IPsec VPN gateway list page, choose an IPsec VPN gateway and click the downward arrow in front of the gateway to view the VPN tunnel list.
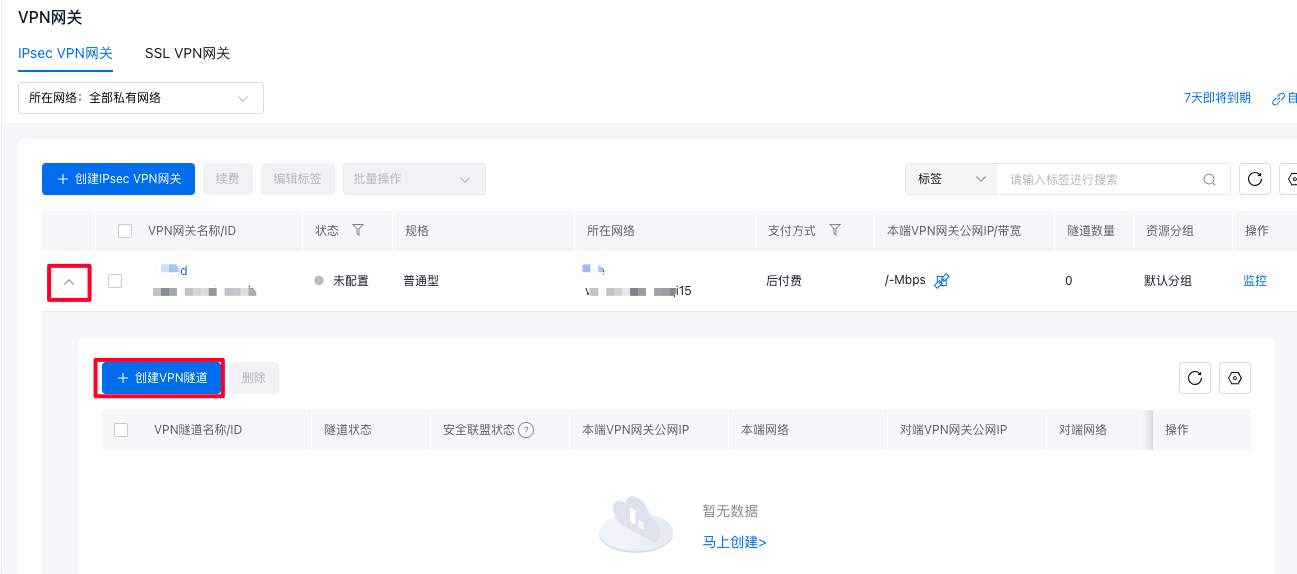
Notes Each IPsec VPN gateway supports up to 10 IPsec VPN tunnels. To create more, submit a ticket for application.
- Click Create VPN Tunnel and enter the following configuration details:
Basic configuration
1> **Note:** Each VPN gateway supports only one communication mode. For example, if the first tunnel uses destination-based routing mode for communication, all subsequent tunnels created in the same gateway must also use destination-based routing mode. Similarly, if the first tunnel uses traffic selector mode, all subsequent tunnels must adopt traffic selector mode.Advanced configuration: IKE configuration
| ConfigMap | Description |
|---|---|
| Version | Select the version of the IKE protocol. Currently, IKE V1 and IKE V2 are supported. IKE V2 is recommended for devices with high-security requirements and multiple network segments. |
| Negotiation Mode | Select the IKE V1 negotiation mode. - Main Mode: High-security negotiation process. - Aggressive Mode: Fast negotiation with a high success rate. Upon successful negotiation, both modes provide identical information transmission security. |
| Encryption algorithm | Choose the encryption algorithm for phase 1 negotiation. Supported algorithms include aes, aes192, aes256, and 3des. 3des is less secure and not recommended. |
| Certification algorithm | Select the authentication algorithm for phase 1 negotiation. Supported algorithms are sha1 (low security, not recommended), md5 (low security, not recommended), sha2_256, sha2_384, and sha2_512. |
| Local identifier | Supports both IP addresses and Fully Qualified Domain Names (FQDN). The "Local Identifier" must match the "Remote Identifier" configured on the peer tunnel. |
| Remote identifier | Supports both IP addresses and Fully Qualified Domain Names (FQDN). The "Remote Identifier" must match the "Local Identifier" configured on the peer tunnel. |
| DH grouping | Supported algorithms include Group2, Group5, Group14, and Group24 (recommended). The "disabled" option indicates no Diffie-Hellman (DH) key exchange algorithm is used. Choose a DH key exchange algorithm for phase 1 negotiation. |
| SA lifecycle (seconds) | Set the lifetime of the SA negotiated during phase 1. The default value is 28,800 seconds. |
Advanced configuration: IPsec configuration
| ConfigMap | Description |
|---|---|
| Encryption algorithm | Choose the encryption algorithm for phase 2 negotiation. Supported algorithms include aes, aes192, aes256, and 3des. 3des is less secure and not recommended. |
| Certification algorithm | Select the authentication algorithm for phase 2 negotiation. Supported algorithms are sha1 (low security, not recommended), md5 (low security, not recommended), sha2_256, sha2_384, and sha2_512. |
| DH grouping | Supported algorithms include Group2, Group5, Group14, and Group24 (recommended), while "disabled" indicates that no Diffie-Hellman key exchange algorithm is used. Choose a Diffie-Hellman key exchange algorithm for phase 2 negotiation. |
| SA lifecycle (seconds) | Set the lifespan of the Security Association (SA) negotiated in phase 2. The default value is 28,800 seconds. |
Create a client VPN gateway and parameters
The client gateway (or peer gateway) refers to the IPsec VPN service gateway located in the user's data center. It must be used alongside the IPsec VPN gateway provided by Baidu AI Cloud. For setup guidance, refer to the VPN tunnel's advanced settings.
Notes Enable NAT traversal on the local IDC's VPN gateway device.
At this stage, the VPN connection has been successfully established.
VPN configuration route table
After the VPN connection is successfully established, configure the route tables on both ends of the VPN tunnel to enable traffic exchange between the cloud environment and the user-side network. To configure the route table in Baidu AI Cloud, follow these steps:
- In the navigation bar, select Route Table, click the Route Table name to access the details page, and then click Add Route.
- Enter the route table associated with the on-premises network that will be accessed.
- Source network segment
- Enter the destination network segment
- Route type; select VPN gateway
- Select the created VPN gateway for the next-hop instance.
- Click "OK" to finalize the route table setup. When the Baidu Cloud Compute (BCC) instances within the subnet linked to this route table communicate with the user-side network, traffic will be routed through the VPN gateway.
VPN network address translation (NAT) configuration
Network Address Translation (NAT) resolves IP address conflicts commonly seen in hybrid cloud environments. The VPN gateway supports four conversion types: Cloud Static NAT, IDC Static NAT, IDC DNAT, and Cloud DNAT. These options address IP conflicts and meet security requirements by masking IP addresses.
In the diagram below, the term "local" refers to the cloud-based virtual private cloud (VPC), and "peer" represents the user's IDC-side network.
Notes Only IPsec VPN gateways support NAT function; neither SSL VPN gateways nor GRE VPN gateways support NAT.
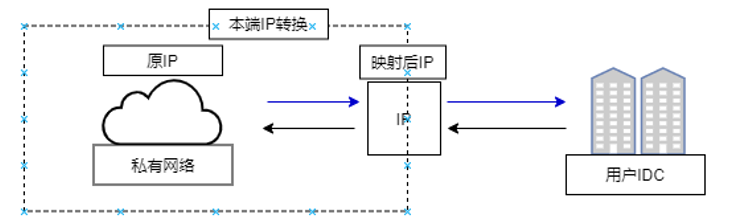
Cloud static NAT
- Cloud (local) IP conversion means mapping an IP address from the cloud's private network to a new IP address, allowing the cloud to communicate with the VPN peer using the newly assigned IP.
- Cloud (local) IP conversion imposes no restrictions on the direction of network requests—either the VPC can initiate communication with the VPN peer, or the VPN peer can initiate communication with the VPC.
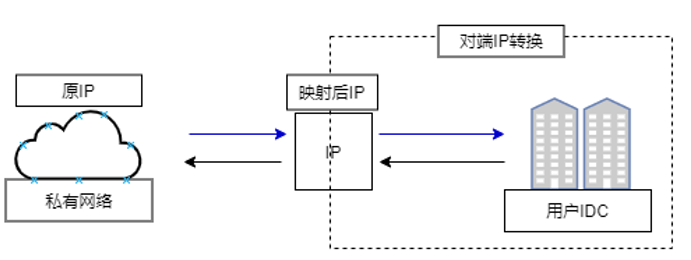
IDC-side static NAT
- IDC-side static NAT involves mapping an IP address from the user's IDC network to a new IP address, enabling communication with the VPC using this newly assigned address.
- IDC-side static NAT conversion doesn't restrict the direction of network requests, allowing both the virtual private cloud to initiate communication with the VPN peer and the VPN peer to initiate communication with the virtual private cloud.
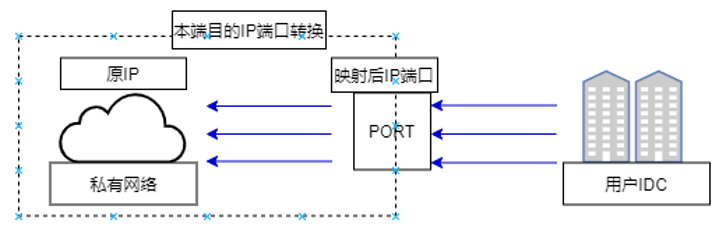
IDC-side DNAT
IDC-side DNAT, or local destination IP and port translation, allows the IDC network to actively connect to the VPC. It maps specific IP addresses and ports from the IDC subnet to new IP addresses and ports, enabling targeted communication with the VPC while ensuring IDC access is limited to the specified IP-port mappings.
Cloud DNAT
Cloud DNAT translates specific IP addresses and ports from the IDC (peer) side to new IP-port mappings. The VPC can only communicate with the designated IDC IP addresses and ports through these mapped values.

View monitor data
VPN gateway monitor
- Log in to the Management Console, navigate to Product Services - Virtual Private Cloud (VPC), then select Network Connection - VPN Gateway from the left navigation panel to view the VPN Gateway Instance List.
- Select Monitor after the instance, and a floating monitor window will appear on the right side of the page.
- Click View More to access the Monitor Of Instance Details page.
- Click Alarm Details on the Monitor page to enter the alarm policy configuration page, where you can manage the alarm strategy of VPN gateway. For detailed operation steps, please refer to BCM Alarm Management.
VPN tunnel monitor
- Sign in to the Management Console, select Product Service - Virtual Private Cloud (VPC), then select Network Connection - VPN Gateway from the left navigation bar to access the VPN Gateway Instance List.
- In the VPN gateway instance list, click the arrow beneath "Tunnel Count" to display the details of available VPN tunnels.
- Click "Monitor" next to a VPN tunnel to open the monitoring data window.
- Click Alarm Details in the list operation to enter the alarm policy configuration page, where you can manage the alarm strategy of VPN tunnel. For detailed operation steps, please refer to BCM Alarm Management.