Peering Connections
This document introduces the method of" configuring peering connection on VPC " (including instructional video) of Baidu AI Cloud. Users can refer to key steps in the video to use Baidu AI Cloud products or self-solve issues. Click here to watch Configure Across-account Peering Connections
Description:
If the interface elements or operation methods shown in the video guidance are updated, please rely on the AI Cloud console interface for the most accurate information. The video aims to demonstrate the functional operation process, and minor interface changes will not affect the overall functionality or presentation.
Overview
Peering connections offer users VPC-level network interconnection services, allowing traffic exchange between or among different virtual networks. Both same-user and cross-user virtual network interconnections, whether within the same region or across regions, are supported. The connection methods for these scenarios are described below:
| Types | Current account | Cross account |
|---|---|---|
| ConfigMap | Local and peer networks | Local and peer VPC IDs, peer account ID |
| Operation steps | 1. Create peering connections 2. After creation, establish interconnection 3. Configure the routing table for traffic interoperability |
1. Create peering connections 2. Wait for the peer to accept the connection request 3. After the peer accepts the request, establish interconnection 4. Configure the routing table for traffic interoperability |
Before configuration, you should know:
- A single VPC can host a maximum of 10 peering connection instances, and a single user is allowed to create up to 10 such instances.
- Only one peering connection can exist between a given pair of VPCs at any time.
Cross-account peering connections
Taking cross-account as an example, the steps to establish peering connections between two users are as follows:
- Local VPC subnet: 172.16.2.0/24
- Peer VPC subnet: 192.168.2.0/24
- Log in to the Management Console, select Product Service - Virtual Private Cloud (VPC), then go to Network Connection - Peering Connections in the left navigation bar to view the Peering Connection Instance List.
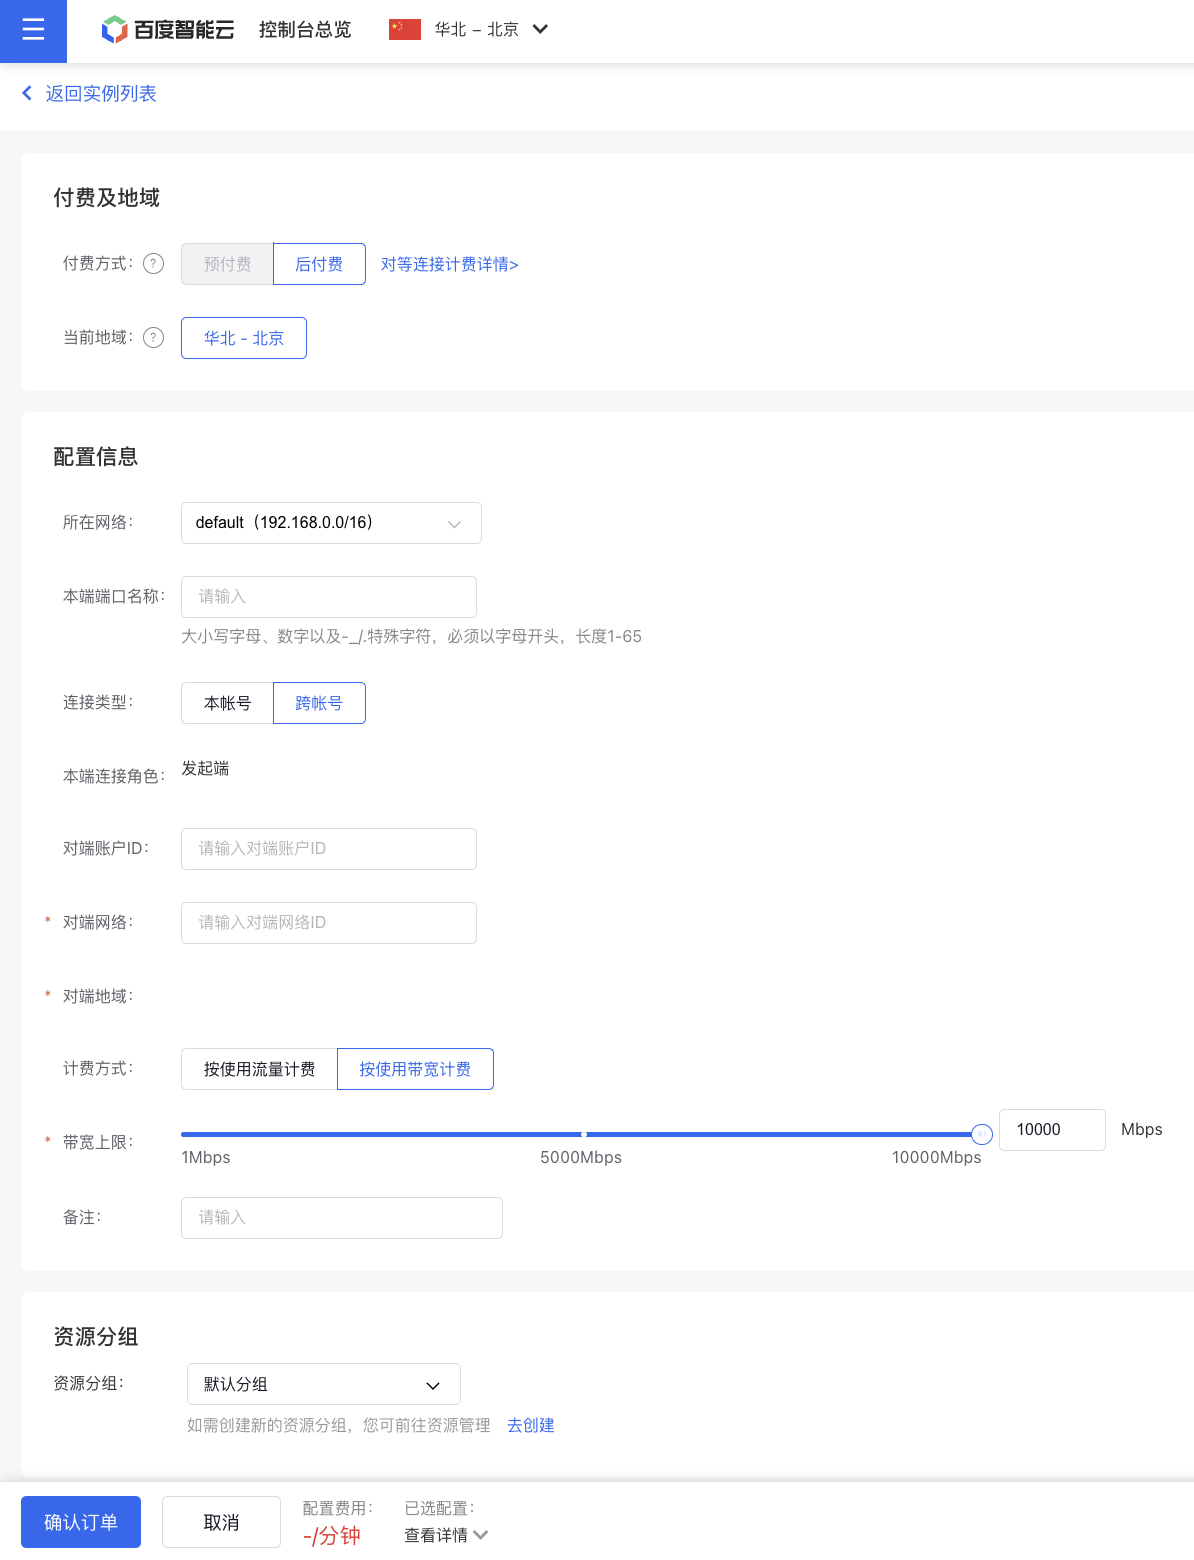
- Click Create Peering Connections, then enter the following configuration information
| ConfigMap | Description | Example |
|---|---|---|
| Billing and Region | Peering connections purchase method and region | Prepay, North China-Beijing |
| Network | Peering connections local network | 172.16.2.0/24 |
| Local port name | User-defined local port name for peering connections | int-1 |
| Connection type | Current account: Intra-account interconnection Cross-account: Initiator-acceptor interconnection |
Cross account |
| Local Connection Role | Initiator: peering connection creator Acceptor: Connection request acceptor |
Initiator |
| Peer Account ID | Current account/peer account user ID | 966c7ecdd8901111111111111111 |
| Peer Network | Peering Connection Peer VPC instance ID | vpc-1111111111 |
| Peer region | The region where the peer VPC of the peering connection is located, North China-Beijing/South China-Guangzhou/Hong Kong Zone 2/East China-Suzhou |
North China-Beijing |
| Charge type | Select charge type | Billed by traffic/Billed by bandwidth |
| Bandwidth limit | The maximum bandwidth for peering connections channels is 1,000Mbps | 100Mbps |
| Resource group | Select resource group | Default group |
- Choose the purchase duration, click Next, confirm your order, and complete the payment process.
- The initiator has successfully set up the peering connection. Awaiting action from the receiver.

- In the peering connections API on the console, the recipient clicks the Connection Request button to display the connection request list.

- Verify the peer network information, input the local port name, and click Accept.

- Establish a communication channel between the two ends.

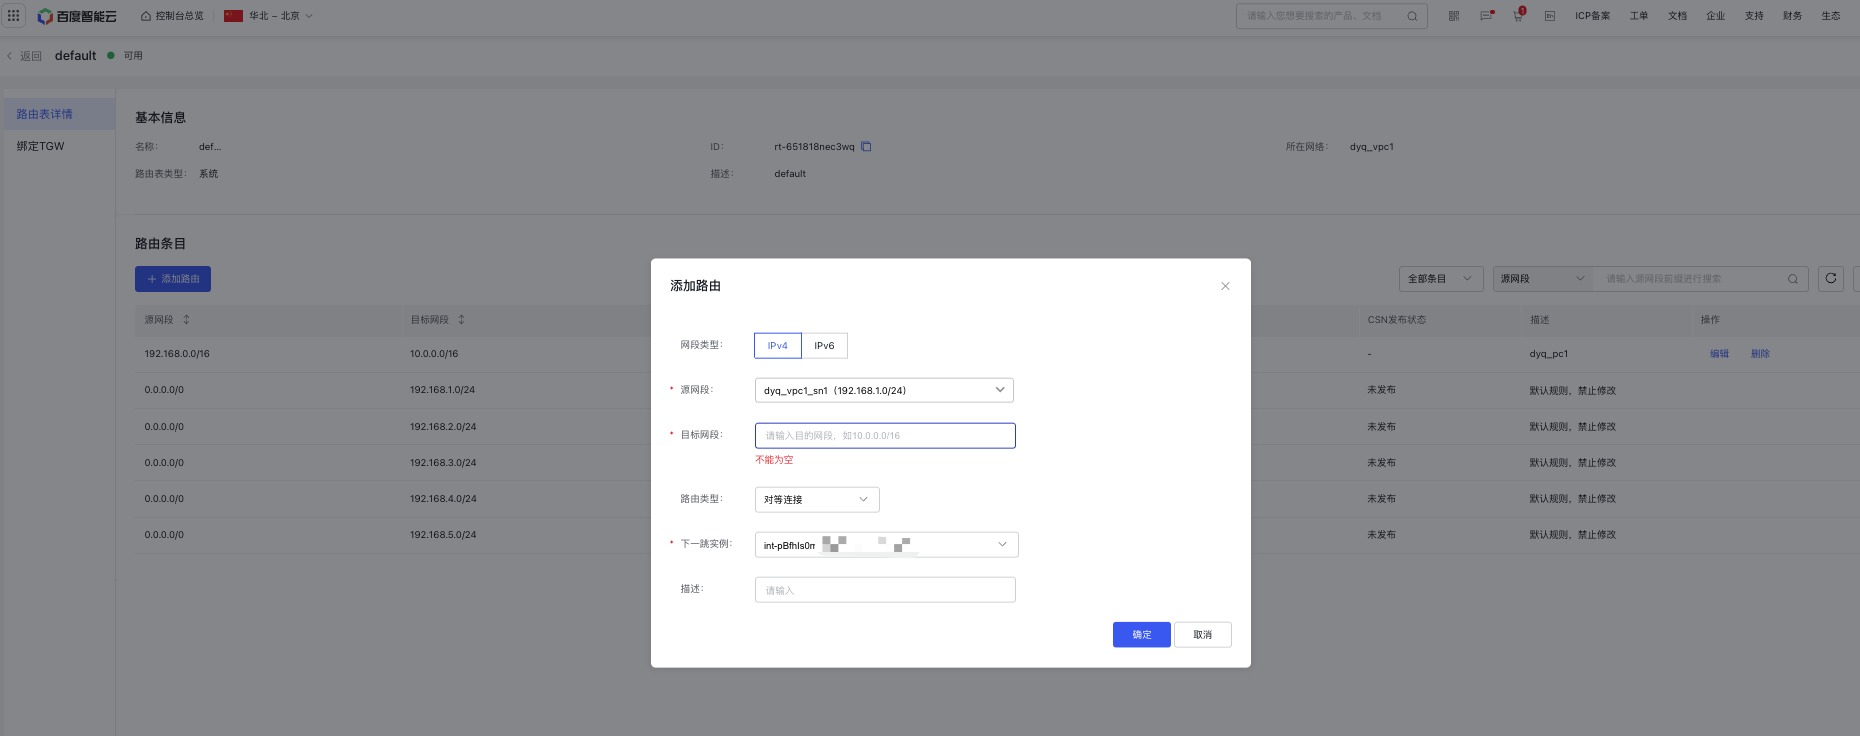
- Set up route tables on both ends. Go to the Route Table section in the navigation bar, and click Add Route in the route table list.
- Source segment: Local subnet network or custom segment
- Target segment: The target IP or target subnet of the peer subnet network
- For the route type, select Peering Connections.
- For the Next Hop instance, choose the local API name or ID associated with the established peering connection.

Same account peering connections
- Sign in to the Management Console, select Product Service - Virtual Private Cloud (VPC), then select Network Connection - Peering Connections from the left navigation bar to access the Peering Connection Instance List.
- Click the Create Peering Connections button, then provide the local port name, peer port name, select the peer network, specify the bandwidth limit, and other necessary details.
- Follow the order confirmation steps, make the payment, and the interconnection will be established.
- Set up the associated route tables on both ends. Navigate to the Route Table section in the navigation bar to finalize the configuration for traffic interconnection.
View monitor data
Users can view monitoring data on ingress and egress of peering connections, including information about bandwidth and traffic.
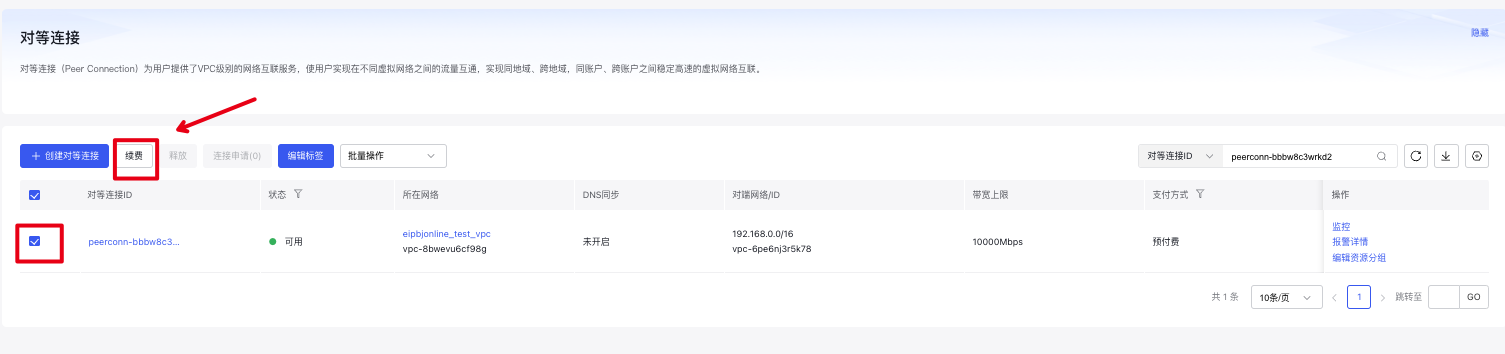
- Sign in to the Management Console, select Product Service - Virtual Private Cloud (VPC), then select Network Connection - Peering Connections from the left navigation bar to access the Peering Connection Instance List.
- Select the ID of the desired peering connection instance and click Monitor to proceed.
- Choose Traffic or Bandwidth, then set the sampling period and query duration to generate monitoring data.

Peering Connections support TOPN statistics
TOPN: After setting the time range, statistical method, and metric, enable the TOP display function and click the Refresh button on the far-left side. The system will then automatically showcase the top 10 VPC network segments ranked by traffic share based on your selection.
Statistical methods include: Average, Maximum, Minimum, Sum.
Monitoring metrics include: ingress traffic, egress traffic, ingress bandwidth, egress bandwidth, ingress packet rate, and egress packet rate.
Log in to the Baidu AI Cloud Management Console, navigate to Product Services - Network - Virtual Private Cloud (VPC), choose Network Connection - Peering Connections from the left-hand menu, click the desired Peering Connection ID, select Monitor from the left navigation, and view monitoring data for the backend instance associated with the peering connection.
Note:
- At present, the TOPN function is in the public beta stage. If you need to use it, please submit a Ticket application.
- Peering connections instance status is "Available";
- Network traffic must pass through the peering connections instance;
- After clicking the Refresh button, there may be a delay before the Traffic Graph appears. Please wait approximately three minutes for it to load.
- Data should be available within the past three days, and the maximum query time span is 30 days.
- The system supports three time selection methods: 1. Query time range less than 1 hour (1–59 minutes): For example, if you initiate a query at 20:00, only data from 18:56 to 19:55 can be queried. 2. Query time range of more than 1 hour: Query time must be an integer multiple of 1 hour, ranging from 1 to 12 hours. For example, if you query at 20:00 with a range between 1 and 12 hours, only data before 19:00 will be available. 3. For ranges over 1 hour that are not whole multiples, you can query up to an hour's data combined with a range of less than 1 hour (1–59 minutes).
Reject connection request
For untrusted connection requests, you have the option to reject the peering connection.
- Log in to the Management Console, navigate to Product Services - Virtual Private Cloud (VPC), and select Peering Connections from the left-hand menu to view the Peering Connection Instance List.
- On the peering connections list page, click the Connection Request button, then select Reject in the pop-up request list.
- The peering connection instance initiated will display "Negotiation failed.\

Connection request timeout
The connection request timeout for the initiator is 7 days. After the timeout, the peering connection instance status will change to "Negotiation failed." Users must manually delete failed connections before sending new requests to the peer VPC.
Delete peering connections
Currently, Baidu AI Cloud's peering connections service supports deleting postpaid instances and instances with failed negotiations. instances in other statuses cannot be manually deleted by users. To delete an instance, submit a ticket, and our staff will contact you as soon as possible.
Enable DNS synchronization
Application scenario
This feature enables the synchronization of DNS server records between two VPCs once a peering connection is established.
Scenario 1: After establishing a peering connection between two VPCs, instances in VPC1 can use the peering connection's intranet to access service domain names (e.g., BSG, RDS) of other products in VPC2.
Scenario 2: Automatically synchronize local DNS records across two VPCs, simplifying the organization of services using local domain names in both VPCs.
Operation step
For peering connections within the same account, DNS synchronization can be enabled on either the initiator or receiver side, and it will automatically synchronize on the other end. For cross-account peering connections, DNS synchronization must be enabled on both ends.
Description:
The DNS synchronization feature is disabled by default.
Complete the following three configuration steps on the initiator side. For cross-account usage, repeat these steps on the receiver side:
- Log in to the Baidu AI Cloud Management Console, go to Product Services - Network - Virtual Private Cloud (VPC).
-
From the left-hand menu, select Peering Connections, locate the desired peering connection on the list page, and choose Enable DNS Synchronization from the More Operations menu.

- Once the "DNS Synchronization" status in the peering connections list updates to "Enabled," the synchronization process is complete.
Disable DNS synchronization
On the Peering Connections List page in the VPC, select the peering connections to be closed and choose "Disable DNS Synchronization" from the "More Operations" menu.
Peering connections support China Unicom's cross-border service
Qualification review
- The user signs in to Baidu AI Cloud Console and fills in the compliance check content for cross-border product sales.
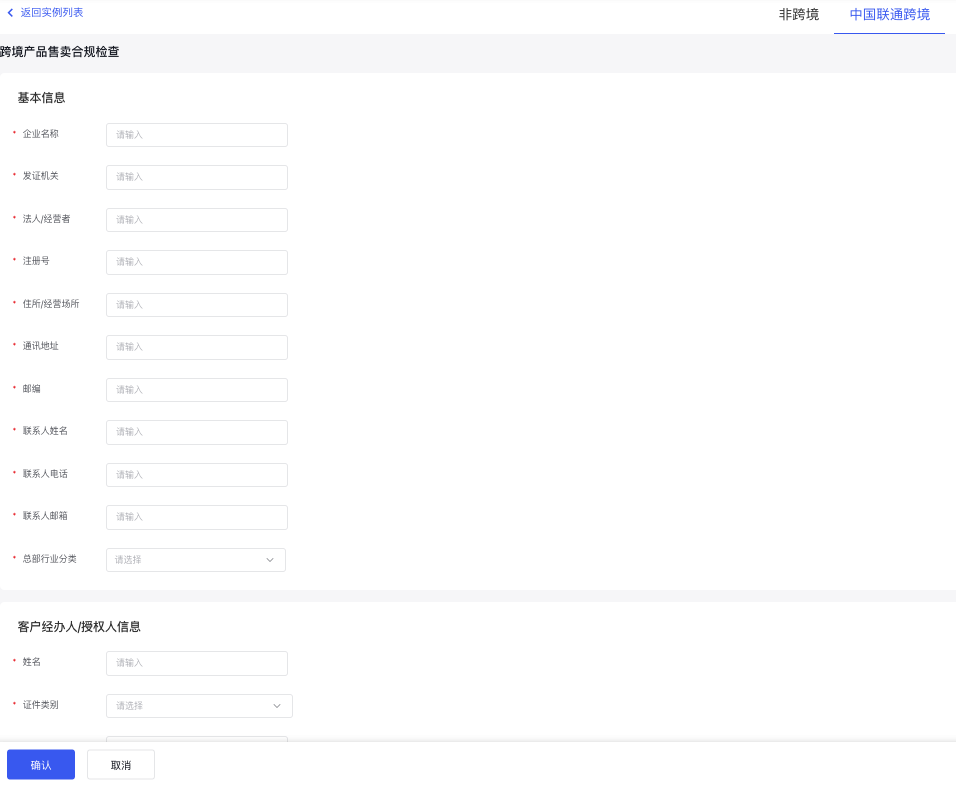
Description of configuration items
| ConfigMap | Description |
|---|---|
| Company name | Required, within 100 characters |
| Issuing authority | Required, within 50 characters |
| Legal person/operator | Required, within 50 characters |
| Registration No. | Required, in number + letter format, within 18 characters |
| Residence/business premises | Required, within 100 characters |
| Mailing address | Required, within 100 characters |
| Postcode | Required, within 20 characters |
| Contact person name | Required, within 50 characters |
| Contact person tel. | Required, in number format, within 11 characters |
| Contact person email | Required, in email format |
| Headquarters industry classification | Required |
| Name | Required, within 50 characters |
| Document type | Required |
| Document No. | Corresponding to the document type, fill in the corresponding evidence number, within 18 characters |
| Document address | Required, within 100 characters |
| Telephone | Required, in number format, within 11 characters |
| Scanned copy of enterprise documents | Must be uploaded. Supported types: jpg, jpeg, png. Image size is not less than 55 KB and not more than 10 MB |
- After completing the form, confirm and submit it. The status will change to "Under Review," awaiting approval from China Unicom.
- Once approved by China Unicom, users can proceed to purchase cross-border peering connection products.
Note:
- Why is a compliance application required when applying for China Unicom's cross-border service?
In accordance with the requirements of the Ministry of Industry and Information Technology, qualification review must be completed for the use of cross-border products. The relevant documents are as follows: According to the relevant national and local laws and administrative regulations such as Decree No. 42 of the Ministry of Industry and Information Technology of the People’s Republic of China and Letter [2017] No. 32 of the Ministry of Industry and Information Technology, China Unicom centrally establishes user files for users in respect of relevant cross-border services. According to the requirements of the Ministry of Industry and Information Technology: When accepting services for users, they shall be required to provide real identity information and such information shall be verified. China Unicom will truthfully register the certificate type and the name (title), number and address information recorded on the certificate. If the user refuses to present a valid certificate and provide the identity information recorded on the certificate, and uses another person's certificate or a forged or altered certificate, China Unicom shall not accept the service for them. For more information on the regulations, please search and view the following documents by yourself:
- Letter [2018] No. 54 of the Ministry of Industry and Information Technology of the People’s Republic of China
- No. 42 of the Ministry of Industry and Information Technology of the People’s Republic of China
- [Letter No. 32 (2017) of the Ministry of Industry and Information Technology of the People’s Republic of China]
- To submit review materials for China Unicom's cross-border peering connection product, users must email the required documents to Baidu AI Cloud staff offline. The four required documents should be converted into color PDF files. Each page of the security commitment letter must be stamped with a seal, including a perforated seal.
-
- A copy of the business license (with the official seal).
-
- A copy of the handler's ID card (with the official seal).
-
- An introduction letter (with the official seal).
-
- A China Unicom dedicated line business information security commitment letter (with the official seal).
Purchase
- Sign in to Baidu AI Cloud, select Peering Connections in Console Navigation to access the instance list.
- Click Create Peering Connections and select China Unicom Cross-border.
Payment type is prepay, with peer region limited to Hong Kong, China.
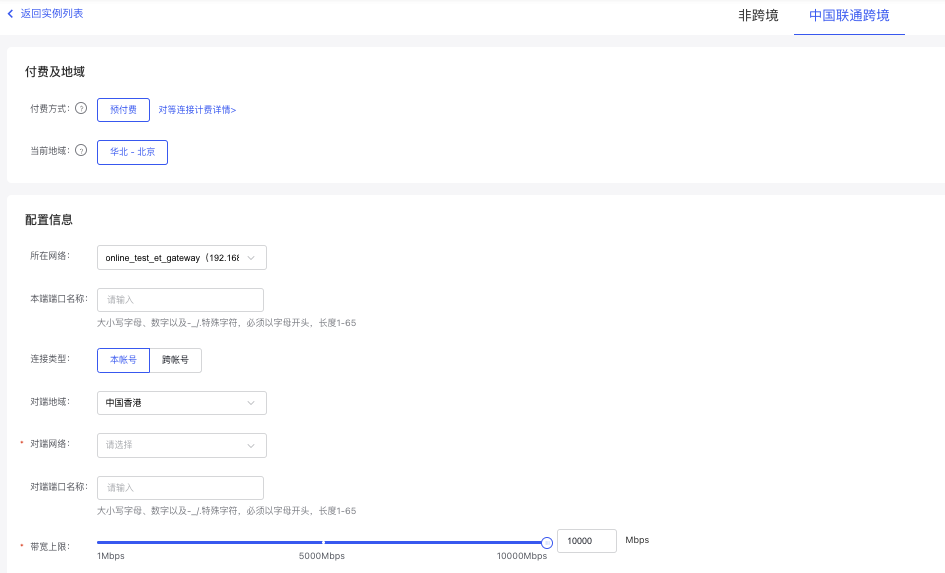
- After creating a cross-border peering connection, users need to wait for China Unicom's review process.
- Once approved by China Unicom, users can configure the peering connection routes in the associated VPC route table.
VPC1 route table:
VPC2 route table:

- Configuration is complete. Users can now use the cross-border peering connections product as normal.
Notes:
- The network segments of peering connections must not overlap.
- Both VPCs associated with peering connections need to reference each other in their respective route tables, with the route type as peering connections and the next hop instance as the peering connection ID.
Renew
- The entry point for cross-border peering connection renewals is on the Peering Connections List page. Select the instance and click "Renew.\
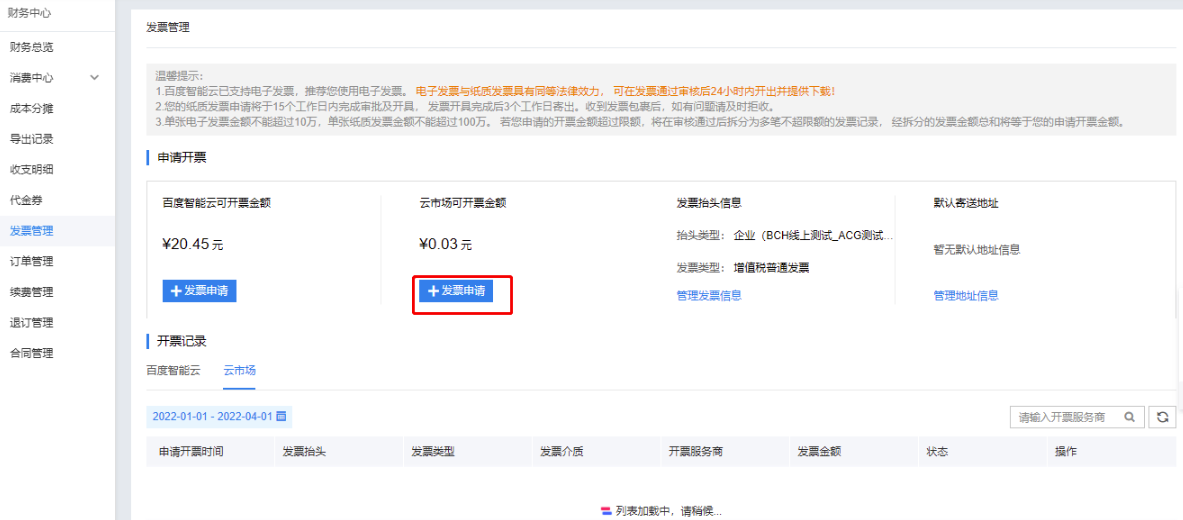
Invoice
- For China Unicom's cross-border peering connections product, payment is made to the China Unicom merchant through Baidu AI Cloud Market. Therefore, for invoicing, you need to select Financial Center - Invoice Management - Cloud Market Invoicing in the Baidu AI Cloud console to submit an application to China Unicom merchants.