
Perform the System Optimization (Linux)
Change the Disk ID of fstab File to UUID
Run the command blkid on your system to return the results as shown in the figure below:

To view the "/" root directory row of mount point for the file cat /etc/fstab as shown in the figure below, you do not need to change the disk ID.

If it displays the partition name in the first column as shown in the figure below, you need to edit the file /etc/fstab and change the partition name /dev/vda1 to "UUID=ce4f29f2-f1a9-4c31-95e6-5bc32a698d2b".

Change the Disk ID of grub File to UUID
Create an instance with the imported image. To boot the system successfully, it is strongly recommended that you change the boot disk ID to UUID in the grub configuration file.
The following take centos 7 as an exmaple to view the file /boot/grub2/grub.conf. If it displays as root=UUID=ID, you do not need to change the disk ID.

If it displays as root=/dev/, you need to query UUID of corresponding partition through the command blkid, and then change the disk ID to root=UUID=ID in the file /boot/grub2/grub.conf.

Check grub Start-up Parameters
Before you import the image into the Baidu AI Cloud platform, you need to check the start-up parameters of the grub configuration file:
The following takes CentOS 7 as an example to view the file /boot/grub2/grub.cfg.
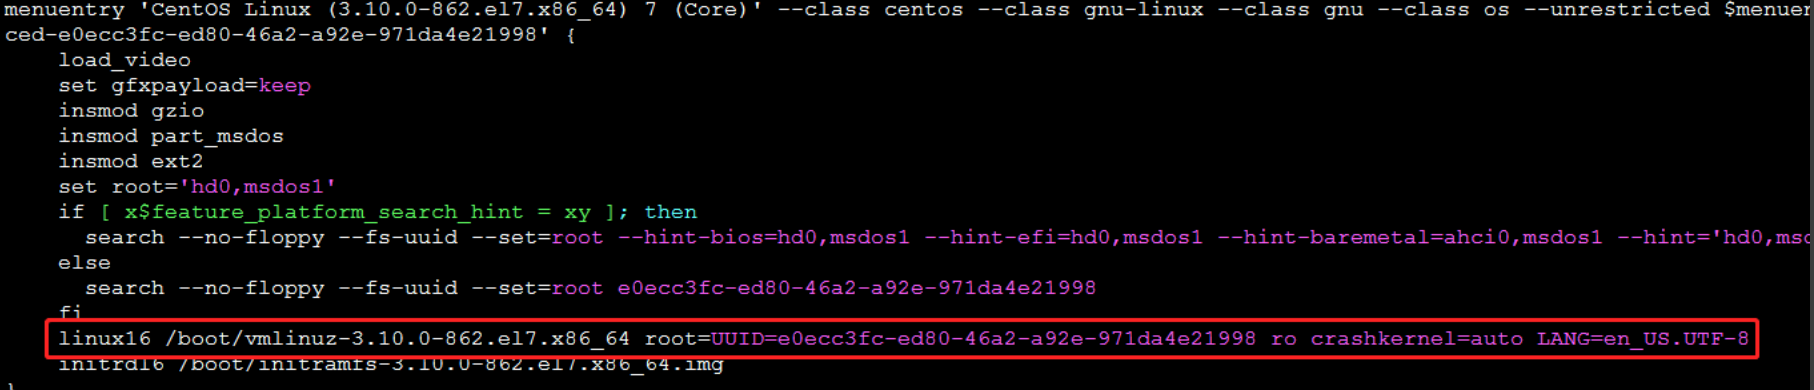
As shown in the figure below, view whether there is the parameter "console=tty0 console=ttyS0,115200" in the red box in menuentry.
If this parameter does not exist, you need to edit the file /boot/grub2/grub.cfg and add "console=tty0 console=ttyS0,115200" following the parameter ro.
Note: For the centos6 system, you also need to add console=tty0 console=ttyS0, 115200 following the parameter root as shown in the figure below.

Note: The grub start-up parameter of the ubuntu system is console=tty1 console=ttyS0, 115200n8。
Configure DNS
To ensure that you can normally access the network after you imports the image, you need to set the DNS configuration.
- CentOS and openSUSE System
Confirm whether the directory /etc/NetworkManager/dispatcher.d/ exists. If this directory does not exist, install NetworkManager firstly.
Enter the directory /etc/NetworkManager/dispatcher.d/ to create a file 99-resolvconf, and write the following content into the file 99-resolvconf.
 #!/bin/bash

 resolv_file="/etc/resolv.conf"

 exist_options=`grep -r "options" ${resolv_file}`

 if [ -z $exist_options ];then

     echo "options rotate timeout:1" >> ${resolv_file}

 fi
Add the executable privilege for 99-resolvconf: chmod +x 99-resolvconf.
- Debian/ubuntu System
Edit the file /etc/resolvconf/resolv.conf.d/tail, and add the following content to the end of file:
options rotate timeout:1Empty a Network Rule File
Before you import your BCC system into Baidu AI Lloud, ensure that the file /etc/udev/rules.d/70-persistent-net.rules is empty.
Run the following command from the command line: cat /etc/udev/rules.d/70-persistent-net.rules. If the return information contains the following content:

Delete all similar information, or delete the file /etc/udev/rules.d/70-persistent-net.rules.
Run the following commmand to empty the file content: echo "" -> "/etc/udev/rules.d/70-persistent-net.rules.
Run the following command to delete files: rm -f /etc/udev/rules.d/70-persistent-net.rules.
Disable a Firewall
The folowing takes the CentOS system as an example.
The Centos6 system runs the following commands on the terminal:
chkconfig iptables offThe Centos7 system runs the following commands on the terminal:
systemctl disable firewalldCentOS System Disables Selinux
Edit the file /etc/selinux/config, and change SELINUX=enforcing to SELINUX=disabled.