
Application BLB instance
The flow chart for users employing an application BLB instance is as follows:
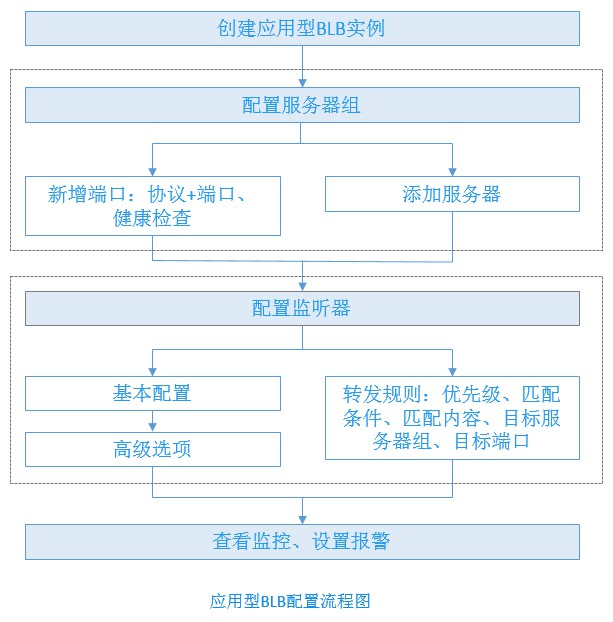
It is divided into the following four steps:
- Step I: Create an application BLB instance;
- Step II: Configure the server group, mainly including port configuration, health checks and server addition;
- Step III: Configure listener;
- Step IV: Monitor the system and configure alarms.
Create an application BLB instance
- Log in to Baidu AI Cloud Platform, go to Product Services > Baidu Load Balancer (BLB) > Application Instance, and navigate to the Instance List page.
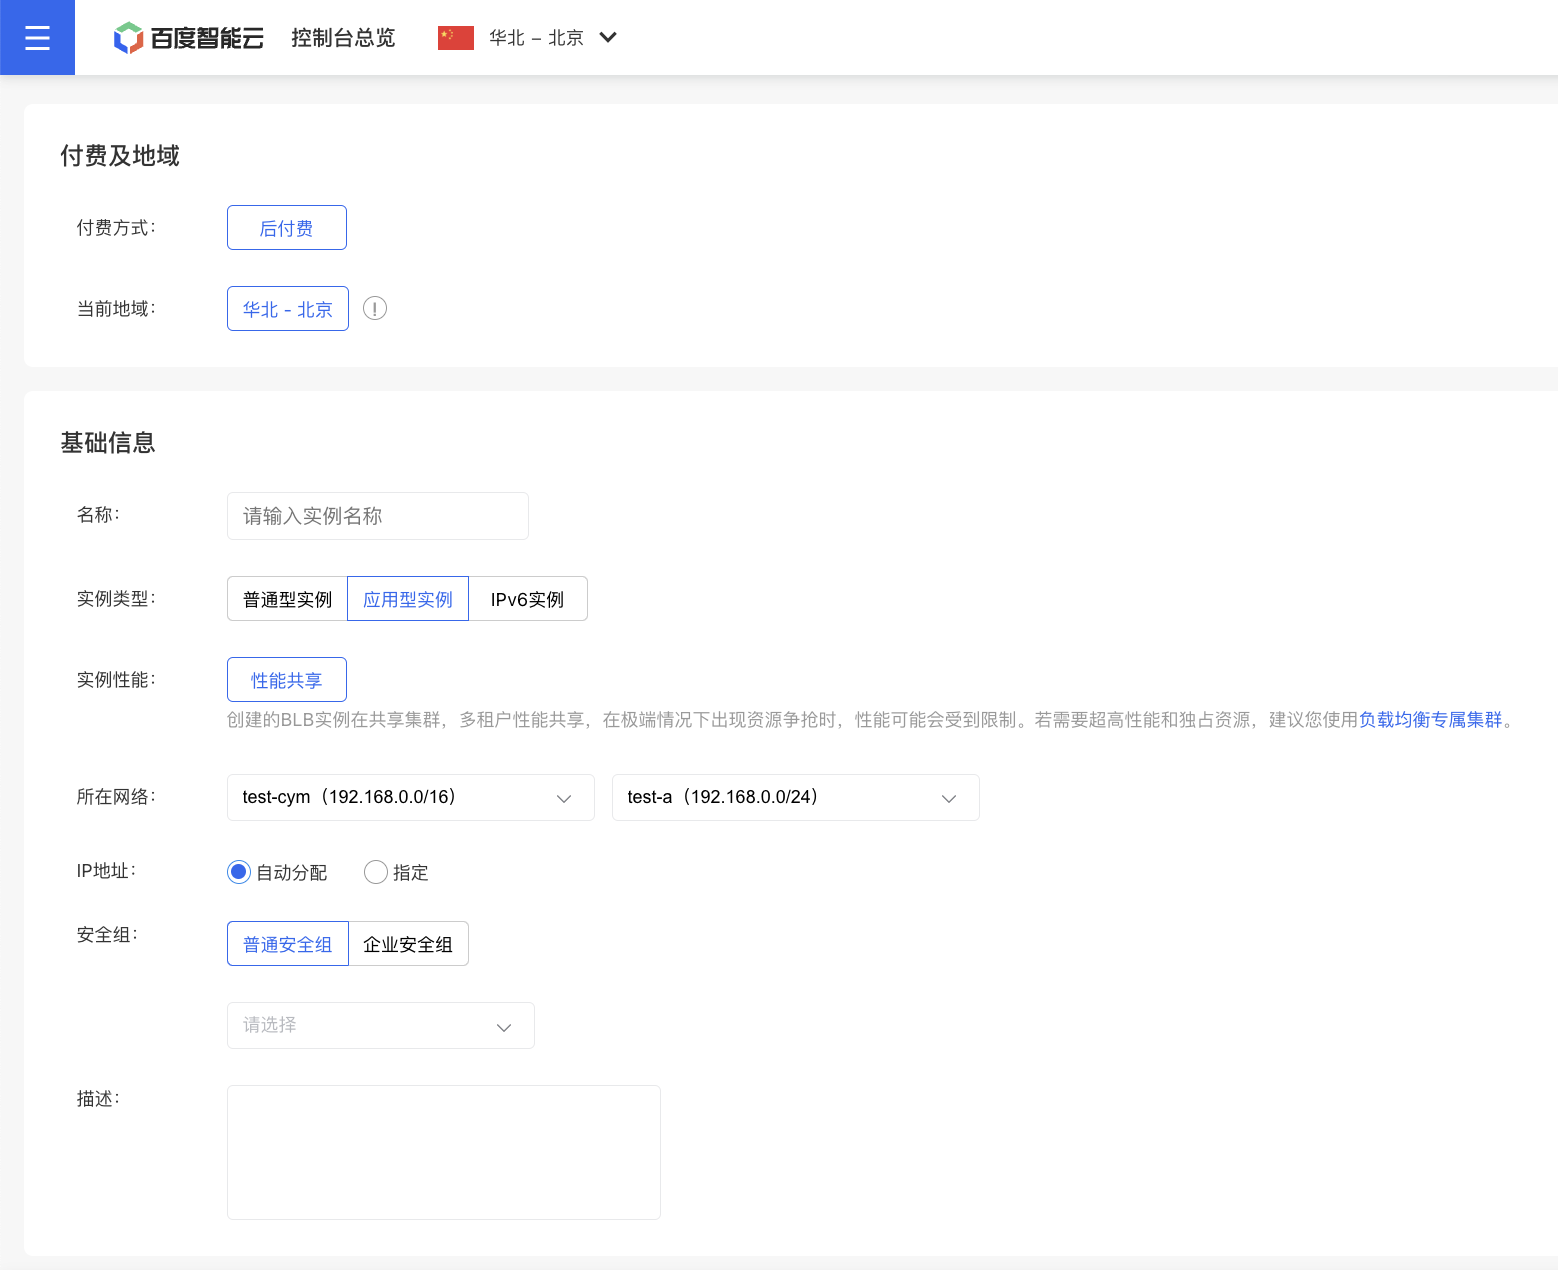
- Click on Create Load Balancer to enter the Create Instance page.
Description:
Ensure the BCC instance is created before creating the BLB instance; otherwise, the BLB instance creation will fail.
- Choose the configuration information.
- Basic Information: Select the region and set the instance name. Network: Choose the Virtual Private Cloud (VPC) to which the BLB and related BCC cloud resources will belong.
Notes Users need to specify a subnet when creating a BLB instance.
-
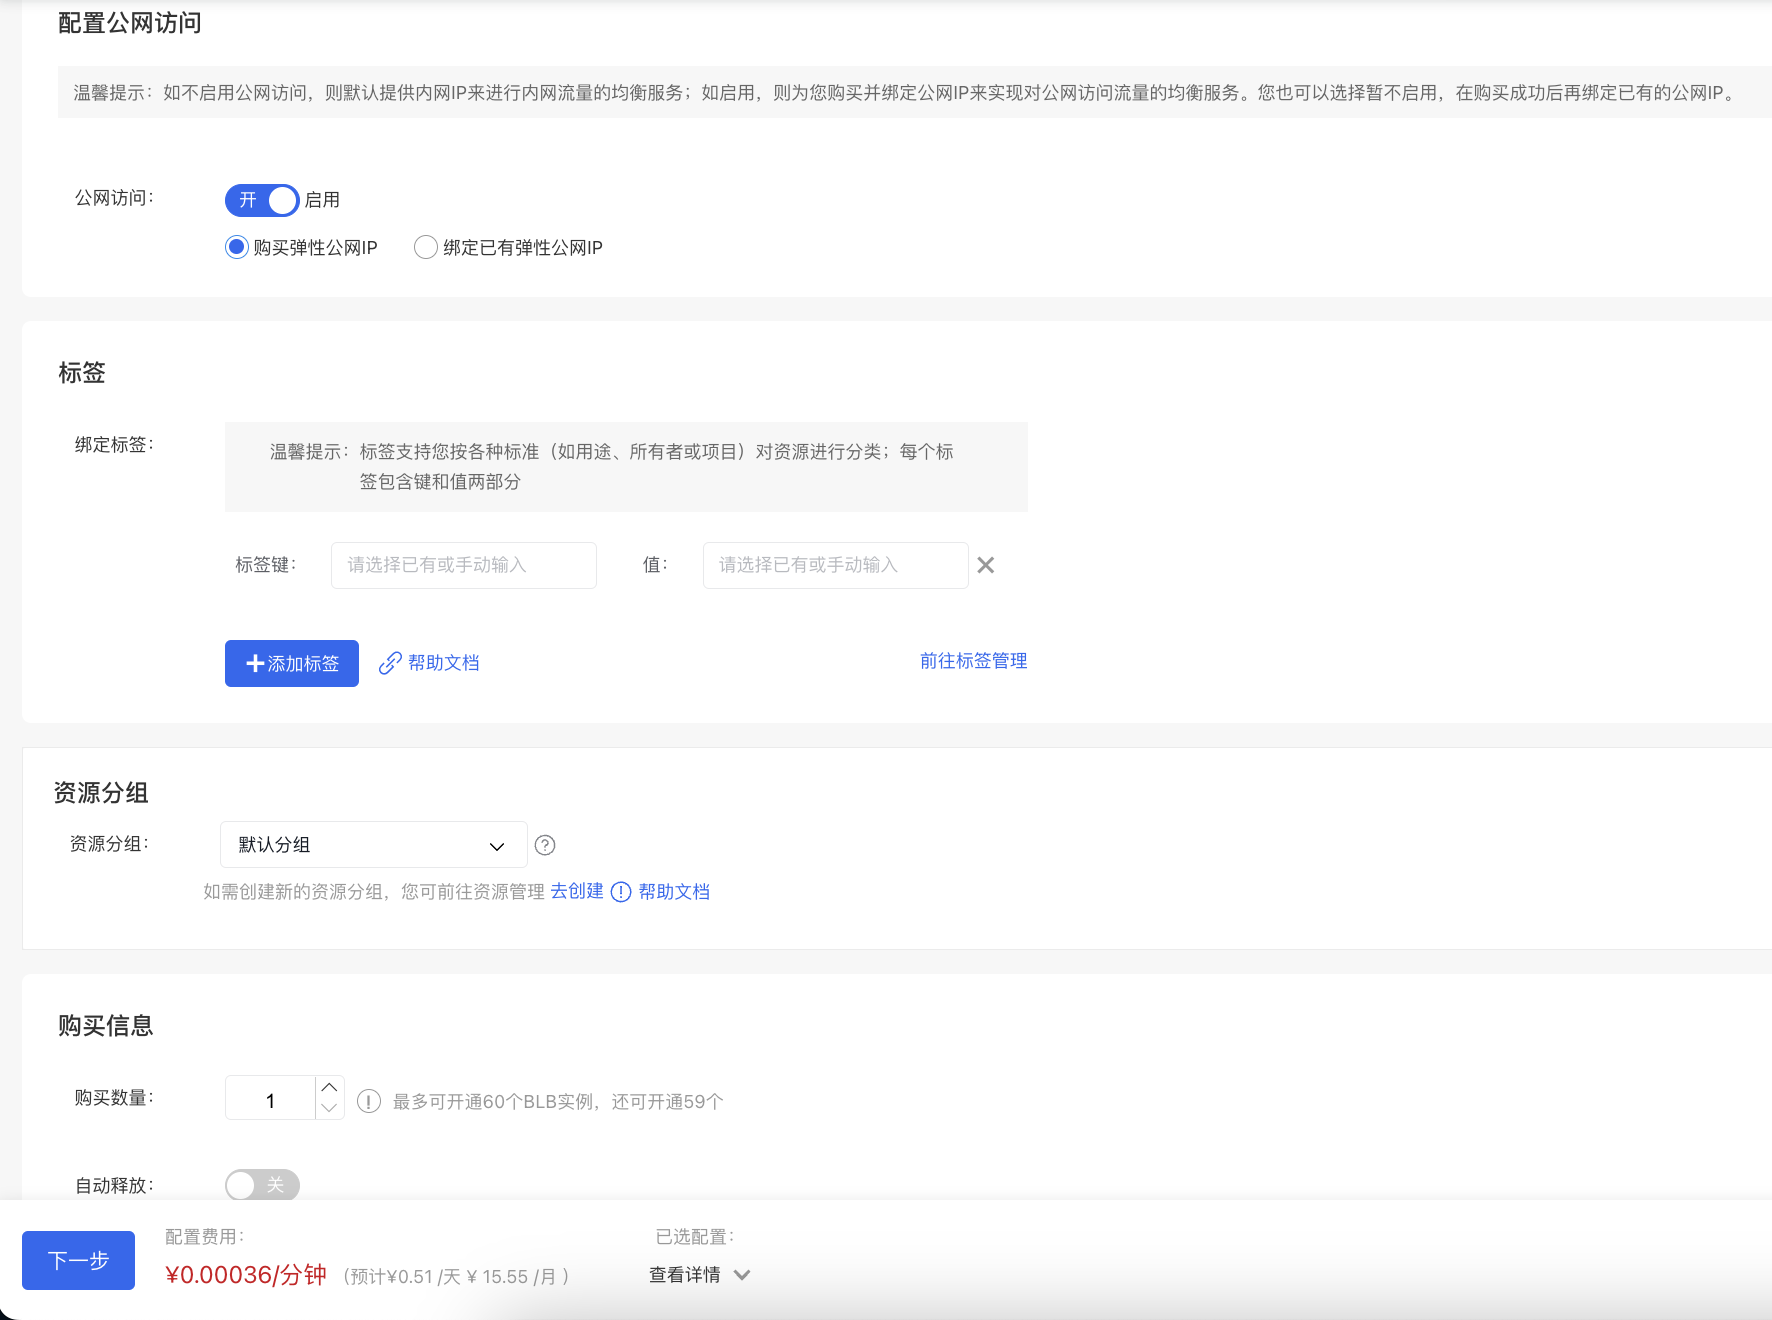
Configure public network access: Select Enable or Disable Public network access based on actual conditions.
Description:
- If OFF is selected, the feature will not be enabled, meaning that no public IP will be bound to the BLB instance during its creation. You can bind a public IP later if required.
- If ON is selected, the feature will be enabled, meaning that a public IP will be purchased and bound to the BLB instance during its creation.
- Purchase Information: Specify the purchase quantity and configure whether to enable auto-release.
Notes When creating a BLB instance, users can directly configure the Auto-release of BLB instance, and the BLB instance will be released automatically at the set time.
(Optional. If public network access is not enabled, the system will skip this step) Configure EIP instance information. For the configuration method of EIP instance, refer to [Create EIP Instance](EIP/Operation guide/EIP Instance/Create instance.md).
- Verify the configuration details and complete the order and payment by following the system prompts. You will receive an SMS notification upon successful creation.
Configure server group
The steps for configuring a server group mainly include:
- Fill in basic information of server group
- Configure open ports;
- Add server group;
Note: A single server group can support multiple open ports. For example, Server Group A can simultaneously open TCP 80 and HTTP 80 ports.
Fill in basic information of server group
Operation step
- Go to Product Services > Baidu Load Balancer (BLB) > Application Instance to access the application instance list.
- Click on the link in the Load Balancer ID/Name column to proceed to the Instance Details page.
- In the left navigation bar, select Target Group, click the Server Group tab on the details page, then choose Add Server Group to enter the configuration page and fill in the server group name and description.
Configure TCP protocol open ports
Operation step
- Enter the Add Server Group configuration page, click Add Port to set the basic settings and health check of the listener, and open the protocol [Port] to select TCP.
- Provide configuration details.
| Item | Description |
|---|---|
| Open Protocol [Port] | This refers to the protocol and port used by the real server to deliver services. The BLB forwards incoming requests to the target service, which listens on a port within the integer range of 1-65535. The default is set to “80”. |
- Set up health checks.
| Item | Description |
|---|---|
| Health check protocol | Specify the protocol type used to assess the real server's health status. |
| Response timeout | If the real server does not respond within the specified timeframe, it is considered a timeout. |
| Health check interval | Set the interval for checking the real servers. |
| Unhealthy threshold | If the number of consecutive health check failures for the real server surpasses the threshold, the server will be marked as unhealthy. |
| Health threshold | For an unhealthy server, if the number of successful consecutive health checks exceeds the threshold, the server will be marked as healthy. |
- Once all configurations are complete, click the OK button to finalize the setup of the TCP protocol open port.
Configure UDP protocol open ports
Operation step
- Enter the Add Server Group configuration page, click Add Port to set the basic settings and health check of the listener, and open the protocol [Port] to select UDP.
- Provide configuration details.
| Item | Description |
|---|---|
| Open protocol port | This refers to the protocol and port used by the real server to deliver services. The BLB forwards incoming requests to the target service, which listens on a port within the integer range of 1-65535. The default is set to “80”. |
- Set up health checks.
| Item | Description |
|---|---|
| Health check protocol | Specify the protocol type used to assess the real server's health status. |
| Check string | BLB implements health checks by sending UDP packets containing user-specified strings to real servers. You need to configure the application to complete the response. When the real server is a DNS server, you can configure a DNS resolution request as the health check packet, with the default value being a DNS resolution request for baidu.com (00\01\01\00\01\00\00\00\00\00\00\05baidu\03com\00\00\01\00\01). |
| Response timeout | If no response is received from the real server within the specified time, it is considered that the real server's response has timed out. Enter an integer between 1 and 60. It is recommended to set it to 3 seconds |
| Health check interval | Specify the time interval for checking the health of real servers. Input an integer between 1 and 10; the recommended setting is 3 seconds. |
| Unhealthy threshold | If the number of consecutive health check failures for the real server surpasses the threshold, the server will be marked as unhealthy. |
| Health threshold | For an unhealthy server, if the number of successful consecutive health checks exceeds the threshold, the server will be marked as healthy. |
- Once all configurations are complete, click the OK button to finalize the setup of the UDP protocol open port.
Configure HTTP protocol open ports
- Enter the Add Server Group configuration page, click Add Port to set the basic settings and health check of the listener, and open the protocol [Port] to select HTTP.
- Provide configuration details.
| Item | Description |
|---|---|
| Open protocol port | This refers to the protocol and port used by the real server to deliver services. The BLB forwards incoming requests to the target service, which listens on a port within the integer range of 1-65535. The default is set to “80”. |
- Set up health check details.
| Item | Description |
|---|---|
| Health check protocol | Specify the protocol type for checking the health status of the real server. You can choose between "HTTP" and "TCP". |
| Host header | The Host header for health check requests sent to real servers is set to null by default. |
| Check port | This refers to the port used by the real server to deliver services. This field is valid only for HTTP health checks. |
| Check path | URI for the health check page file. It is recommended to check static pages. The length is limited to 1-80 characters. Only letters, digits, '-', '/', '.', '%', '?', '#', and '&' can be used. This field is only valid for HTTP health checks. |
| Response timeout | If the real server does not respond within the specified timeframe, it is considered a timeout. |
| Health check interval | Set the interval for checking the real servers. |
| Unhealthy threshold | If the number of consecutive health check failures for the real server surpasses the threshold, the server will be marked as unhealthy. |
| Health threshold | For an unhealthy server, if the number of successful consecutive health checks exceeds the threshold, the server will be marked as healthy. |
| Normal code status | HTTP status code of normal health check. The options include "HTTP_2xx", "HTTP_3xx", "HTTP_4xx" and "HTTP_5xx". This field is only valid for HTTP health check. |
- After completing the configurations above, click OK to finalize the setup of the HTTP protocol server group.
Add server group
On the server group details page, click Add Server, select the server name you want to add to the group, click Next to set the server weight, and finally click OK to finish adding the server to the group.
Note:
- While adding servers, ensure that all servers belong to the same VPC as the application BLB instance.
- Set the weight for the real servers. The weight determines the distribution of request forwarding among the server instances. For instance, if two servers have different configurations, the more powerful server can be assigned a higher weight to handle more incoming requests.
- The weight value is relative. If all servers have the same weight, their request forwarding ratios will be equal.
- Supports setting a weight value ranging from 0 to 100. The higher the weight, the more requests the server will receive.
- Weights do not apply to forwarding rules other than weighted round robin. If the weight is set to "0", no new requests will be sent to the server.
Server security group settings
For the server security group settings of the application BLB instance, please refer to [Security Group Settings of General-purpose BCC Instance](BLB/Operation guide/General-purpose BLB instance/Creating BLB Ordinary Instance.md#Set security group for real servers).
Edit port
Under the Open Port tab, click Edit to access the editing interface. After making changes, click OK.
Delete port
- In the Open Ports tab, select the listener settings you wish to delete, and click Delete.
- In the pop-up confirmation window, click OK to finalize the release process.
Once you've filled in the server group's basic information, added servers, and configured open ports, click OK at the bottom of the page to complete the server group creation.
Configure IP group
The steps for configuring an IP group mainly include:
- Fill in the basic information of IP group
- Configure open protocol;
- Add an IP address.
Notes
IP groups are currently only available to Allow List users. If required, submit a Ticket.
Fill in the basic information of IP group
Operation step
- Go to Product Services > Baidu Load Balancer (BLB) > Application Instance to access the application instance list.
- Click on the link in the Load Balancer ID/Name column to proceed to the Instance Details page.
- In the left navigation bar, select Target Group, go to the IP Group tab on the details page, click Add IP Group to access the configuration page, and complete the fields for the IP group name and description.
Configure TCP open protocol
Operation step
- Go to the Add IP Group configuration page, click Add Protocol to configure the listener's basic settings and health check, and select TCP as the open protocol.
- Provide configuration details.
| Item | Description |
|---|---|
| Open protocol | Specify the protocol used by backend members to deliver services. The BLB service will forward requests to the backend members. |
- Set up health checks.
| Item | Description |
|---|---|
| Health check protocol | Define the protocol type for checking the health of backend members. |
| Response timeout | If a response from the backend member is not received within the specified time frame, the backend member is considered to have timed out. |
| Health check interval | Set the time interval for conducting health checks on backend members. |
| Unhealthy threshold | If the number of consecutive health check failures of a backend member exceeds the threshold, the backend member is judged as unhealthy. |
| Health threshold | For an unhealthy backend member, if the number of consecutive successful health checks surpasses the threshold, the backend member is deemed healthy. |
- After completing the settings above, click OK to finalize the setup of the TCP open protocol.
Configure UDP open protocol
Operation step
- Go to the Add IP Group configuration page, click Add Protocol to configure the listener's basic settings and health check, and select UDP as the open protocol.
- Provide configuration details.
| Item | Description |
|---|---|
| Open protocol | Specify the protocol and port used by backend members to deliver services. The BLB service routes requests to backend members. |
- Set up health checks.
| Item | Description |
|---|---|
| Health check protocol | Define the protocol type for checking the health of backend members. |
| Check string | BLB implements health checks by sending UDP packets containing user-specified strings to backend members. You need to configure the application to complete the response. When the real server is a DNS server, you can configure a DNS resolution request as the health check packet, with the default value being a DNS resolution request for baidu.com (\00\01\01\00\00\01\00\00\00\00\00\00\05baidu\03com\00\00\01\00\01). |
| Response timeout | If no response is received from the backend member within the specified time, it is considered that the backend member's response has timed out. Enter an integer between 1 and 60. It is recommended to set it to 3 seconds |
| Health check interval | Set the interval for checking backend members. Enter an integer between 1 and 10. Setting it to 3 seconds is recommended. |
| Unhealthy threshold | If the number of consecutive health check failures of a backend member exceeds the threshold, the backend member is judged as unhealthy. |
| Health threshold | For an unhealthy backend member, if the number of consecutive successful health checks surpasses the threshold, the backend member is deemed healthy. |
- After setting up the configurations, click OK to finalize the UDP open protocol configuration.
Configure HTTP open protocol
- Go to the Add IP Group configuration page, click Add Protocol to configure the basic settings and health check for the listener, and choose HTTP as the open protocol.
- Provide configuration details.
| Item | Description |
|---|---|
| Open protocol port | Specify the protocol used by backend members to deliver services. The BLB service will forward requests to the backend members. |
- Set up health check details.
| Item | Description |
|---|---|
| Health check protocol | Choose the protocol type for checking the health status of backend members. You can select "HTTP". |
| Host header | The Host header for health check requests sent to real servers is set to null by default. |
| Check port | Define the port for backend members to deliver services. This field is applicable only for HTTP health checks. |
| Check path | URI for the health check page file. It is recommended to check static pages. The length is limited to 1-80 characters. Only letters, digits, '-', '/', '.', '%', '?', '#', and '&' can be used. This field is only valid for HTTP health checks. |
| Response timeout | If a response from the backend member is not received within the specified time frame, the backend member is considered to have timed out. |
| Health check interval | Set the time interval for conducting health checks on backend members. |
| Unhealthy threshold | If the number of consecutive health check failures of a backend member exceeds the threshold, the backend member is judged as unhealthy. |
| Health threshold | For an unhealthy backend member, if the number of consecutive successful health checks surpasses the threshold, the backend member is deemed healthy. |
| Normal code status | HTTP status code of normal health check. The options include "HTTP_2xx", "HTTP_3xx", "HTTP_4xx" and "HTTP_5xx". This field is only valid for HTTP health check. |
- After configuring the settings, click OK to finalize the HTTP open protocol configuration.
Add IP group
In the server group details section, click Add IP, then open the Add IP menu, input the IP address and port to be added to the IP group, configure the weight, and finally click OK to complete the IP addition.
Description:
- While adding an IP, it can belong to the same VPC as the application BLB instance. If intranet connectivity is possible, it may also be from a cross-region VPC or a user IDC.
- Set the weight for each backend member (i.e., IP + port). Weight determines how requests are distributed across backend members. For instance, if two backend members have different configurations, the higher-configured member can be assigned a greater weight to handle more external requests.
- The weight value is relative. If all servers have the same weight, their request forwarding ratios will be equal.
- Supports setting a weight value ranging from 0 to 100. The higher the weight, the more requests the server will receive.
- Weights do not apply to forwarding rules other than weighted round robin. If the weight is set to "0", no new requests will be sent to the server.
Configure the listener for an application BLB Instance
It mainly includes the configuration of TCP, UDP, SSL, HTTP and HTTPS listener
TCP listener
Scenario overview
Key application scenarios for the TCP protocol include cases where reliability is critical, high data accuracy is required, and slower transmission speeds are acceptable.
Operation step
- Go to Product Services > Baidu Load Balancer (BLB) > Application Instance to access the application instance list.
- Click on the link in the Load Balancer ID/Name column to proceed to the Instance Details page.
- Click Listener Settings > Add Listener Settings in the left navigation bar to configure basic listener settings. Select TCP for listener protocol [Port].
- Configure the necessary settings.
| Item | Description |
|---|---|
| Listener protocol [Port] | Specify the protocol and port that the BLB listener will use. The port range must be an integer between 1 and 65535, and the default is set to “80”. |
| Scheduling method | Weighted round robin: Requests are sent to the backend members in turn according to the weight of the backend members. It is often used for short-connection services, such as HTTP services. For weight configuration methods, refer to the Configure Real Server section. Weighted least connections: In addition to polling based on the weight values set for each real server, it also considers the connection count of the real servers. When the weight values are the same, requests are preferentially routed to the real server with the fewest connections. This is commonly used for long-connection services such as database connections. The source IP algorithm provides a session persistence mechanism for TCP listeners. Under this algorithm, the server weight does not take effect. |
- Advanced options
| Item | Description |
|---|---|
| Timeout duration | Specify the TCP connection timeout duration. The input range should be an integer between 10 and 4000, with the default set to 900 seconds. |
- Define forwarding rules.
| Item | Description |
|---|---|
| Target group | Forward the traffic matching the rules to the specified server group or IP group |
| Target port | Forward the traffic matching the rules to the specified open port of the designated server group |
1> **Note:**
2>  TCP listeners has only one default forwarding rule, which cannot be deleted.
3> For example: Forward the traffic received by this listener to TCP Port 80 of Server Group A. In the target server group, select Server Group A, and in the target port, select TCP 80.- After completing the above setup, click the OK button to finalize adding the TCP listener.
UDP listener
Scenario overview
Typical application scenarios for UDP protocol include DNS services, IoT applications, and situations where high reliability of data transmission is not required.
Operation step
When health checks are enabled, BLB automatically blocks backend members marked as unhealthy.
- Go to Product Services > Baidu Load Balancer (BLB) > Application Instance to access the application instance list.
- Click on the link in the Load Balancer ID/Name column to proceed to the Instance Details page.
- Click Listener Settings > Add Listener Settings in the left navigation bar to configure basic listener settings. Select UDP for listener protocol [port].
- Configure the necessary settings.
| Item | Description |
|---|---|
| Listener protocol [port] | Indicate the protocol and port the BLB listener will listen on. The port must be an integer from 1 to 65535 and defaults to "53." |
| Scheduling method | Weighted round robin: Requests are sent to the backend members in turn according to the weight of the backend members. It is often used for short-connection services, such as HTTP services. For weight configuration methods, refer to the Configure Real Server section. Weighted least connections: In addition to polling based on the weight values set for each real server, it also considers the connection count of the real servers. When the weight values are the same, requests are preferentially routed to the real server with the fewest connections. This is commonly used for long-connection services such as database connections. Source IP: After performing a hash operation on the source IP of the request, the request is dispatched to a matching server. This can ensure that requests from the same client IP are always dispatched to a specific server. The source IP algorithm provides a session persistence mechanism for UDP listeners. Under this algorithm, the server weight does not take effect. |
- Advanced options
| Item | Description |
|---|---|
| Timeout duration | Specify the TCP connection timeout duration. The input range should be an integer between 10 and 4000, with the default set to 900 seconds. |
- Define forwarding rules.
| Item | Description |
|---|---|
| Target group | Forward the traffic matching the rules to the specified server group or IP group |
| Target port | Forward the traffic matching the rules to the specified open port of the designated server group |
1> **Note:**
2>  UDP listeners has only one default forwarding rule, which cannot be deleted.
3> For example: Forward the traffic received by this listener to UDP Port 53 of Server Group A. In the target server group, select Server Group A, and in the target port, select UDP 53.- After completing the above setup, click the OK button to finalize adding the UDP listener.
SSL listener
Scenario overview
Common use cases for SSL protocols include environments requiring ultra-high performance and large-scale TLS offload.
Operation step
When health checks are enabled, BLB automatically blocks backend members marked as unhealthy.
- Go to Product Services > Baidu Load Balancer (BLB) > Application Instance to access the application instance list.
- Click on the link in the Load Balancer ID/Name column to proceed to the Instance Details page.
- Click Listener Settings > Add Listener Settings in the left navigation bar to configure basic listener settings. Select SSL for listener protocol [port].
- Configure the necessary settings.
| Item | Description |
|---|---|
| Listener protocol [port] | Indicate the protocol and port the BLB listener will listen on. The port must be an integer from 1 to 65535 and defaults to "443." |
| Scheduling method | Weighted round robin: Requests are sent to the backend members in turn according to the weight of the backend members. It is often used for short-connection services, such as HTTP services. For weight configuration methods, refer to the Configure Real Server section. Weighted least connections: In addition to polling based on the weight values set for each real server, it also considers the connection count of the real servers. When the weight values are the same, requests are preferentially routed to the real server with the fewest connections. This is commonly used for long-connection services such as database connections. Source IP: After performing a hash operation on the source IP of the request, the request is dispatched to a matching server. This can ensure that requests from the same client IP are always dispatched to a specific server. The source IP algorithm provides a session persistence mechanism for UDP listeners. Under this algorithm, the server weight does not take effect. |
| Server certificate | Before configuring an SSL listener, apply for a server certificate and upload it to the certificate management module. For details, refer to Certificate Management. Note: BLB instances in dedicated clusters support both international standard and national cryptographic (SM2) standard certificates, while BLB instances in shared clusters only support international standard certificates. |
| Mutual certification | Decide whether to enable mutual authentication. |
| Encryption options | The security policy includes optional TLS protocol versions and their respective encryption algorithm suites for HTTPS. |
- Advanced options
| Item | Description |
|---|---|
| Timeout duration | Specify the timeout period for waiting for backend member responses. If backend members need more time to process requests, you can increase this value as needed. The default setting is 30 seconds. |
- Define forwarding rules.
| Item | Description |
|---|---|
| Target group | Forward the traffic matching the rules to the specified server group or IP group |
| Target port | Forward the traffic matching the rules to the specified open port of the designated server group |
1> **Note:**
2> SSL listeners has only one default forwarding rule, which cannot be deleted.- Once the above configurations are completed, click the OK button to add the SSL listener.
HTTP listener
Scenario overview
Typical usage scenarios for HTTP protocol include applications requiring the ability to recognize data content.
Operation step
- Go to Product Services > Baidu Load Balancer (BLB) > Application Instance to access the application instance list.
- Click on the link in the Load Balancer ID/Name column to proceed to the Instance Details page.
- Click Listener Settings > Add Listener Settings in the left navigation bar to configure basic listener settings. Select HTTP for listener protocol [port].
- Configure the necessary settings.
| Item | Description |
|---|---|
| Listener protocol [port] | Specify the protocol and port that the BLB listener will use. The port range must be an integer between 1 and 65535, and the default is set to “80”. |
| Scheduling method | Weighted round robin: Requests are sent to the backend members in turn according to the weight of the backend members. It is often used for short-connection services, such as HTTP services. For weight configuration methods, refer to the Configure Real Server section. Weighted least connections: In addition to polling based on the weight values set for each real server, it also considers the connection count of the real servers. When the weight values are the same, requests are preferentially routed to the real server with the fewest connections. This is commonly used for long-connection services such as database connections. |
| Timeout duration | Specify the timeout period for waiting for backend member responses. If backend members need more time to process requests, you can increase this value as needed. The default setting is 30 seconds. |
- Advanced options
| Item | Description |
|---|---|
| Session persistence | TCP listeners enable session persistence through source IP forwarding rules, while Layer 7 listeners (HTTP, HTTPS) do so by inserting or modifying cookies. You can choose to "Enable" or "Disable" this feature. |
| Additional HTTP headers | Append header fields to HTTP requests to obtain the client's real IP or listener protocol information when backend members process the messages. Obtain real IP: After enabling this function, the user's IP address can be recorded in the X-Forwarded-For header; Obtain listener protocol: After enabling this function, the listener protocol can be recorded in the X-Forwarded-Proto header. |
| Enable HTTPS redirection | Redirect HTTP requests from this listener to the BLB's HTTPS listener. Ensure the HTTPS listener at the relevant port is operating properly. You can choose to "Enable" or "Disable" this option. It is disabled by default. |
| HTTP requests allow non-ASCII characters | This option is disabled by default. When enabled, if an HTTP request includes non-ASCII characters, BLB will process the request and pass it to the real server. Activating this feature may lead to potential security risks. It is advised to keep it disabled unless necessary for specific situations. |
| Data compression | Enabling will compress specific file types; Disabling will not compress any file types. It is disabled by default. |
| Custom configuration | BLB Layer 7 listeners support custom configuration. For ConfigMap and descriptions, refer to Configuration Parameter Details. |
| HTTP2.0 | When enabled, it supports connection requests of HTTP2.0 version protocol. |
- Define forwarding rules.
| Item | Description |
|---|---|
| Priority | The smaller the priority value, the higher the priority. Priority is not allowed to be repeated. |
| Matching conditions | You can set forwarding rules for domain names, URLs, or match all. |
| Target group | Forward the traffic matching the rules to the specified server group or IP group |
| Target port | Forward the traffic matching the rules to the specified open port of the designated server group |
Note:
- When domain name and URL conditions appear in a single rule at the same time, the conditions must be met at the same time before the match is successful.
Domain name forwarding rule matching content restrictions:
- Limit length <100
- Wildcard only supports *
- Wildcard * may appear 0 or 1 time
- Wildcard * can match 0-n characters
- Only prefix matching is supported, that is, \ * can only appear at the beginning of the domain name, for example: *.baidu.com
URL forwarding rule matching content restrictions:
- Limit length <100
- Wildcard only supports *
- Wildcard * may appear 0 or 1 time
- Wildcard * can match 0-n characters
- prefix, middle and suffix matchings are supported, that is, \ * can appear anywhere in the matching rule.
For instance: Route the traffic received by the listener to HTTP Port 80 of Server Group A. In the target server group setting, select Server Group A, and for the target port, choose HTTP 80.
- Once the above configurations are completed, click the OK button to add the HTTP listener.
HTTPS listener
To enhance information security, users can configure the BLB listener protocol as HTTPS. BLB decrypts users' HTTPS requests and forwards them to backend members. Once backend members process the requests, response packets are sent back to BLB, encrypted, and delivered to the user. The process is illustrated in the diagram below:

Predecessor task
Before configuring an HTTPS listener, apply for a server certificate and upload it to the certificate management module. For details, refer to [Certificate Management](Reference/Certificate management/Introduction.md).
Operation step
- Go to Product Services > Baidu Load Balancer (BLB) > Application Instance to access the application instance list.
- Click on the link in the Load Balancer ID/Name column to proceed to the Instance Details page.
- Click Listener Settings > Add Listener Settings in the left navigation bar to configure basic listener settings. Select HTTPS for listener protocol [Port].
- Configure the necessary settings.
| Item | Description |
|---|---|
| Listener protocol [port] | Indicate the protocol and port the BLB listener will listen on. The port must be an integer from 1 to 65535 and defaults to "443." |
| Scheduling method | Weighted round robin: Requests are sent to the backend members in turn according to the weight of the backend members. It is often used for short-connection services, such as HTTP services. For weight configuration methods, refer to the Configure Real Server section. Weighted least connections: In addition to polling based on the weight values set for each real server, it also considers the connection count of the real servers. When the weight values are the same, requests are preferentially routed to the real server with the fewest connections. This is commonly used for long-connection services such as database connections. |
| Server certificate | Before configuring an HTTPS listener, apply for a server certificate and upload it to the certificate management module. For details, refer to Certificate Management. Note: BLB instances in dedicated clusters support both international standard and national cryptographic (SM2) standard certificates, while BLB instances in shared clusters only support international standard certificates. |
| Extended domain name | Decide whether to enable extended domain names. |
| Mutual certification | Decide whether to enable mutual authentication. |
| Encryption options | The security policy includes optional TLS protocol versions and their respective encryption algorithm suites for HTTPS. |
| Timeout duration | Specify the timeout period for waiting for backend member responses. If backend members need more time to process requests, you can increase this value as needed. The default setting is 30 seconds. |
- Advanced options
| Item | Description |
|---|---|
| Session persistence | TCP listeners enable session persistence through source IP forwarding rules, while Layer 7 listeners (HTTP, HTTPS) achieve this by inserting or modifying cookies. You can choose to "Enable" or "Disable" this feature. Disabled by default. |
| Additional HTTP headers | Append header fields to HTTP requests to obtain the client's real IP or listener protocol information when backend members process the messages. Obtain real IP: After enabling this function, the user's IP address can be recorded in the X-Forwarded-For header; Obtain listener protocol: After enabling this function, the listener protocol can be recorded in the X-Forwarded-Proto header. |
| HTTP requests allow non-ASCII characters | When this option is activated, if an HTTP request includes non-ASCII characters, BLB will process and pass the request to backend members. Activating this feature may lead to potential security risks, so it is recommended to leave it disabled unless required for special cases. Disabled by default. |
| Data compression | Enabling will compress specific file types; Disabling will not compress any file types. It is disabled by default. |
| Custom configuration | BLB Layer 7 listeners support custom configuration. For ConfigMap and descriptions, refer to Configuration Parameter Details. |
| HTTP2.0 | When enabled, it supports connection requests of HTTP2.0 version protocol. |
- Define forwarding rules.
| Item | Description |
|---|---|
| Priority | The smaller the priority value, the higher the priority. Priority is not allowed to be repeated. |
| Forwarding rules | You can set forwarding rules for domain names, host, or a combination of both |
| Target group | Forward the traffic matching the rules to the specified server group or IP group |
| Target port | Forward the traffic matching the rules to the specified open port of the designated server group |
Note:
- When domain name and URL conditions appear in a single rule at the same time, the conditions must be met at the same time before the match is successful.
Domain name forwarding rule matching content restrictions:
- Limit length <100
- Wildcard only supports *
- Wildcard * may appear 0 or 1 time
- Wildcard * can match 0-n characters
- Only prefix matching is supported, that is, \ * can only appear at the beginning of the domain name, for example: *.baidu.com
URL forwarding rule matching content restrictions:
- Limit length <100
- Wildcard only supports *
- Wildcard * may appear 0 or 1 time
- Wildcard * can match 0-n characters
- prefix, middle and suffix matchings are supported, that is, \ * can appear anywhere in the matching rule.
For instance: Route the traffic received by the listener to HTTP Port 80 of Server Group A. In the target server group setting, select Server Group A, and for the target port, choose HTTP 80.
- After configuring the parameters, click OK to complete the addition of the HTTPS listener.
Edit listener
Go to the Listener Settings tab, click Edit to enter the editing mode, make your changes, and then click OK to save.
Release listener
- On the Listener Settings tab, choose the listener settings you want to release and click the Release button.
- In the pop-up confirmation window, click OK to finalize the release process.