
Set Different User Permissions for Different Directories
Problem background
In many cases, various functional departments and business units within a company or organization need to share data while ensuring data security through distinct permissions. In such scenarios, users expect to assign different access permissions to different users, similar to how permissions are set in a local file system.
The NFS protocol utilizes a UNIX-style permission authentication mechanism, verifying permissions based on UID and GID instead of usernames and group names. Therefore, when accessing a CFS file system from two different virtual machines, the user experience depends on whether the UID of the same user is consistent across the virtual machines:
- If the UID of the same user is identical on both VMs, the CFS will recognize them as the same user;
- If the UIDs of the same user are different on both VMs, the If CFS will recognize them as different users;
- If two users with the same UID exist on different virtual machines, the CFS will recognize them as the same user.
For most users other than a few special ones (e.g., root), the UID and GID values for the same user often differ across machines. As a result, specific configurations are necessary to ensure correct access permissions.
Standardizing user UID and GID
You can set the UID and GID on each VM using the following methods:
Method I: Modify UID and GID using usermod and groupmod
- If the user doesn’t exist, create a user (e.g., with the username cfs) and verify the UID and GID using the id command. The command and its sample output are provided below:
1[root@test-cfs ~]# useradd cfs
2[root@test-cfs ~]# id cfs
3uid=500(cfs) gid=500(cfs) groups=500(cfs)- Use the usermod and groupmod commands to change the UID and GID of the cfs account to a predefined value (e.g., 888). The commands and their sample output are as follows:
1[root@test-cfs ~]# usermod -u 888 cfs
2[root@test-cfs ~]# groupmod -g 888 cfs
3[root@test-cfs ~]# id cfs
4uid=888(cfs) gid=888(cfs) groups=888(cfs)
Method II: Directly modify the /etc/passwd and /etc/group files
The first step is the same as Method I: create the user. Once created, open and edit the /etc/passwd and /etc/group files, respectively.
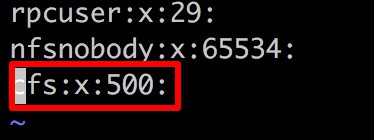
Run vi /etc/passwd, locate the line corresponding to the cfs user, and modify the UID and GID.
Before modification:

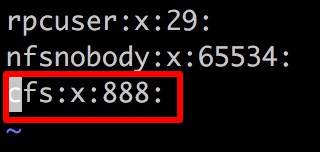
After modification:

Enter :wq to exit the editing mode and save the changes.
Run vi /etc/group, locate the line corresponding to the cfs user, and modify its associated group.
Before modification:
After modification:
Enter :wq to exit the editing mode and save the changes.
Creating initial directories
By default, only the ROOT user has permission to create directories and files. Therefore, you need to use the root account to create a dedicated root directory for each user. After modifying the permissions with the chown command, the user can access and use the directory under their own identity. Sample code is as follows (assuming the mount target is /mnt):
1[root@test-cfs ~]# mkdir /mnt/cfs
2[root@test-cfs ~]# chown -R cfs:cfs /mnt/cfs
3[root@test-cfs ~]# ls -l /mnt/
4total 8
5drwxr-xr-x 2 cfs  cfs  4096 Jul 24 15:38 cfs
6drwxr-xr-x 2 root root 4096 Jul 24 15:39 root
The kernel restricts non-root users from mounting file systems. Therefore, before a user can utilize the file system, it must first be mounted using the root account. This can be automated through "automatic mounting." Additionally, during the mounting process, the file system can be mounted directly to the user's root directory path, limiting its usage scope to that user alone.