
Quick start (Linux)
Updated at:2025-11-11
This guide explains how to create an NFS file system in the CFS console and mount it to a Baidu Cloud Compute (BCC) instance (Linux) for data reading and writing.
Prerequisites
- The Cloud File System (CFS) service has been activated. When signing into the Cloud File System (CFS) console for the first time, you need to activate the CFS service as guided on the page.
- The target BCC instance has been created for mounting the CFS file system. For BCC creation methods, refer to: Quick Configuration of Linux Cloud Servers.
Mounting steps
Step 1: Create a CFS file system
- Click "Create File System" in the CFS console.
- On the Create File System panel, fill in details such as the file system name, availability zone, protocol type, and storage class. For detailed parameter descriptions, refer to Create File System.
Description:
①For optimal performance, it is recommended to deploy CFS file systems in the same availability zone as BCC instances
②This document selects the NFS, indicating that BCC instances running Linux OS will mount and access the CFS file system via NFS
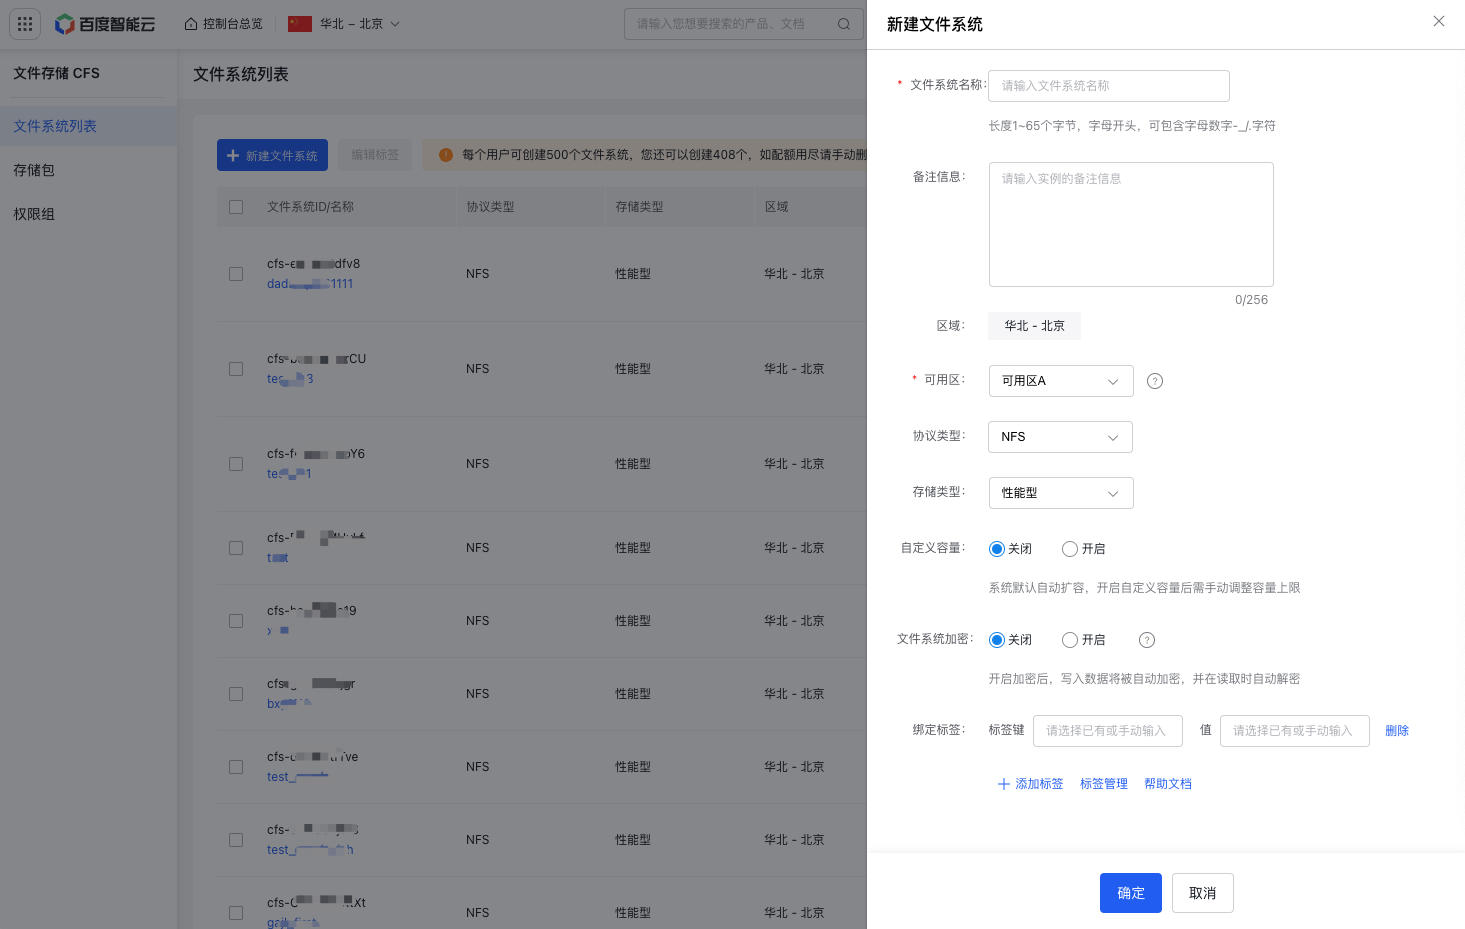
- Click "OK" and follow the on-screen instructions to complete the creation of the CFS file system.
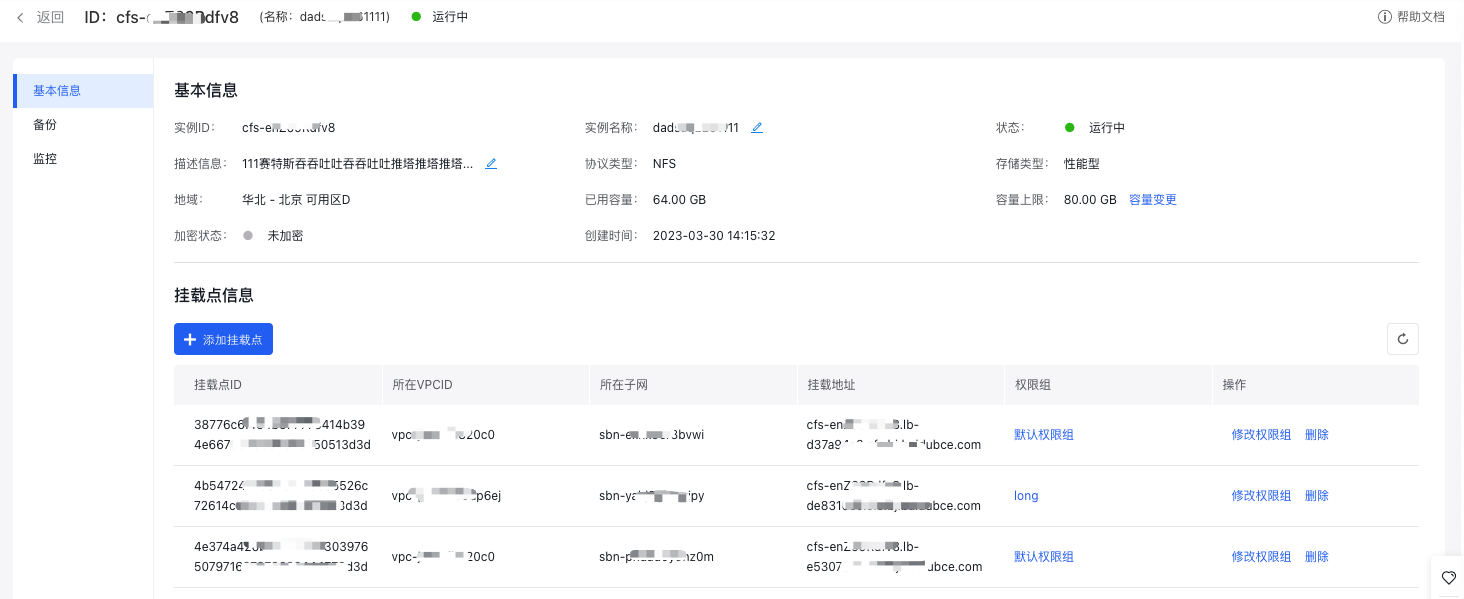
Step 2: Create mount target
- Click the File System Name in CFS console to access the Basic Information page
- Click Add Mount Target, and select the subnet and permission group in the pop-up page. For more permission group details, refer to Permission Group Management

- Click "Confirm" to view the mount target information. Make sure to record the domain name of the mount target (cfs-***.baidubce.com) for future mounting operations.
Step 3: Mount CFS file system
- Sign in to the target BCC instance in the BCC console. This document uses VNC for login. For other login methods, refer to Baidu Cloud Compute (BCC) Login Methods.
- Install the NFS client on the target BCC instance. Ensure all commands are run with root permissions.
- For CentOS/RHEL OS, run the following command:
Bash
1yum install nfs-utils- For Ubuntu/Debian OS, run the following command:
Bash
1apt-get install nfs-common- Execute the following mount command in the target BCC instance
Bash
1mount -t nfs4 -o minorversion=1,rsize=1048576,wsize=1048576,hard,timeo=600,retrans=2,noresvport <Domain name of a mount target>:/ <client local path>Description:
can be found in the file system’s mount target list (see Step 2); - Path of the CFS file system: By default, it is the root directory of CFS (e.g., /). You can modify it to an existing subdirectory (e.g., /dir0);
refers to the local path on the client where the mounting will occur. It must be an absolute path beginning with / (e.g., /mnt/cfs), and this path needs to be created in advance.
Example:
Bash
1mount -t nfs4 -o minorversion=1,rsize=1048576,wsize=1048576,hard,timeo=600,retrans=2,noresvport cfs-***.baidubce.com:/ /mnt/cfsStep 4: Verify the mount
- Check if the mount is successful using the following command:
Bash
1df -hIf the following information is returned, it indicates the mount is successful

- Once mounted successfully, the CFS file system can be accessed and used like a regular local directory on the BCC.
Unmounting steps
- Sign in to the Baidu Cloud Compute (BCC) where the CFS file system is mounted.
- Use the "umount" command to detach the file system.
Bash
1umount <target path>
2 ## Among them, <target path> refers to the local path of the CFS file system to be unmounted- Execute the
mount -lcommand to check the unmounting result. If the mounted CFS file system information is not found in the echo, it means the file system's mount directory has been successfully unmounted.