
Configuration Center Access
Configure Center Access
Preparation
- Download Maven in the development environment and complete the environment configuration.
- Install JDK 1.8 in the development environment and complete the environment configuration (Currently the project only supports 1.8)。
Create Demo Service
1. Create config-demo project
Create a Maven project and name it config-demo. Choose JDK version 1.8.
2. Modify the pom file, add Spring Cloud and configure Center Client Dependency
Microservices support Spring boot 2.0.7.REALEASE and above and Spring Cloud Finchley.SR2 and above. Spring boot 2.0.7.REALEASE and Spring Cloud Finchley.SR2 are taken as examples.
<parent>
    <groupId>org.springframework.boot</groupId>
    <artifactId>spring-boot-starter-parent</artifactId>
    <version>2.0.7.RELEASE</version>
    <relativePath/>
</parent>

<dependencyManagement>
    <dependencies>
        <dependency>
            <groupId>org.springframework.cloud</groupId>
            <artifactId>spring-cloud-dependencies</artifactId>
            <version>Finchley.SR2</version>
            <type>pom</type>
            <scope>import</scope>
        </dependency>
    </dependencies>
</dependencyManagement>

<dependencies>
    <dependency>
        <groupId>org.springframework.boot</groupId>
        <artifactId>spring-boot-starter-web</artifactId>
    </dependency>

    <!--Local development does not need the dependency-->
    <dependency>
    	<groupId>com.baidubce.formula</groupId>
    	<artifactId>env-core-spring-boot-starter</artifactId>
    	<version>${env-core-version}</version>
    </dependency>

    <dependency>
    	<groupId>com.baidubce.formula</groupId>
    	<artifactId>consul-config-spring-boot-starter</artifactId>
    	<version>${consul-config-version}</version>
    </dependency>
</dependencies>
${env-core-version} and ${consul-config-version} are version numbers. You can find and use the latest version from the public Maven repository yourself.
3. Create a configuration class and add the @ConfigurationProperties annotation
Hot Update refreshes two types of beans; one is an object using @ ConfigurationProperties and the other is an object using @RefRefeshScope. The update mechanism of the two is also different. The former annotated bean is refreshed by rebinding; the latter uses the RefreshScope cache and lazy loading mechanism to destroy the old object and generate a new one. Users can choose one or both at the same time according to their usual usage habits or specific scenarios. This article will use @ConfigurationProperties as an example, and it is also the official recommended configuration method of Spring Cloud.
In addition, the attributes of the @Value annotation can also obtain configuration values from the configuration center at startup, but the annotation cannot be used for configuration hot update.
@ConfigurationProperties(prefix = "test")
public class TestProperties {

    private String k0;

    private String k1;

    private String k2;

    // getters and setters

}
4. Create a simple Controller that contains a method to get the configuration class value
@RestController
@EnableConfigurationProperties(TestProperties.class)
public class EchoController {

 	@Autowired
    private TestProperties testProperties;

    @GetMapping("/getProperties")
    public ResponseEntity<Object> getConfigFromProperty() {
        return new ResponseEntity<>(testProperties, HttpStatus.OK);
    }
}
@EnableConfigurationProperties is used with @ConfigurationProperties. @EnableConfigurationProperties (TestProperties.class) can also be annotated in the configuration or startup class.
5. Configure application.properties
Add the following configuration in application.properties to register the service in the registry.
# Service name
spring.application.name=config-demo
server.port=8888
# Default values of configure class parameter
test.k0=0
test.k1=0
test.k2=0 Note:Test in the default value of the configuration class parameter isprefix of the configuration class. It is recommended to set the default value in the configuration file for all configuration class parameters, so that the application will restore the use of the default value instead of staying in the undeleted state when the corresponding configuration is deleted in the configuration center management.
6. CNAP Deployment
6.1. Make an image
Refer to Image Production document .
6.2. Deploy with CNAP
Please refer to the Application Hosting section of the CNAP Operation Guide.
6.3. Create configurations and validate
Please refer to the Microservice Configuration Management section of the CNAP Operation Guide to create a configuration group.
Through the access portal created for the deploy group, call the interface of the config-demo application and observe whether the return value is the value of the corresponding configuration group that was created (if multiple configuration groups are created under multiple scopes, observe whether the configuration values take fffect according to priority):
http://{ip}:{port}/getProperties.
Local Development and Debugging
1. Start the local Consul Server
- Download the Consul startup package according to the development machine system: https://www.consul.io/downloads.html
- Follow the Consul User Guide to install: https://learn.hashicorp.com/consul/getting-started/install
-
Start Consul Agent: https://learn.hashicorp.com/consul/getting-started/agent
- Start in development mode: consul agent - dev (recommended for fast testing)
- Start in persistence mode: consul agent -server -bootstrap-expect 1 -data-dir=/usr/local/consul/data/ -config-dir=/usr/local/consul/consul.d/
-
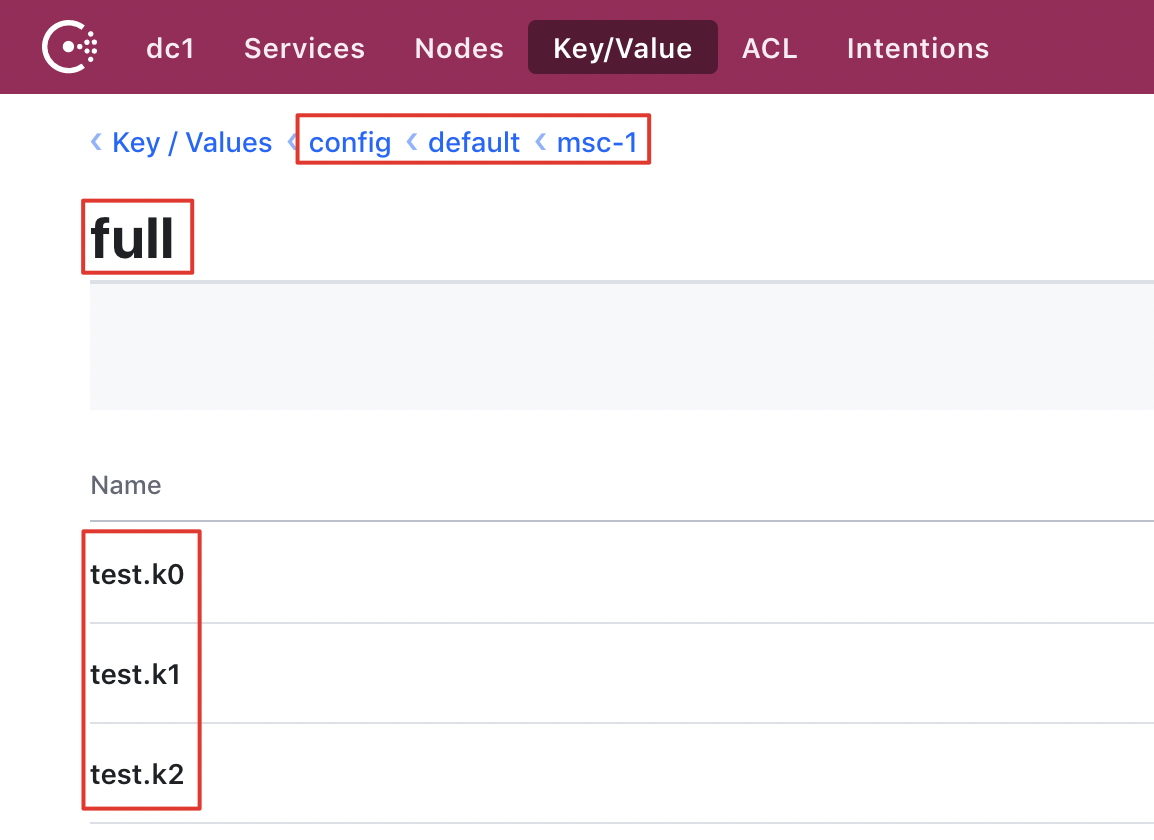
Visit http://localhost:8500/ui/dc1/kv , Click [Create], enter config/ in the Key or folder, and then click [Save] to save. Click to enter the config directory to create the second-level directory "default", third-level directory "msc-1" (any combination of characters and numbers) and fourth-level directory "full" in the same way.
- You can create the Key/Value of the demo application in the fourth-level directory (full) as required by the test.
- E.g.: test.k0=v0; test.k1=v1; test.k2=v2.
2. Add the configuration file of bootstrap.properties
Add the following configuration to bootstrap.properties (or bootstrap.yml):
# Local development does not support consul access token authorization
spring.cloud.consul.config.token-enabled=false

# The following are default configurations, which can be adjusted according to test requirements:
spring.cloud.consul.host=localhost
spring.cloud.consul.port=8500
# default to true, set false to disable all consul config func.
spring.cloud.consul.config.enabled=true
# default to true, set false to disable watch config change (disable hot update).
spring.cloud.consul.config.watch.enabled=true
# default to 'config', this is the first directory.
spring.cloud.consul.config.prefix=config
# default value is 'default', this is one of the second directory, but with lowest priority.
spring.cloud.consul.config.default-context=default
If Consul Server in the previous step is started locally, simply add the configuration in the first line to quickly start the test: spring.cloud.consul.config.token-enabled=false
It is recommended that users add the configuration to bootstrap-local.properties, and specify profiles as local when starting locally, so that the local configuration and online configuration can be isolated from each other, and there is no need to repeatedly add or delete the configuration in each local development test.
3. Update Maven dependencies
Due to local development, there is no need for platform-dependent environment variable dependencies. You need to comment out the env-core-spring-boot-starter dependency added in theCreate demo service step.
4. Start in local IDE
Execute the main method of config-demo to start.
In normal scenarios, the program will start to finish. If you encounter a startup error, it is recommended to add the following parameters to Program Arguement to print more detailed output information: --logging.level.root=debug
5. Start FatJar
5.1. Configure packaging plugins in Maven
<build>
    <plugins>
        <plugin>
            <groupId>org.springframework.boot</groupId>
            <artifactId>spring-boot-maven-plugin</artifactId>
        </plugin>
    </plugins>
</build>
5.2. Package FatJar files
Under the project main path of config-demo, use mvn clean package to package, and an executable jar file will be generated in the target directory.
5.3. Execute FatJar via java commands
Enter the deployed K8S POD and execute the following command: java -jar config-demo-1.0-SNAPSHOT.jar
6. Service verification
Call the following interface and observe if the call returns the value configured in Consul Server: http://localhost:8888/getProperties;
Update configuration values, e.g.: test.k1=v1.1, call the interface again and observe whether the return value is updated to the latest configuration value;
Delete the configuration from Consul Server, e.g.: test.k0, call the interface again and observe whether the return value is updated to the default value in the file configuration.
Principle of the Microservice Configuration Center
The microservice configuration center is architecturally divided into: client, server and management.
The client consists of the user application and the configuration center SDK, and the configuration takes effect on the client. At the beginning of the project, the client initiates a short connection request to the server to pull the initial configuration. If the client has enabled the hot update function (spring.cloud.consul.config.watch.enabled = true), the client will initiate a long-term connection request to the server after the project is started to monitor configuration changes. After it changes, the configuration will take effect on the client in near real time (effective time < 1 sec).
The configuration hot update mechanism is implemented based on the Spring Cloud framework. The current version only supports @ConfigurationProperties and @RefreshScope annotations.
The Consul Server started in local development is the server, provides configuration KV storage, and processes requests initiated by the client.
The CNAP provides a Consul Server cluster featuring high-availability and high-performance as a server. Based on the PaaS platform and environment and a series of advanced functions provided by the configuration center, it provides the configuration center management UI. Based on the management center of the configuration center, you can configure configuration groups with different priorities. The priority order is as follows: Deploy group > Environment > Applications > Workspace.
Note: If multiple configuration groups are put into service for a same action scope, for example, the action scope of both "msc-1" and "msc-2" is deployment group, and the effective object is "Deployment group = dg-1", and repeated configuration keys exist in these two configuration groups, then there is no guarantee for the key of which configuration group will take effect. Therefore, it is recommended that users classify the configuration groups and put one type of configuration in each configuration group to avoid repeated keys of configuration groups in a same action scope.