
Spring-cloud-application Access
Service Registration and Discovery
Preparation
- Download Maven in the development environment and configure the environment.
- Install JDK1.8 in the development environment and configure the environment (Currently the project only supports 1.8).
- We have provided simple demos for you to quickly get to know and experience our platform: Provider Demo, Consumer Demo.
Create a Provider
Create a provider project locally, add microservice registration and discovery dependencies, and enable service registration and discovery functions. And register the project itself to the service registration center through the microservice platform.
1. Create a provider project
Create a Maven project and name it provider-demo. Select JDK version 1.8.
2. Modify Pom, and add Spring Cloud and Microservice Dependencies
Microservices support Spring boot 2.0.7.REALEASE and above and Spring Cloud Finchley.SR2 and above. Spring boot 2.0.7.REALEASE and Spring Cloud Finchley.SR2 are taken as examples.
<parent>
    <groupId>org.springframework.boot</groupId>
    <artifactId>spring-boot-starter-parent</artifactId>
    <version>2.0.7.RELEASE</version>
    <relativePath/>
</parent>

<dependencyManagement>
    <dependencies>
        <dependency>
            <groupId>org.springframework.cloud</groupId>
            <artifactId>spring-cloud-dependencies</artifactId>
            <version>Finchley.SR2</version>
            <type>pom</type>
            <scope>import</scope>
        </dependency>
    </dependencies>
</dependencyManagement>

<dependencies>
    <dependency>
        <groupId>org.springframework.boot</groupId>
        <artifactId>spring-boot-starter-web</artifactId>
    </dependency>
    <dependency>
        <groupId>com.baidubce.formula</groupId>
        <artifactId>spring-cloud-formula-cnap</artifactId>
        <version>{spring-cloud-formula.version}</version>
    </dependency>
</dependencies>
Note: There are many known problems with versions prior to Spring boot 2.0.7.REALEASE. If the original program version is lower than the version, we recommend upgrading to 2.0.7.REALEASE or above;
spring-cloud-formula-cnap contains all the functional packages needed to access the CNAP microservices platform. {spring-cloud-formula.version} is the version number. You can find and use the latest version in the download page or Maven (not yet open).
3. Develop provider startup and enable service registration and discovery
@SpringBootApplication
@EnableDiscoveryClient
public class ProviderApplication {

    public static void main(String[] args) {
        SpringApplication.run(ProviderApplication.class, args);
    }
}
@EnableDiscoveryClient annotation is used to enable service registration and discovery
4. Create a simple Controller including a method to get the parameters in the URL.
@RestController
@RequestMapping(value = "/echo")
public class EchoController {

    @RequestMapping(value = "/{message}", method = RequestMethod.GET)
    public String echo(@PathVariable String message) {

        return message;
    }
}
5. Configure application.properties
Add the following configuration in application.properties:
 # Service name
 spring.application.name=provider-demo
 server.port=10001
Create a Consumer
In this example, a consumer is created, and the dependencies discovered by the service are added. At the same time, the provider is called through three clients, RestTemplate, AsyncRestTemplate, and FeignClient.
1. Create a consumer project
Create a Maven project and name it consumer-demo. Select JDK version 1.8.
2. Modify Pom and add spring cloud dependencies
Microservices support Spring boot 2.0.7.REALEASE and above and Spring Cloud Finchley.SR2 and above. Spring boot 2.0.7.REALEASE and Spring Cloud Finchley.SR2 are taken as examples.
<parent>
    <groupId>org.springframework.boot</groupId>
    <artifactId>spring-boot-starter-parent</artifactId>
    <version>2.0.7.RELEASE</version>
    <relativePath/>
</parent>

<dependencyManagement>
    <dependencies>
        <dependency>
            <groupId>org.springframework.cloud</groupId>
            <artifactId>spring-cloud-dependencies</artifactId>
            <version>Finchley.SR2</version>
            <type>pom</type>
            <scope>import</scope>
        </dependency>
    </dependencies>
</dependencyManagement>

<dependencies>
    <dependency>
        <groupId>org.springframework.boot</groupId>
        <artifactId>spring-boot-starter-web</artifactId>
    </dependency>
    <dependency>
        <groupId>com.baidubce.formula</groupId>
        <artifactId>spring-cloud-formula-cnap</artifactId>
        <version>{spring-cloud-formula.version}</version>
    </dependency>
    <dependency>
        <groupId>org.springframework.cloud</groupId>
        <artifactId>spring-cloud-starter-openfeign</artifactId>
    </dependency>
</dependencies>
Compared to the provider, we add dependency on spring-cloud-starter-openfeign because we need to demonstrate the use of FeignClient.
3. Develop consumer startup and enable service discovery
You need to use RestTemplate, AsyncRestTemplate, and FeignClient, so you need additional configuration:
- Add @LoadBalance annotation to integrate RestTemplate and AsyncRestTemplate with service discovery
-
Register @EnableFeignClients to activate FeignClient
 @SpringBootApplication
 @EnableDiscoveryClient
 @EnableFeignClients
 public class ConsumerApplication {

 @LoadBalanced
 @Bean
 public RestTemplate restTemplate() {
     return new RestTemplate();
 }

 @LoadBalanced
 @Bean
 public AsyncRestTemplate asyncRestTemplate(){
     return new AsyncRestTemplate();
 }

 public static void main(String[] args) {
     SpringApplication.run(ConsumerApplication.class, args);
 }
}
4. Create a FeignClient interface
@FeignClient(name = "provider-demo")
public interface EchoService {
    @RequestMapping(value = "/echo/{message}", method = RequestMethod.GET)
    String echo(@PathVariable("message") String message);
}
The name provider-demo of FeignClient is the service name (spring.application.name) configured in the provider project.
5. Create a test Controller to demonstrate and perform service discovery
@RestController
public class TestController {
     @Autowired
     private RestTemplate restTemplate;

     @Autowired
     private AsyncRestTemplate asyncRestTemplate;

     @Autowired
     private EchoService echoService;

     @RequestMapping(value = "/echo-rest/{message}", method = RequestMethod.GET)
     public String rest(@PathVariable String message) {
         return restTemplate.getForObject("http://provider-demo/echo/" + message, String.class);
     }

     @RequestMapping(value = "/echo-async-rest/{message}", method = RequestMethod.GET)
     public String asyncRest(@PathVariable String message) throws Exception{
         ListenableFuture<ResponseEntity<String>> future = asyncRestTemplate.
         getForEntity("http://provider-demo/echo/"+message, String.class);
         return future.get().getBody();
     }

     @RequestMapping(value = "/echo-feign/{message}", method = RequestMethod.GET)
     public String feign(@PathVariable String message) {
         return echoService.echo(message);
     }
}
6. Modify configuration
Modify the configuration information of application.properties:
 spring.application.name=consumer-demo
 server.port=10002
Local Development and Debugging
Please refer to: lightweight registry access
Launch in local IDE
Execute the main methods of provider-demo and consumer-demo to start them.
In normal scenarios, the program will start to finish. If you encounter a startup error, it is recommended to add the following parameters to Program Arguement to print more detailed output information:
--logging.level.org.apache=debugFatJar launch
1.Configure package plugin in Maven
<build>
    <plugins>
        <plugin>
            <groupId>org.springframework.boot</groupId>
            <artifactId>spring-boot-maven-plugin</artifactId>
        </plugin>
    </plugins>
</build>
2.Package FatJar files
Use mvn clean package to package in the main path of consumer-demo and provider-demo respectively, and an executable jar file will be generated in the target directory.
3.Execute FatJar via java command
Enter the deployed K8S POD and execute the following command:
java -jar consumer-demo-1.0-SNAPSHOT.jar
java -jar provider-demo-1.0-SNAPSHOT.jar
Service verification
Call the following interfaces separately and observe whether the call returns as expected
http://{consumer-demo-ip}:{consumer-demo-port}/echo-rest/hello
http://{consumer-demo-ip}:{consumer-demo-port}/echo-async-rest/hello
http://{consumer-demo-ip}:{consumer-demo-port}/echo-feign/hello
Deploy CNAP
1. Make an image
Refer to Image Production document .
Note: If you need to use the monitoring function of the microservice platform, please follow the steps in this document to make an image
2. Deploy using CNAP
Please refer to the service deployment section in CNAP Operation Manual.
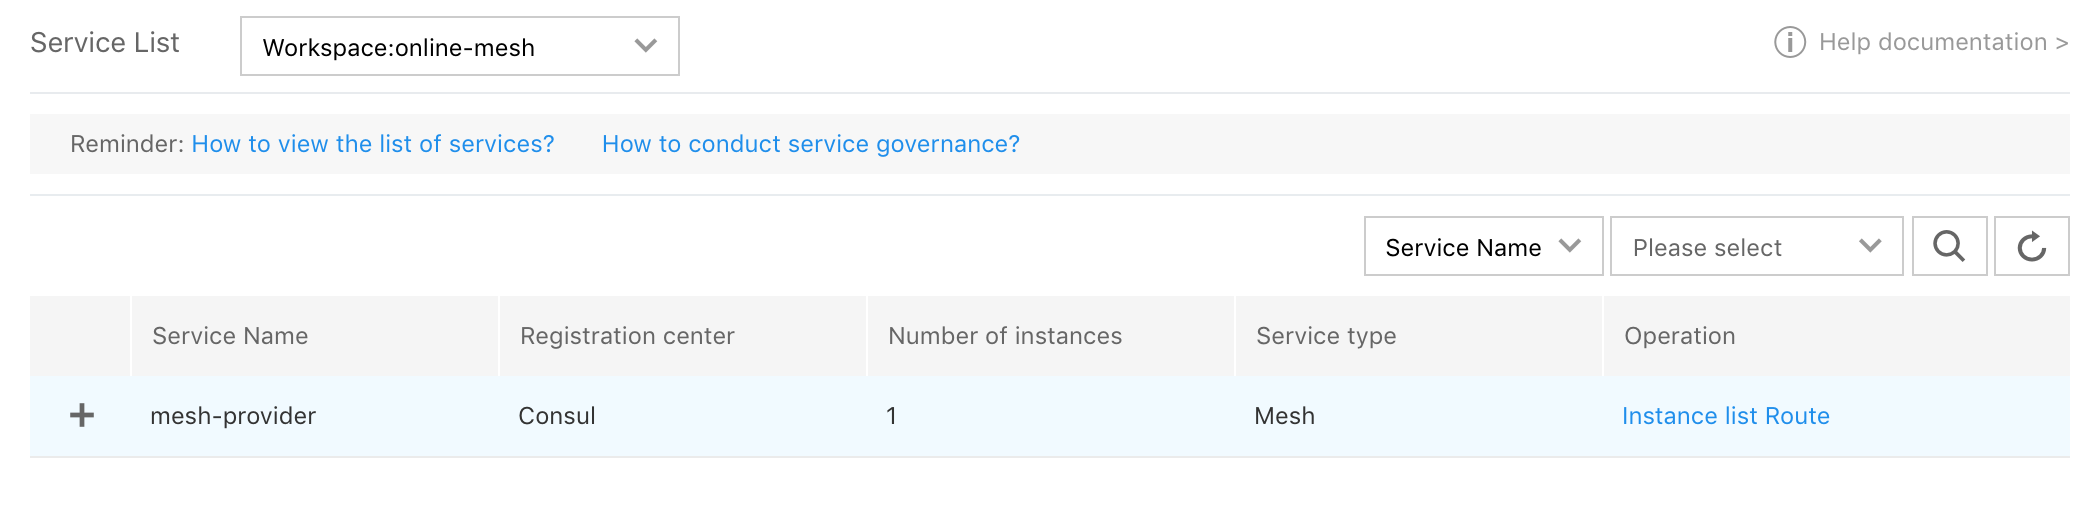
3. Check the deployment results
You will see the service information on the registration in CNAP service list page after successful deployment
Routing
Service Routing principle
- Service Routing overview
Service Routing means that users can configure routing rules to route consumer traffic to the provider instance specified in the rule in a certain scope (workspace+environment).
CNAP Service Routing currently supports the following configuration methods:
- Configure routing rules according to system tags. Pre-set system tags for services running in CNAP such as information about the deploy group of the service. Users can configure routing rules to distribute the traffic of a consumer's deploy group to a provider's determined deploy group for processing to meet the needs of service routing.
Enable Routing
The routing function requires users to add related dependencies in the code to enable the service routing function.
1. Configure routing module dependencies
 <dependency>
    <groupId>com.baidubce.formula</groupId>
    <artifactId>spring-cloud-formula-cnap</artifactId>
    <version>{spring-cloud-formula.version}</version>
 </dependency>
At this point, the routing function is enabled for the program. In conjunction with the routing management function of the CNAP product console, service routing can be performed according to the configured rules. If it has already been introduced, it may not need to be reintroduced.
Note: If the routing function is used, it needs to be configured on the consumer side
At this point, the user code already has the function of service routing. You need to cooperate with setting routing rules on the console to view the routing effect. After the code is written, you need to package and upload the image (refer to Image Production), and deploy and run it in CNAP.
2. Deploy and configure in CNAP
2.1 Deploy
You need to create at least two applications for the service routing function, one as a provider (using provider-demo as an example) and the other as a consumer (using consumer-demo as an example).
And you need at least one deploy group (Group-C1) for the consumer application, and two deploy groups (Group-P1 and Group-P2) for the provider application. For specific deploy operations, refer to Operation Guide.
2.2 Configure
Operation:
- Log in to the CNAP product console.
- Enter "Microservice Management" > "Service List" from the left menu bar.
- Select the target service "provider-demo" and enter the routing list page from Route in Operation.
- Click [Add] Routing Rule to configure the routing rule.
Fill in the rule name of the basic information after entering the route configuration page.
For the service name in the traffic source, we select consumer-demo, specify the source tag as the application name, and select the value as consumer, which means that the routing rule will take effect in all instances of the application consumer where the consumer-demo is located.
The service name in the traffic destination is provider-demo by default, and the policy selection weight is assigned. In the weight routing, we can choose the tag as the deploy group, and the two deploy groups of the provider as the value. To highlight the demonstration, we set the weight of the deploy group Group-P1 of the provider application to 100 and of the deploy group Group-P2 to 0. The load balancing policy can be chosen randomly. The configuration means that the desired traffic is fully distributed to Group-P1 while Group-P2 has no traffic when the consumer-demo service accesses the provider-demo service. The selected load balancing policy is random if multiple instances exist in Group-P1.
Verify Routing Function
The call to the provider is initiated from the consumer. Due to the delay of about 30 seconds between the routing rule being issued and taking effect, it is recommended that the consumer continue to initiate requests for the provider.
If the code logic in different deploy groups of the provider produces different return results, you can verify the routing function through the return result information. It can also be verified by observing changes in the PV graph in the provider service monitoring page.
Throttling
Throttling Principle
Add throttling dependencies in the provider code and configure the throttling rule in the CNAP console.
After the rule takes effect within 30 seconds, all access will first pass through the throttling module when the consumer calls the provider. After reaching the throttling module, first determine whether the request meets the throttling method of the throttling rule, and then check whether the source of the throttling rule configuration is met. When both are satisfied, then determine whether the current request reaches the threshold of the throttling rule.
If the threshold is exceeded, the provider will directly return, and the HTTP status code is "429 Too many requests".
The dimensions of CNAP's throttling function are: Method level and instance level. Under the premise that the throttling rule is configured, a specific algorithm is used to ensure that the provider smoothly processes the request based on a certain threshold when the traffic is large.
Enable throttling Function
Enabling the throttling function requires adding a throttling function module to the provider program code so that the provider may have the function of throttling control. The enabling steps are as follows:
1. Configure the throttling module dependency
<dependency>
    <groupId>com.baidubce.formula</groupId>
    <artifactId>spring-cloud-formula-cnap</artifactId>
    <version>{spring-cloud-formula.version}</version>
 </dependency>
After adding the dependency, the provider will introduce the module component of the throttling function.
At this time, the provider application has the function of service throttling. All requests will pass through the throttling module. After the quota on the service node is used up, throttling will be performed in response to "429: Too Many Reqeusts".
The throttling function needs to be configured with the CNAP console for configuration delivery. Therefore, after the code is written, the image must be packaged and uploaded (refer to Image Production), and deployed in CNAP.
2. Deploy and configure in CNAP
After the code is written and the image is created, they need to be deployed in CNAP and configured with the throttling rules using the throttling management function. For deploy and startup of applications in CNAP, refer to Operation Guide.
Operation:
- Log in to the CNAP product console.
- Enter "Service Governance" > "Service List" from the left menu bar.
- Select the target service (provider) and enter the throttling list page from Throttling of Operation.
- Click [Add] Throttling Rule to configure the rule.
Select the application name and deploy group of the throttling object, and the URL and httpMethod to be throttled. The throttling granularity of CNAP is httpMethod+uri. For the throttling rule, you can further configure the traffic source (for example, the service name is the consumer-demo). By default, you do not need to configure the source, namely, the throttling rule restricts traffic to all sources.
uri: It can be a complete uri or a url with a uri parameter (such as /echo/{message}). It is recommended that the uri be the same as the uri defined in requestMapping in the provider code to facilitate verification of the access throttling function.
Verify throttling Function
If a throttling rule is configured for the traffic source to be the specified consumer, the call to the URL of the specified provider is continuously initiated from the consumer. If the requests exceed the specified QPS threshold in a unit time, the consumer receives a 429 status code.
Circuit Break
Circuit Break Principle
The function of Circuit break is to blow a call to a target service when the call is slow or there are a large number of failures. For subsequent call requests, the target service is no longer called, and it returns directly, quickly releasing the resource. Resume the call if the condition of the target service improves.
There are active circuit break and automatic circuit break. Active circuit break will blow all consumer requests. During automatic circuit break, it is determined whether subsequent requests are blown based on the historical request result.
If the CircuitBreaker is enabled, the request will not be sent out, but will be returned directly. The http status code is "500 Circuit break is open".
The dimensions of CNAP circuit break are: The method dimension and the service dimension.
- The method dimension means that the circuit break rule can be configured for the specific method of the target service. This rule takes effect for the current method and does not affect other methods. The current method supports HttpMethod+URL
- The service dimension means that the Circuit break rule can be configured for the target service, and is valid for all requests made to the service.
Enable the Circuit Break Function
Enabling the circuit break function needs to add a circuit break function module to the consumer program code so that the consumer may have the function of circuit break control. The enabling steps are as follows:
1. Configure the circuit break module dependency
<dependency>
    <groupId>com.baidubce.formula</groupId>
    <artifactId>spring-cloud-formula-cnap</artifactId>
    <version>{spring-cloud-formula.version}</version>
 </dependency>
After adding the dependency, the consumer will introduce the module component of the circuit break function.
At this time, the consumer application has the function of requesting a Circuit break. All requests will first pass through the Circuit break module. If the Circuit break is enabled, the request will directly return "500: Circuit break is open".
The Circuit break function needs to be configured with the CNAP console, so the image needs to be packaged and uploaded after the code is written (refer to Image Production), and deployed in CNAP.
2. Deploy and configure in CNAP
After the code is written and the image is created, they need to be deployed in CNAP and the Circuit break management function must be used to configure the Circuit break rule.
For deploy and startup of applications in CNAP, refer to Operation Guide.
Operation:
- Log in to the CNAP product console.
- Enter "Service Governance" > "Service List" from the left menu bar.
- Select the target service and enter the Circuit break list page from Circuit break in Operation.
- Click [Add] Circuit break Rule to configure the rule.
The Circuit break object supports tag selection, and it is not necessary to configure tag deletion condition. If no tag deletion condition is configured, the circuit breaker takes effect on all consumer services.
CNAP throttling granularity is server-side service name+httpMethod+uri. uri: It can be a complete uri or a url with a uri parameter (such as /echo/{message}). It is recommended to be consistent with the uri defined in requestMapping in the provider code to facilitate verification of the access Circuit break function.
Verify Circuit Break Function
A call to the provider is initiated from the consumer, and there is a delay of up to 30 seconds between the release and activation of the Circuit break rule. If the request to the provider returns an exception, you can observe the activation of the Circuit break from the request result after the Circuit break condition is met; you can also turn on the manual Circuit break to directly blow all the requests to the provider.