
Build Based on Existing Image
The Cloud Container Registry (CCR) enterprise edition allows for quickly building new container images from existing ones and automatically pushing completed builds to the image registry. This document outlines the process of building images with the enterprise container image and provides examples for varied scenarios.
Related concepts
Image: A specialized file system containing programs, registries, resources, configurations, etc., necessary for container runtime. It essentially encapsulates the software runtime environment.
Dockerfile: A text file for image building, including commands, dependency lists and some key notes required in the image building process. For Dockerfile syntax, refer to its Official Document.
Prerequisites
- Successfully [Create Enterprise Edition Instance](CCR/Enterprise Edition Operation Guide/Create Enterprise Edition Instance.md).
- Each instance must contain at least one namespace. For detailed information, refer to [Manage Namespace](CCR/Enterprise Edition Operation Guide/Manage Namespace.md).
Usage restrictions
- Only container images with the amd64 architecture are supported for building.
- Building container images larger than 50 GB is not supported.
Operation steps
- Sign in to Cloud Container Registry Console.
- Select Instance List in the left navigation bar to enter the management page.
- Select Image Registry in the left navigation bar to enter the Image Registry page.
- Click on the target image registry to access the image management page.
- Select Image Build in the left navigation bar to enter the Image Build page.
- Click Create Image Build to enter the creation page and complete relevant configurations:
| ConfigMap | Required/Optional | Configuration |
|---|---|---|
| Construction method | Required | Select the image build method, which supports building based on an existing image or Dockerfile. Currently, an example is given based on an existing image. |
| Container image | Required | Select the image registry for building. You can opt for an existing registry from the Cloud Container Registry (CCR) or directly provide the access address of an external registry, ensuring it is accessible. |
| Image version | Required | Choose the version of the image for building. You can select an existing version from the Cloud Container Registry (CCR) or directly provide the version from an external registry. |
| Dependency | Required | Install additional dependencies based on the chosen container image. Multiple dependencies are supported, and installation can be done via apt, pip2, pip3, or yum. |
| Image version | Required | Enter the version of the newly created image. The version can include uppercase and lowercase letters, numbers, and the special characters "." and "-". It must begin with either a letter or a number and have a length between 1 and 127 characters. |
- Click OK to start performing the image build task. Once the status changes to
Build Succeeded, the newly built container image can be used on the version management page. - If the status changes to
Build Failed, click View Build Log to troubleshoot the issue.
Example
Build an image based on an existing image
Describe how to create custom images by installing additional dependencies based on images stored in the Cloud Container Registry (CCR).
- Click Select Image on the Create Image Build page, and choose an eligible existing image in the CCR enterprise or personal edition from the image list.
- Click Select Version, and then choose an eligible existing image version from the version list.
-
Choose different installation methods and specific dependency versions based on existing images. To install vim in the base image, select the apt installation method and input "vim" in the relevant field. To install Python3-related dependency packages, select pip3 and input the corresponding dependency package name and version.
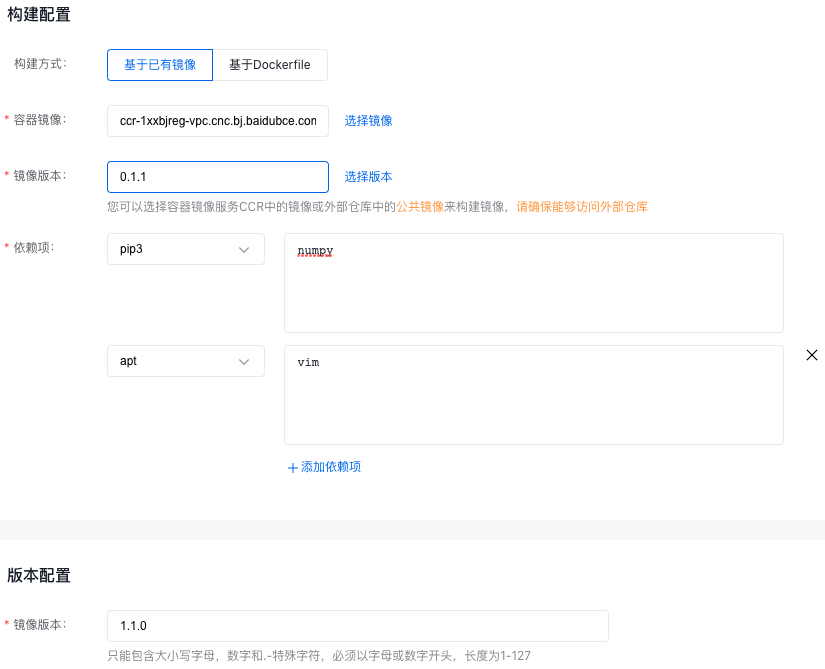
pip2andpip3correspond to the installation methods for Python2 and Python3 dependencies respectively, and are not installed simultaneously in general.aptandyumcorrespond to the installation methods for Ubuntu and CentOS dependencies respectively, and are not installed simultaneously in general.
- Enter the newly built image version name, and click OK to start building image.
Build an image based on Dockerfile
Explain how to initiate a custom image build using a Dockerfile and by writing a Dockerfile according to the required specifications. Below is an example Dockerfile:
1    # Configure base image
2    FROM ubuntu:18.04
3# Install a series of APT dependencies
4    RUN apt-get update && apt-get install -y --no-install-recommends \
5      python3-pip \
6      vim && \
7      apt-get clean && \
8      rm -rf /var/lib/apt/lists/*
9# Install a series of PIP dependencies
10    RUN pip3 install\
11      numpy==1.19.5 \
12      scipy==1.5.4
13# Configure timezone
14 RUN ln -sf /usr/share/zoneinfo/Asia/Shanghai /etc/localtime1 >**Description:**
2 >
3 >When configuring base images, enter the base image address after the `FROM` field.