
Create an Instance
Overview
The following introduces the creation of RDS for SQL Server master instance, and you can create and manage the instance via the RDS console. Databases of different engines and specifications vary in price. See Pricingfor details.
Operation guide
-
Log in to the Baidu AI Cloud Official Website.
- Not registered, please Register Account first.
- If you have registered a Baidu account, you can Log in to it directly.
-
Enter the RDS console.
Select "Product Service > RDS", and enter the "RDS Instance List" page.
-
Click "Create RDS Instance".
After entering the RDS console, click "Create Instance" button. On the "Create Instance" page, select the following information, and confirm the instance configuration.
Region Information

Instance Type Single-AZ (A/B/C) Multi-AZ A+B…… Allocation by Default Master instance Master/backup nodes are created in the same AZ Master/backup nodes are randomly assigned to different AZs selected. A given AZ is selected at random. Read-only instance Created in the AZ specified by the user - The same as the master instance If the master instance is Multi-AZ, it is assigned to a given Single-AZ at random. Proxy instance Created in the AZ specified by the user Proxy instance node is randomly allocated to different AZs selected. Master instance Note: "Availability zone" denotes the data center with relatively isolated physical resources, which may help users build high-availability architecture. See Availability Zone Instructions for details. Availability zone selection rule:
- Single-AZ (A, B, C……): The master instance is created in the same availability zone.
- Multi-AZ (A+B, A+C, and B+C……): Includes two (or multiple) availability zones. When creating, the master instance's master/backup nodes are respectively created in different areas of the Multi-AZ.
Configuration Information
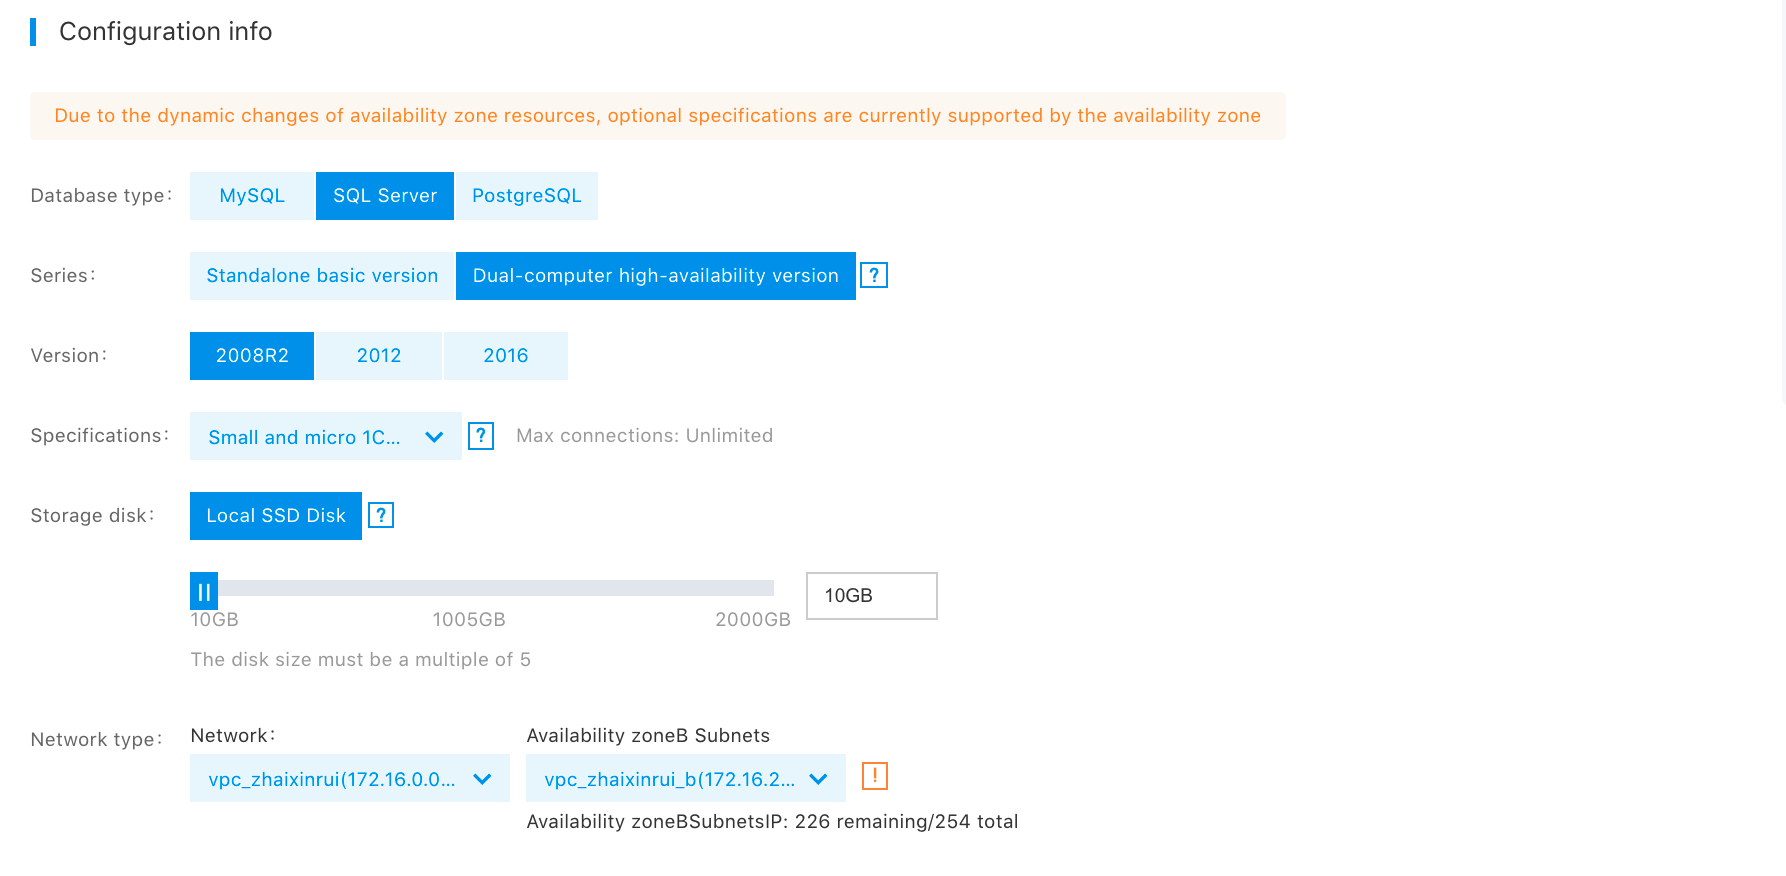
Notes:
- Presently, the RDS for SQL Server supports Standalone Basic and Dual-Compute High-Availability Version, and Dual-Compute High-Availability Version is preferred by default. Dual-Compute High-Availability Version in "One Master and One Backup" architecture provides users with high-availability database services, but the cost is relatively high. If you have no overly high requirements about high availability (for example, in case of data analysis or R & D test), you are advised to select Standalone Basic for cost reduction.
- RDS for SQL Server (Standalone Basic ) only supports Version 2012. If the RDS of standalone basic version is faulted, there is no standby database for switching, but existing data backups and transaction log backups may be used for data recovery, and data in the last 10 minutes may be recovered. That rids users of worries about data security.
- RDS for SQL Server (Dual-Compute High-Availability Version) supports Version 2008R2, Version 2012, and Version 2016. See What's New in SQL Server 2016 for new features of Version 2016.
Purchase Information

Note: Master instance supports "Prepaid" and "Postpaid", of which, duration must be selected in the "Prepaid" mode. You can define the "Automated Renewal" setting.
-
Confirm the configuration.
After confirming the configuration information, click "Next" to go to the payment page. Here, you can view the selected instance's package and price for your confirmation.
-
Confirm the order.
After confirming, click the "Go to pay" button at the lower right corner. Then, the system shows the "Payment" page, on which you can confirm the payment and complete the order.
-
Make a payment successfully.
You can view the order by clicking "View Order Details", or click "Management Console" to enter "RDS Instance List". The system creates an RDS instance at the back end, which usually lasts for 5-10 minutes. After successful creation, you receive the information "Successfully create an RDS instance".
-
View the Instance.
After successful purchase, return to the "RDS Instance List" page, where you can view the created RDS instance, instance status, location, database type, and expiry time.
-
View instance details.
In the instance list, click the Instance Name to go to the Instance Details page, where "Basic Information" tag shows information such as instance running status and configuration. You can select other tags to manage and operate the instance.