
Set the Hotlink Protection
Set Referer Blacklist and Whitelist
Introduction to the principle
CDN gets the Referer Header in HTTP requests, matches it with the Referer blacklist/whitelist in the configuration and rejects/passes the matched request.
Notes
- For verified domain names, you have to set hotlink protection to protect your website link from being stolen by other websites.
- CDN supports you to configure the Referer blacklist and whitelist. You can set hotlink protection on the “Hotlink protection " tab of the domain name details page.
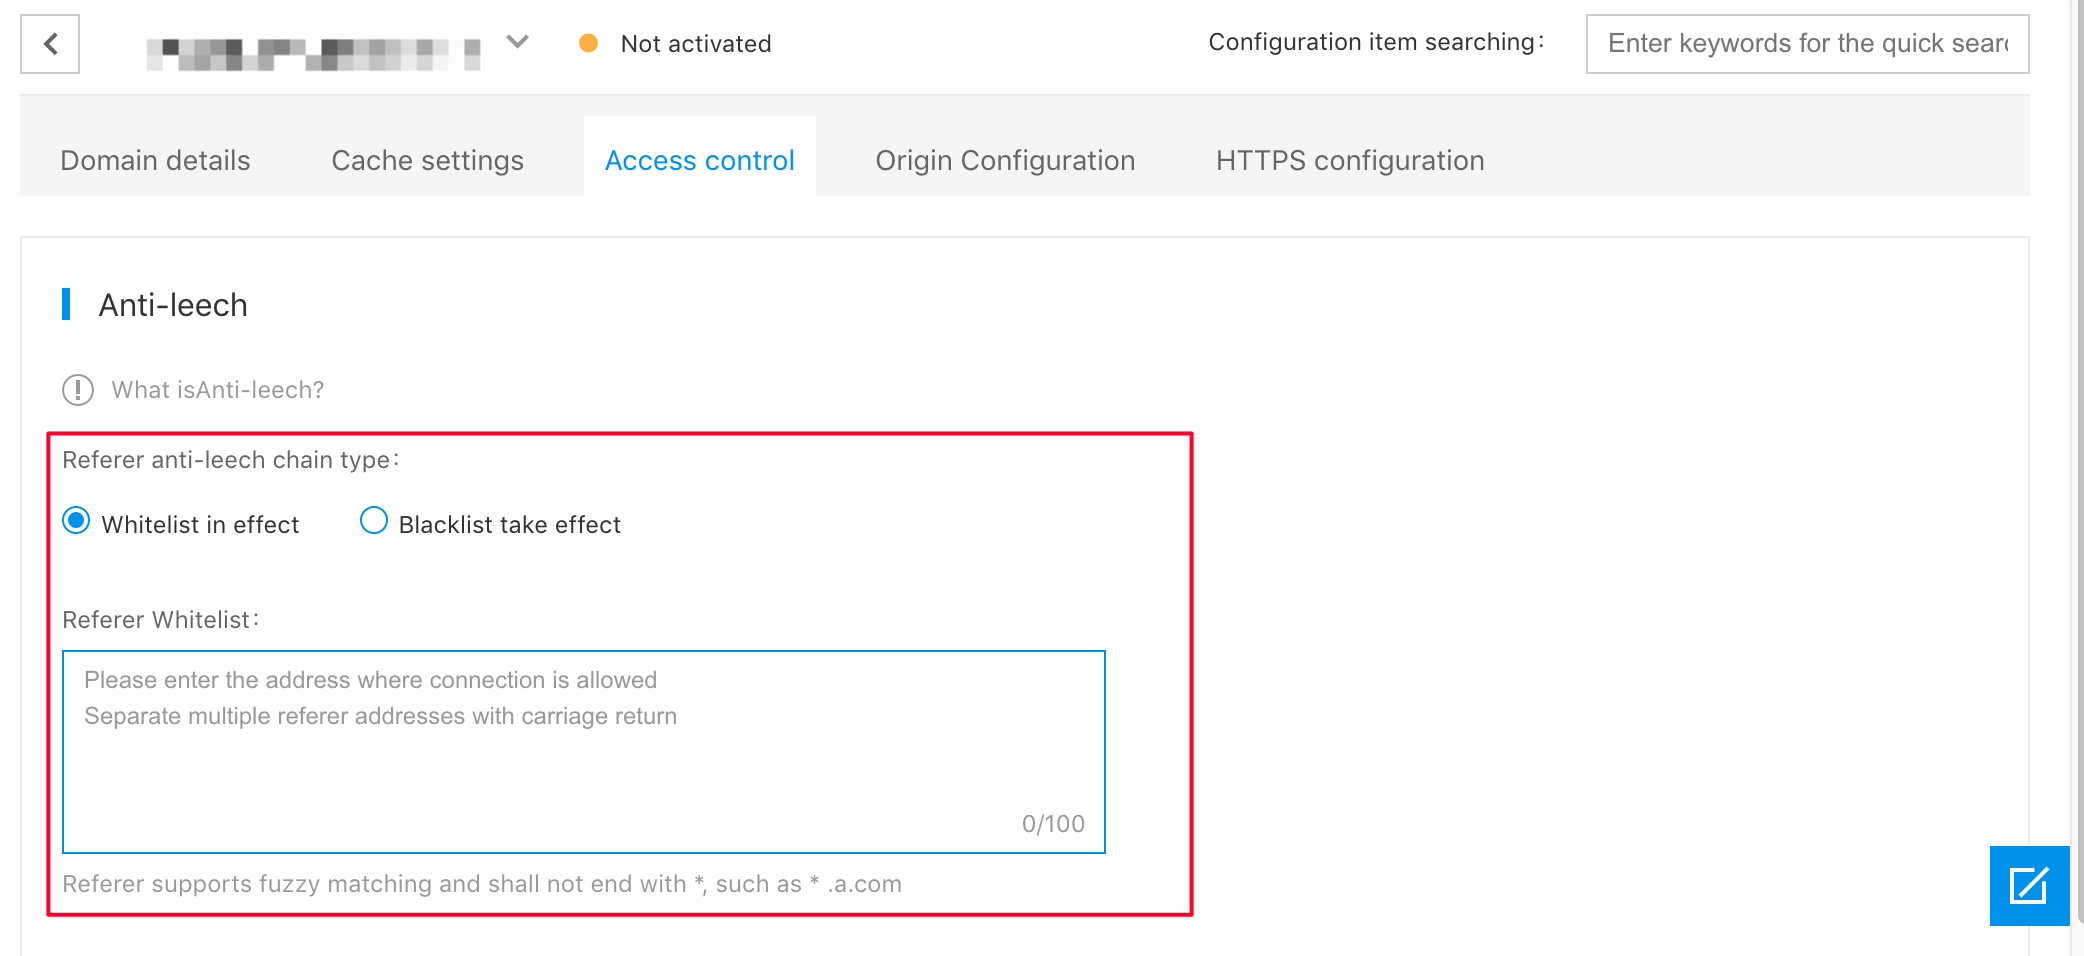
- You can configure 100 Referer blacklists and whitelists at most.
- The system does not default to enable the hotlink protection feature, which needs to be configured by users themselves.
Operation Steps
- Log into the CDN Management Console and enter the “Content Delivery Network (CDN) " page.
- Click Domain Name Management on the left navigation bar.
- Enter the domain name management page, and click the Management of the target domain name operation column.
- Enter the “CDN Domain Name Details " page, and select the Access Control tab in the navigation bar at the top of the page.
- Enter the access control page, click Edit in the setting module of Hotlink Protection.
- Enter the hotlink protection configuration interface and find the setting area of Referer blacklist and whitelist.
-
Select Whitelist Takes Effect or Blacklist Takes Effect. Set the Referer blacklist and whitelist corresponding to the domain name, and separate them by carriage returns.
Hotlink protection domain name matching rule
- For the Referer configuration of the existing stock, remain the matching policy unchanged. Only support fuzzy matching in the form of
*.a.com/*. - The matching method for the Referer hotlink protection configuration of the New and Stock Update after December 6, 2019 is of domain name level, and supports to add wildcard character to match with the subdomain name, such as:
*.test.com. - Protocol settings are not distinguished for Referer. You do not have to enter
http://orhttps://as the prefix. If you want to configure the Referer address ofhttp://zoe.baidu.com, you only need to enterzoe.baidu. com.
- For the Referer configuration of the existing stock, remain the matching policy unchanged. Only support fuzzy matching in the form of
-
Set Enable or Disable the "Null Referer":
- Enabled: Allow Referer to be empty. When the Referer of the HTTP request Header is empty, access is allowed, and CDN returns information normally. Referer is allowed to be empty by default.
- Closing: Referer should not be empty, disallowed access prevents the returned information.
NoteAllow Referer to be empty by default. When the request Referer field is null or without Referer, CDN returns the request information normally. The null Referer and Referer blacklist/whitelist are configured respectively, and will not interfere with each other.
-
Click OK to take effect the configuration.
NoteClick "Edit" to delete all Referer blacklists/whitelists corresponding to the domain name, and the data will not be recovered after deletion, please operate with caution.
Set IP Blacklist/Whitelist
Introduction to the principle
CDN gets the client IP, matches it with the IP blacklist/whitelist in the configuration and rejects/passes the matched client request.
Notes
- For verified domain names, you have to set IP blacklist and whitelist to protect your website link from being stolen by other websites.
- CDN supports you to configure the IP blacklist and whitelist. You can set the IP blacklist and whitelist on the “Access control " tab of the domain name details page.
- You can configure 100 IP blacklists/whitelists at most.
- The system does not enable the IP blacklist and whitelist feature by default, and you have to configure it by yourself.
Operation Steps
- Log into the CDN Management Console and enter the “Content Delivery Network (CDN) " page.
- Click Domain Name Management on the left navigation bar.
- Enter the domain name management page, and click the Management of the target domain name operation column.
- Enter the “CDN Domain Name Details " page, and select the Access Control tab in the navigation bar at the top of the page.
- Enter the access control page, click Edit in the setting module of Hotlink Protection.
- Enter the configuration interface of hotlink protection and locate the setup area for IP Blacklist/Whitelist.
- Select Whitelist Takes Effect or Blacklist Takes Effect. Set the IP blacklist and whitelist corresponding to the domain name, and separate them by carriage returns.

- Click OK to take effect the configuration.
Note:After an IP address is deleted, it clears the blacklist and whitelist of all IPs corresponding to the domain name. Data cannot be restored after cleared.